Ergonomic Setup Guide
The best ergonomic home office. — Posture is a system, not a chair.
Monitor at eye level. Elbows at 90°. Feet flat. Lumbar in the curve. Lighting that doesn't backlight your screen. A break schedule you actually keep. Here's the framework.
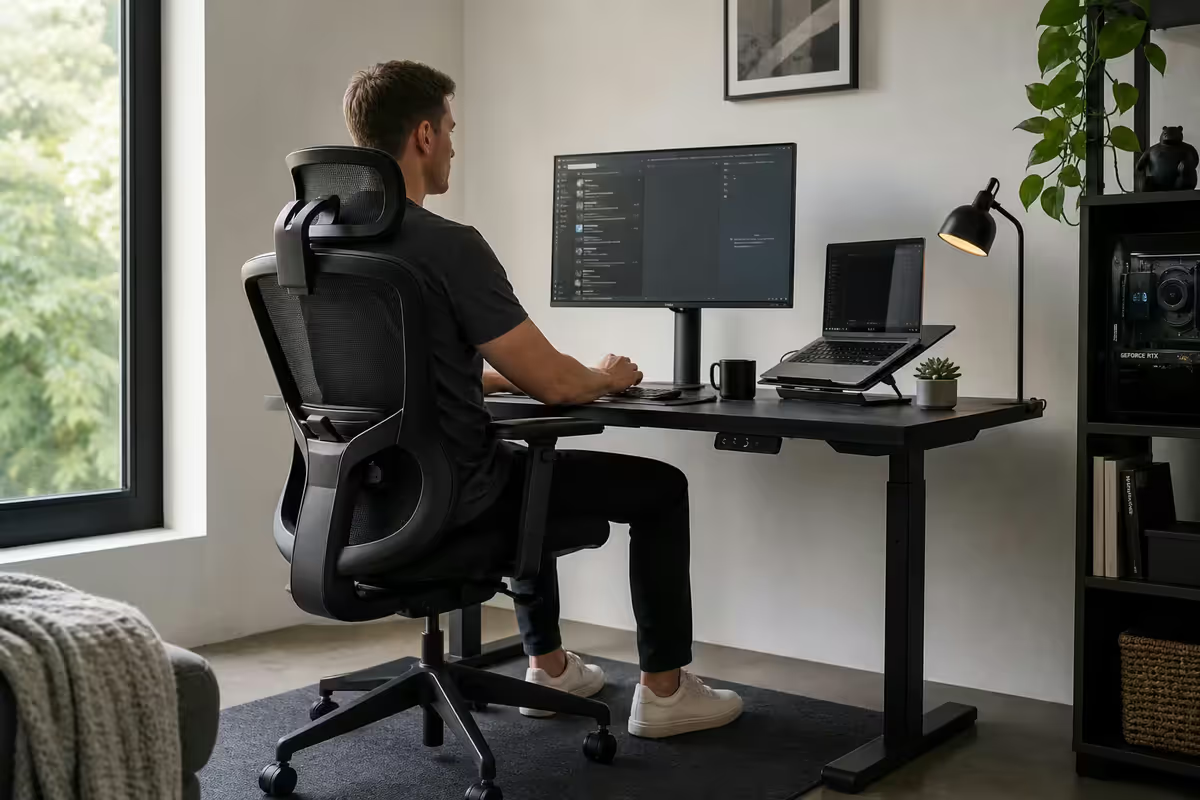
The ideal posture — a reference, not a prison
Ergonomic guides often present "the correct posture" as a single locked position. That's wrong. The body wasn't designed to hold any single posture for hours. The actual goal is to set up a workspace that makes a healthy reference posture easy to return to — so that when you lean back to read, lean forward to type, or shift to one side for a moment, the rest of your setup invites you back to a neutral baseline.
The reference baseline:
- Feet flat on floor (or footrest if you're shorter), thighs parallel to floor.
- Lower back supported in its natural inward curve by chair lumbar.
- Shoulders relaxed, not hunched up or rolled forward.
- Elbows at 90° bent, hands roughly level with the keyboard.
- Wrists straight, not bent upward, downward or sideways.
- Neck neutral, head balanced above shoulders rather than craned forward.
- Eyes looking at the upper third of the monitor, slight downward gaze rather than straight ahead.
If your setup makes any of these uncomfortable, that's where you start fixing things. The five biggest impact points — in order — are monitor height, chair lumbar, elbow angle, feet position and lighting.
Monitor positioning — eye level, arm's length
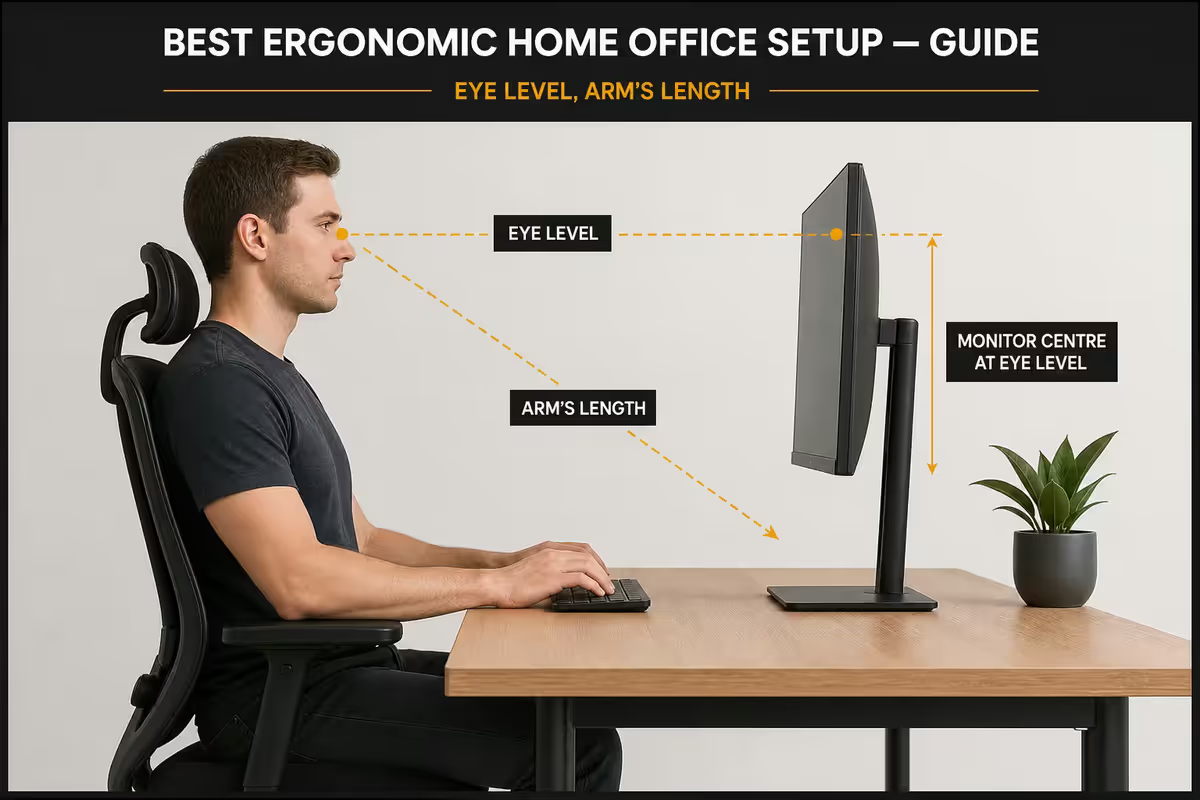
The single biggest ergonomic upgrade most people make: raising the monitor to eye level. The top of the screen should sit at eye level when you look straight ahead, with the screen tilted slightly back (10-20°) so the upper portion faces toward your face.
Why eye level? Because your eyes naturally drop 10-15° below the horizontal when relaxed. If the top of the monitor is at eye level, your line of sight lands on the upper third of the screen — exactly where most content (browser tabs, document headings, video call faces) sits. You read the screen with neutral neck position rather than craning forward.
Distance: 50-70cm from your eyes, roughly an arm's length away. Too close causes eye strain and constant micro-adjustments. Too far makes text smaller and forces leaning in.
For laptop users: a laptop at desk height places the screen too low for any sustained work. The solution: raise the laptop on a stand or monitor arm to eye level, then plug in an external keyboard and mouse. Some people use a separate external monitor at eye level with the laptop as a secondary screen on the side; either approach works.
For dual monitors: if one is primary, centre that one and place the secondary to the side. If you use both roughly equally, place the seam between them directly ahead so you turn slightly left or right rather than always looking off-axis.
Keyboard and mouse placement
Place the keyboard so your elbows fall at 90° (or slightly more, 100-110°, is fine — slightly less, 80° or tighter, is not) with shoulders relaxed and hands floating above the keys. Wrists should be straight, not bent up to clear the keyboard front or bent down to reach across it.
For most desks, this means the keyboard sits roughly 5-10cm below the desk surface — which is why keyboard trays exist. If your desk is too high (common), a keyboard tray lowers the typing surface to the right height without changing the desk. If your desk is the right height already, place the keyboard directly on it.
Mouse placement matters as much as keyboard. The mouse should sit beside the keyboard at the same height — not on a separate raised pad, not stretched to the right side of a wide desk. A mouse you stretch for ten times per hour develops shoulder strain over months.
Wrist rests are a contested topic. Many ergonomists argue against them — your hands should float over the keyboard during typing, not rest on a pad. Wrist rests are useful as a place to rest between bursts of typing, not as continuous support while typing. If you use one, make sure it's at the same height as the keyboard front edge, not pushing your wrists up.
Chair adjustment — five things, in order
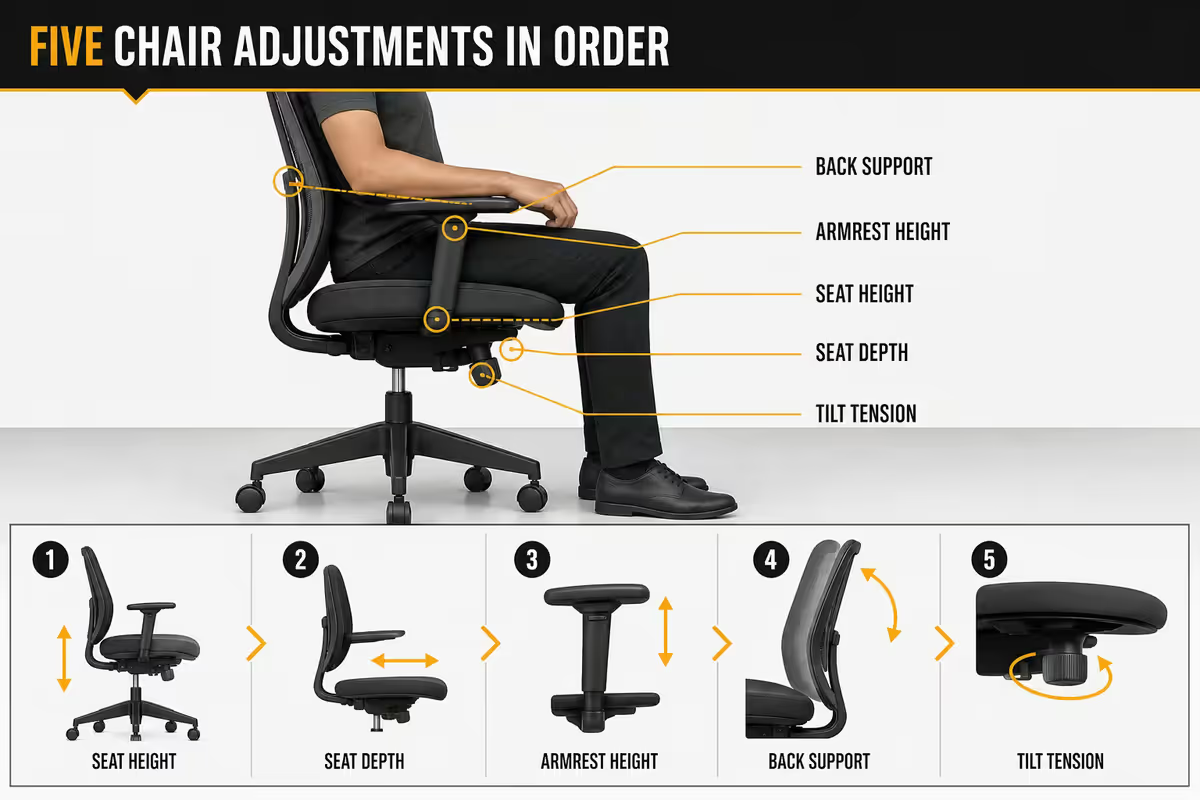
A great ergonomic chair set wrong is no better than a basic chair set right. Most people sit in their chair at factory defaults forever. The 10 minutes to dial it in matter more than the chair brand.
- Seat height first. Adjust until your feet are flat on the floor and thighs parallel to floor (or slightly downward slope). This puts your knees at roughly 90-100°.
- Seat depth next. Slide the seat pan forward or back until there's a two-finger gap between the back of your knee and the front edge of the seat. Most users need to retract the seat 2-4cm from default.
- Lumbar height. Slide the lumbar pad up or down until it lands in the natural inward curve of your lower back, just above your beltline. Test by sitting fully back — you should feel firm but comfortable pressure.
- Armrest height. Raise or lower until your elbows sit at 90° with shoulders relaxed when typing. Both armrests should be exactly the same height.
- Recline tension. Lean back fully. The chair should support you without dumping you backward and without feeling locked. Most chairs have a tension knob under the seat — turn it until lean-back feels natural to your weight.
If you share the chair with a partner or family member of different height, re-adjust on every use. Five minutes to reset is much faster than a month of back pain.
Feet position — flat on floor or footrest
Feet flat on the floor with knees at 90-100° is the baseline. Your feet should be roughly hip-width apart, soles in full contact with the floor, weight distributed evenly across both feet.
If you're shorter (under 165cm) and your feet dangle when the seat is at the right height for your thighs, use a footrest. Footrests start at R300-R600 in SA (Officescape, Takealot) and dramatically improve circulation, reduce pressure on the back of the thighs, and let you maintain neutral lower-back position. Adjustable footrests with a slight tilt are better than static blocks.
Avoid sitting cross-legged at your desk for hours (compresses one leg), tucking one foot under you (twists the pelvis), or sitting with feet hooked behind the chair piston (rotates the hips). All cause measurable lower-back issues within months.
Desk height — by user height
| User height | Ideal desk height | If your desk is fixed |
|---|---|---|
| Under 155cm | 65-69cm | Footrest + lower chair |
| 155-165cm | 68-72cm | Footrest + medium chair |
| 165-180cm | 72-76cm (standard) | Standard desks fit |
| 180-190cm | 76-80cm | Riser blocks under desk feet |
| Over 190cm | 80-84cm | Adjustable desk or custom build |
An adjustable sit-stand desk (Flexispot, Linak, Officescape sit-stand) solves the desk-height problem for everyone — and lets you alternate sitting and standing. SA pricing: R4,000-R8,000 for a basic motorised sit-stand frame, R8,000-R15,000 for premium frames (Flexispot, Linak). Add a desktop surface separately.
If you can't change the desk, you can change the rest of the setup to compensate: raise the chair higher than you'd otherwise want and add a footrest; or use a keyboard tray to lower the typing surface below the desk height.
Monitor arm — why it changes everything
A monitor arm is the single best ergonomic upgrade most people haven't made. Stock monitor stands sit the screen 3-5cm above desk level. For most users, that's 5-15cm below ideal eye level. A monitor arm raises the screen to wherever you need, frees the desk surface beneath the monitor, and lets you tilt, swivel and reposition with zero effort.
Arm types:
- Gas-spring single arm (most common). R600-R2,500 in SA depending on weight capacity and build quality. Supports 2-9kg monitors.
- Mechanical-spring single arm. R1,500-R5,000. More premium feel, easier fine adjustments, better for heavier monitors.
- Dual arm for two monitors. R1,000-R6,000. Same desk clamp serves both.
- Pole-mount single or multi. R2,000-R8,000. Fixed vertical pole, more monitors attach as you grow. Best for multi-screen power users.
Check VESA compatibility on your monitor (most are 75×75mm or 100×100mm) and weight rating on the arm. Don't put a 32-inch 4K monitor on a R600 arm rated for 5kg — it'll droop or fail.
Lighting — layered, no glare
Good office lighting has three layers:
- Ambient. The overall light level in the room. Ideally natural daylight from a window during the day, supplemented by a ceiling light. Aim for 300-500 lux at the desk.
- Task. A dedicated desk lamp positioned to your non-dominant side (left for right-handers, right for left-handers) so it doesn't cast hand shadows on writing or keyboard. Adjustable arm preferred.
- Bias. A soft light source behind or behind-and-above your monitor, reducing the contrast between screen brightness and the dark wall behind it. Reduces eye strain at night significantly. LED strips (Govee, Philips Hue) work well.
Avoid: a window directly behind your monitor (backlight glare), a window directly in front of your monitor (screen reflection), a single bright overhead light reflecting off the screen, fluorescent strip lighting overhead during evening work (flickers cause eye fatigue).
Colour temperature matters too. Cooler light (5000-6500K) during the day matches sunlight and supports alertness. Warmer light (2700-3500K) in the evening doesn't suppress melatonin and lets your body wind down. Smart bulbs (Hue, Govee, Tuya) that shift through the day are useful if you work irregular hours.
Break schedule — microbreaks and rhythm
Sustained sitting longer than 90 minutes shows up as stiffness, eye strain, and measurable reductions in focus. A simple break framework:
- Every 30 minutes: stand up, stretch shoulders and arms, look away from screen for 20 seconds at something 20+ feet away (the 20-20-20 rule for eye strain).
- Every 60-90 minutes: longer break — 5-10 minutes walking, drinking water, looking out the window. Don't sit at the desk for this — physically move away.
- Every 4 hours: a longer break — 30-60 minutes for lunch or a real change of activity.
- End of day: close the lid / power down. Don't let work bleed past your defined hours just because the laptop's still open.
Pomodoro (25 minutes work, 5 minutes break) and its variants (50/10, 90/20) are useful structuring tools. The exact timer matters less than having one — most people significantly underestimate how long they've sat without moving until the alarm fires.
Free / cheap tools that help: macOS Screen Time, Windows Focus Assist, the Pomodoro Tracker website, Forest app, Toggl Track, browser extensions like StayFocusd. Use whichever you'll actually stick with.
Standing desk — alternation, not replacement
A standing desk is genuinely useful — not because standing is healthier than sitting, but because alternating between the two is healthier than locking into either. Standing all day causes its own problems (leg fatigue, foot pressure, lower-back compression). Sitting all day causes the well-known issues. Doing 30-30 cycles, or working out your own rhythm, beats both extremes.
Adjustable sit-stand desks come in three forms in SA:
- Full motorised sit-stand desks. R4,000-R15,000 (frame + top combined). Smoothest, fastest transition. Best long-term option.
- Motorised frames only. R3,500-R8,000 (frame). Add your own existing or new desktop on top. Cheaper way into the category.
- Desk converters. R1,500-R4,500. Sits on your existing desk and lifts monitor + keyboard up when you want to stand. Less elegant, much cheaper. Works fine.
An anti-fatigue mat (R500-R1,500) under a standing desk transforms how long you can comfortably stand. Hard floors cause foot and leg fatigue within 30-45 minutes; a cushioned mat extends that to 90+ minutes easily.
Multi-functional rooms and small spaces
Ergonomic home offices don't require dedicated rooms. The principles are about geometry — chair, monitor, elbow angle, lighting — not square metres. A 1.5m × 2m corner can host a fully ergonomic setup if planned well.
Small-space strategies:
- Monitor arm frees the entire desk surface beneath it.
- Wall-mounted shelves for documents, books, supplies free up desk and storage furniture.
- Cable trays under the desk keep cables off the floor — important visually and for being able to slide back.
- Compact mechanical keyboards (60%, 65%, 75% layouts) save 5-10cm of desk width over full-size.
- A small bookshelf beside the desk doubles as a side surface for water, notebook, headphones.
Avoid working on a couch or bed for any sustained time. Both undo every other piece of ergonomic work within hours — no lumbar support, no defined elbow position, no break rhythm because the boundary between work and rest has dissolved. Even a 60cm × 80cm proper desk in the bedroom corner beats a laptop on the couch every day.
SA-specific — load shedding and home setups
A South African home office has one unique challenge: power continuity through load shedding. Even at Stage 2-4 the 2-2.5-hour blocks can land in the middle of meetings, lose unsaved work, or fail mid-render.
Tiered approach:
- Tier 1 (R1,500-R3,500): a 650-1500VA UPS keeps your laptop, modem, router and monitor up through a 2-2.5 hour Stage 2-4 block easily. Brands available in SA: APC Back-UPS, Mecer, RCT.
- Tier 2 (R5,000-R12,000): a larger UPS (1500-3000VA) handles a desktop PC plus peripherals for 30-90 minutes. Useful as a clean-shutdown buffer if blocks extend.
- Tier 3 (R15,000-R45,000+): inverter + battery setup (Sunsynk, Deye, Mecer hybrid inverter). Whole-room or whole-home backup. Adds solar integration easily.
- Tier 4 (R60,000+): full solar + battery + inverter. Pays back over 5-10 years depending on Eskom tariff changes.
Always prioritise keeping the modem and router up — even with a laptop holding charge, if your internet drops you can't work. A small dedicated UPS (R900-R1,500) for the router alone is the cheapest meaningful intervention. Most SA-based fibre routers run 12V, so a small Li-ion router UPS (R1,200-R2,200 from Takealot or Wootware) gives 4-8 hours of router uptime.
Voltage regulation matters as much as backup capacity. Post-load-shedding voltage spikes have killed thousands of SA monitors and electronics. A UPS or inverter with stabilised output protects against this; a basic surge protector strip does not.
Common ergonomic setup mistakes
Monitor too low. The #1 mistake. Stock monitor stands put the screen 5-15cm below ideal eye level. Add a monitor arm or a riser, or pile books, but raise the screen.
Spending R30,000 on the PC and R3,000 on the chair. The PC is what you use; the chair is what you sit in for 40 hours a week. Their priorities should be roughly inverse to most people's spending.
Working on a couch or bed. Convenient for 20 minutes, destructive for hours. No lumbar support, no defined elbow position, no break rhythm.
Skipping lighting layers. A single overhead light creates glare and contrast strain. A bias-lit monitor and side task lamp dramatically reduce eye fatigue with R1,000-R2,000 of total spend.
Treating "the right posture" as static. Sitting locked in any single posture for hours is worse than rotating between several decent postures. Movement matters more than perfect form.
No UPS in SA. One mid-meeting load-shedding drop loses an hour of recovery time. A R2,000 UPS pays for itself in a fortnight of saved work and meeting time.
Ignoring break alarms. Pomodoro and 20-20-20 work only if you obey the buzzer. Override one in three and your body still benefits; override three in three and the timer is useless.
Key takeaways
- Five measurements remove most pain: monitor top at eye level, elbows 90°, lumbar in curve, feet flat, neck neutral.
- Monitor too low is the #1 mistake — add a monitor arm or raise the screen however you can.
- Spend more on the chair, less on the PC. You sit in the chair 40 hours a week.
- Layered lighting, break rhythm (Pomodoro + 20-20-20) and movement matter as much as the hardware.
- For SA: a UPS for laptop + router is the cheapest meaningful intervention for power continuity.
Frequently asked questions
Where should my monitor be positioned for an ergonomic setup?
Top of monitor at eye level, 50-70cm from your eyes (arm's length), tilted slightly back. Your natural line of sight should fall on the upper third of the screen.How high should my desk be?
Standard 72-76cm fits users 165-180cm tall. Shorter users need 68-72cm or a footrest; taller users need 76-80cm. An adjustable sit-stand desk solves this universally.What posture should I aim for at my desk?
Feet flat, lumbar supported, shoulders relaxed, elbows 90°, wrists straight, neck neutral, monitor at eye level. The goal is a baseline you return to, not a locked position.How often should I take breaks during the workday?
Microbreaks every 30 minutes (20-20-20 rule for eyes), longer breaks every 90-120 minutes, lunch break, hard stop at end of day. Pomodoro 25/5 cycles work well.Do I need a standing desk?
You benefit from being able to alternate sitting and standing, not from standing all day. Ideal pattern: roughly 30 minutes seated, 30 minutes standing, repeat.What is the best lighting setup for a home office?
Layered: ambient daylight + overhead, task light to non-dominant side, bias light behind monitor for night work. Avoid window directly behind or in front of your screen.How does load shedding affect a home office setup?
A 650-1500VA UPS keeps laptop + router + monitor up through Stage 2-4 blocks. For desktops, larger UPS or inverter setup. Prioritise router uptime always.Can I have an ergonomic home office in a small space?
Yes — ergonomics is geometry, not square metres. A 1.5m × 2m corner with monitor arm, proper chair, task lighting and clearance to stand works fine.
Get the Evetech app
Exclusive app-only prices, daily flash sales, and free delivery on orders over R4,000 — download the app and start saving.