Glossary · Fan Curves
Fan curves explained.
The factory fan curve on every motherboard is designed to be safe, not quiet. Five minutes in BIOS turns a jet-engine prebuild into a near-silent productivity machine — without sacrificing a degree of cooling headroom when the games start.
- PWM at idle
- 25%
- PWM at 70°C
- 60%
- BIOS setup time
- 5 min
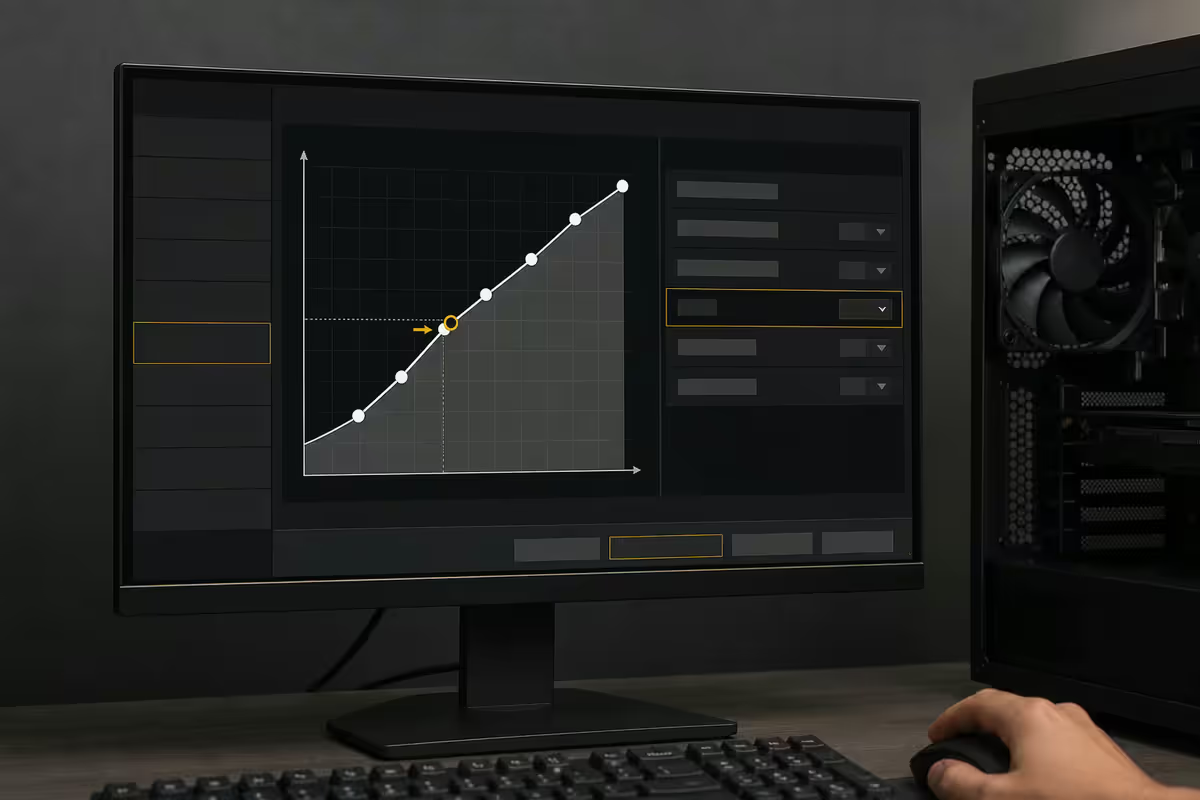
What is a fan curve?
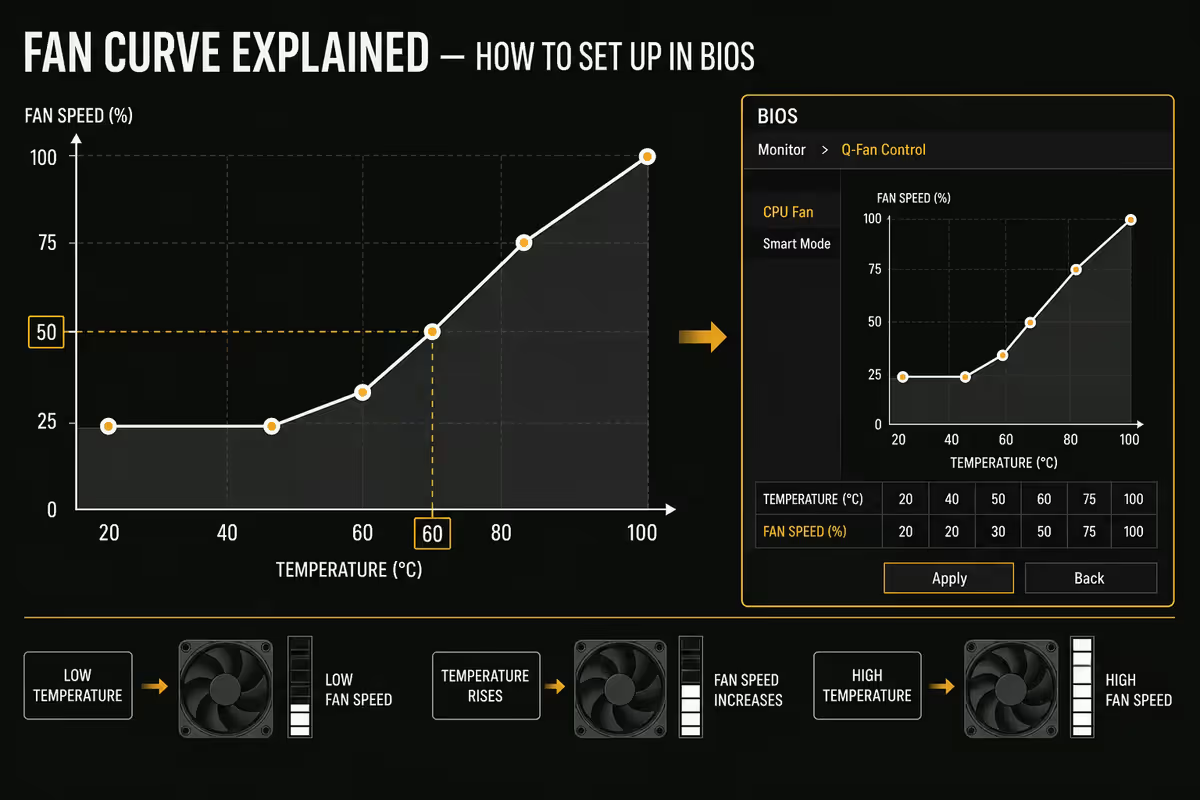
A fan curve is the rule that maps a measured temperature to a fan speed. The motherboard or fan controller reads the source sensor several times per second, interpolates between the curve points you've defined, and sets each fan's PWM duty cycle accordingly. Done well, this gives you near-silence at idle and just-enough airflow under sustained load — without you ever touching a knob.
A fan curve is defined by a sequence of temperature-to-duty-cycle points. For example:
- 30°C = 25% PWM duty (barely audible at idle)
- 60°C = 50% PWM (gentle ramp during light gaming)
- 75°C = 70% PWM (audible but reasonable under heavy load)
- 85°C = 100% PWM (full cooling before thermal throttling)
Between those points the motherboard interpolates linearly, so at 45°C the fan runs at roughly 37%. The factory curve shipped on every motherboard is conservative — it ramps fans aggressively from very low temperatures to "be safe" for the widest set of cases. Tuning that curve to your specific chassis and cooler is where the silence comes from.
PWM vs DC — the connector difference
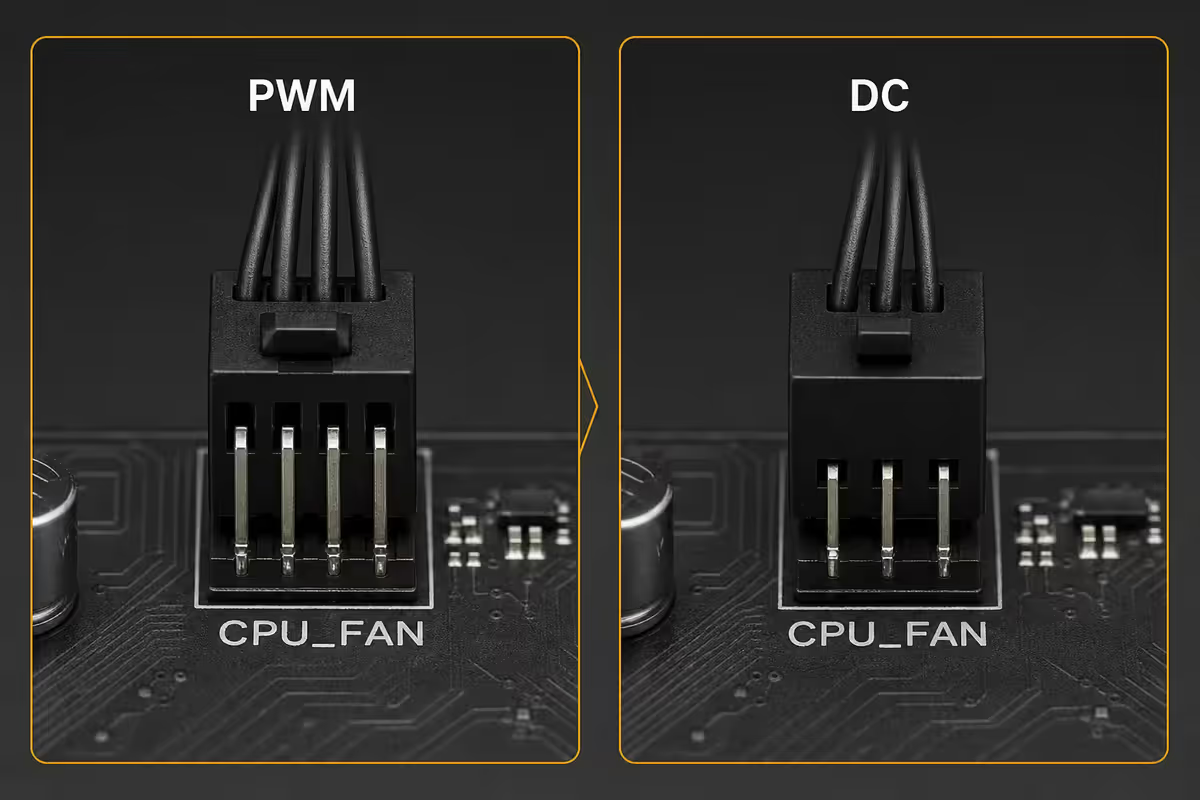
Two fan-control technologies exist on modern motherboards. The difference matters because it changes how much control you actually have.
| PWM (4-pin) | DC (3-pin) | |
|---|---|---|
| Control method | Pulse-width modulation signal | Variable voltage |
| Minimum stable RPM | ~15% duty (250-400 RPM) | ~40-50% duty (600-800 RPM) |
| Speed precision | Smooth from 15-100% | Coarser steps |
| Typical use | Modern case fans, CPU coolers, AIO pumps | Legacy budget fans, some chassis intake fans |
| BIOS profile compatibility | Full curve control | Coarser curve only |
How to tell which you have: count the pins on the fan connector. Four pins = PWM. Three pins = DC. Modern motherboards detect this automatically per-fan-header and switch control modes accordingly, but you can also set the mode manually in BIOS if a fan is misbehaving.
How to set up fan curves in BIOS
The process is similar across all major motherboard brands; the menu name varies. Here's the path for the four major BIOSes.
ASUS — Q-Fan Control: Reboot, press Delete to enter BIOS. Open Q-Fan Control (top-right "Fan" icon in EZ Mode, or Advanced → Monitor → Q-Fan Control). Select the fan header. Choose "Manual" mode. Drag the four curve points on the graph editor to your preferred temperatures and duty cycles. Press F10 to save and exit.
MSI — Smart Fan: Press Delete on boot. Open Hardware Monitor (F6 in Click BIOS 5) and select the fan you want to configure. Set Mode to "Smart Fan Mode" then drag the four points on the graph. Save with F10.
Gigabyte — Smart Fan 6: Press Delete on boot. Open Smart Fan 6 from the bottom toolbar. Pick the fan, set the temperature source (CPU / System), drag the curve points. Save with F10.
ASRock — FAN-Tastic Tuning: Press F2 or Delete on boot. Open H/W Monitor → FAN-Tastic Tuning. Pick a preset (Silent / Standard / Performance / Full Speed) or "Customise" to drag the graph manually. Save with F10.
Common settings worth tweaking on every brand:
- Temperature source — for CPU coolers, choose "CPU Temp." For case fans, choose "Motherboard / Chassis / System Temp."
- Start-up speed or spin-up time — minimum duty before the fan stops spinning. Set this just above the fan's actual stall point (typically 10-15%).
- Step time or spin-down delay — how slowly the fan reacts to temp changes. Longer delay = smoother and quieter; shorter delay = more responsive.
- Hysteresis — the temperature gap between speed-up and speed-down threshold. 3-5°C is the sweet spot.
Recommended fan curves by use case
Three curve presets handle almost every build. Tune from one of these starting points based on your workload.
| Curve | Idle / Light / Heavy / Max | Best for |
|---|---|---|
| Silent | 20% / 30% / 50% / 90% | Productivity, browsing, content consumption |
| Balanced (recommended) | 25% / 50% / 70% / 100% | Mixed gaming and productivity |
| Performance | 35% / 60% / 80% / 100% | Long gaming sessions, streaming |
| Custom (silent + ramp) | 25% / 35% / 65% / 100% | Best of both — quiet at idle, full when needed |
Temperature breakpoints for each preset: idle = 30°C, light = 50-60°C, heavy = 70-75°C, max = 85°C. If you find the fan ramping audibly during normal work, shift the light and heavy points 5°C higher. If your CPU temps climb above 80°C during gaming, shift the heavy point 5°C lower so fans ramp up sooner.
CPU vs case vs GPU fan curves — different sensors, different curves
A surprisingly common mistake is configuring all fans against CPU temperature. Each fan type should follow the heat source it's actually controlling.
CPU cooler fan(s): source = CPU temp. The fan is directly cooling the CPU; the temperature reflects its workload immediately.
Case intake and exhaust fans: source = chassis ambient temp (sometimes called "System Temp" or "MB Temp"). Case fans aren't trying to track CPU spikes — they're managing the total chassis air temperature, which changes slowly. Tying case fans to CPU causes annoying ramp-up oscillations every time you compile, launch a game or push a CPU-bound process for a few seconds. Tying them to chassis ambient gives smooth, predictable behaviour.
GPU-adjacent intake fan(s): in BIOS, you typically can't read GPU temp directly — it's reported by Nvidia/AMD drivers, not the motherboard. Use FanControl (covered below) to drive a chassis intake against GPU temp during gaming. Falls back to chassis ambient when no gaming load.
AIO radiator fans: source = CPU temp (the AIO is the CPU's cooling loop, so this is correct). Use a less aggressive curve than air-cooler CPU fans, because the radiator's thermal mass means it doesn't need rapid response.
FanControl — when BIOS isn't enough
FanControl is a free open-source Windows utility (by Rem0o, hosted on GitHub) that gives dramatically more flexibility than any motherboard BIOS. Install it for free, configure once, and it runs in the background using ~5 MB of RAM.
Capabilities BIOS lacks:
- Multi-sensor curves — a single fan can follow the higher of CPU and GPU temp, with each input on its own curve.
- NVMe-temp-driven curves — a chassis intake fan ramping when your M.2 NVMe gets hot during heavy transfers.
- VRM-temp curves — important on high-end ROG / Aorus boards under sustained overclocked workloads.
- Explicit hysteresis — define the up/down gap precisely instead of trusting BIOS to do it sensibly.
- Graphical curve editor — drag every point, see the curve update in real time against live sensor data.
- Profile switching — Silent / Balanced / Performance profiles toggled by hotkey or app launch trigger.
When BIOS is enough: mainstream gaming or productivity builds with air cooling, no NVMe or VRM heat concerns. BIOS Q-Fan / Smart Fan handles most users.
When FanControl is worth installing: GPU-heavy workloads where case fans should respond to GPU temp; multi-NVMe builds where drive heat matters; AIO setups with multiple radiator fans that need synchronised curves; workstation builds with VRM-temp concern; or just anyone who values precise hysteresis and dramatic silence at idle.
AIO pumps — the one fan curve to skip
CPU AIO pumps run differently from fans. Pumps need consistent coolant flow to function; varying pump speed by CPU temperature creates flow surges that can introduce micro-air-bubbles in the loop, shorten pump bearing life and produce audible flow gurgling at intermediate speeds.
The right pump setting: a fixed PWM duty regardless of CPU temperature. Three approaches work:
- Fixed 100% PWM — maximum flow, lowest CPU temps, but highest pump noise and shortest long-term pump life.
- Fixed 80% PWM (recommended) — near-maximum flow with the quietest pump noise profile and good long-term life. CPU temps are within 1-2°C of 100%.
- Fixed 75% PWM — quietest pump operation, slightly higher CPU temps. Fine for builds prioritising silence over absolute peak cooling.
Set the pump in BIOS to "Manual" or "Fixed" mode with the chosen duty, then leave it alone. The radiator's fans still follow a normal temperature-based curve — only the pump runs at fixed speed.
Key takeaways
- A fan curve maps temperature to PWM duty cycle. Factory curves are conservative; tuning saves audible noise without sacrificing cooling.
- PWM (4-pin) gives smooth 15-100% control. DC (3-pin) is coarser and bottoms out around 40-50%.
- The balanced curve: 25% at 30°C, 50% at 60°C, 70% at 75°C, 100% at 85°C.
- CPU fans follow CPU temp. Case fans follow chassis ambient. Different sensors, different responses.
- AIO pumps run at fixed PWM (80% recommended) — never tie pump speed to CPU temp.
- FanControl beats every BIOS for advanced multi-sensor curves and explicit hysteresis.
Frequently asked questions
What is a fan curve?
A rule that maps measured temperature to fan PWM duty cycle. The motherboard reads the source sensor, interpolates the curve and sets fan speed in real time. Good curves balance silence at idle against airflow under load.What is the difference between PWM and DC fans?
PWM (4-pin) uses pulse-width-modulated signal, smooth control from ~15-100%. DC (3-pin) uses variable voltage, coarser, bottoms out ~40-50%. PWM is the modern standard.What is a good fan curve for a CPU cooler?
25% PWM at 30°C, 50% at 60°C, 70% at 75°C, 100% at 85°C. Silent at idle, gentle ramp under load, full cooling before throttling.Should case fans follow CPU temp or case temp?
Case temp. Tying case fans to CPU causes oscillation during CPU spikes. Chassis ambient changes slowly, so case fans ramp smoothly and quietly.What is FanControl and when should I use it?
Free Windows utility by Rem0o (GitHub). More flexible than BIOS — GPU-temp-driven curves, NVMe-temp curves, explicit hysteresis, profile switching. Worth installing for GPU-heavy or multi-NVMe builds.How do I set up fan curves in my BIOS?
Boot into BIOS (Delete). Find Q-Fan (ASUS), Smart Fan (MSI/Gigabyte) or FAN-Tastic Tuning (ASRock). Select fan header, switch to Manual, drag the graph points. Save with F10.Should my AIO pump run at 100% all the time?
No. Fixed 80% PWM is the recommended sweet spot — near-maximum flow, quietest acoustics, good pump life. Never tie AIO pump speed to CPU temp; pumps need consistent flow.What is fan curve hysteresis and why does it matter?
The temperature gap between speed-up and speed-down thresholds. Prevents fans oscillating at curve breakpoints. 3-5°C is the sweet spot. FanControl supports it explicitly; BIOS uses spin-down delay.
Get the Evetech app
Exclusive app-only prices, daily flash sales, and free delivery on orders over R4,000 — download the app and start saving.