Mesh WiFi Setup Guide
How to set up mesh WiFi. — Coverage that actually reaches the lounge.
A second router stuck in the lounge is not a mesh. Properly configured mesh WiFi delivers seamless roaming, wired backhaul speeds, and dead-zone elimination — but only if you place the nodes right and set the network up properly from day one.
- nodes for most homes
- 2-3
- node spacing
- 8-12 m
- SA mesh price range
- R3-R12K
When mesh beats a single router
Most SA homes don't actually need mesh. A modern WiFi 6 or WiFi 7 single router (TP-Link Archer AX73, ASUS RT-AX86U, Mikrotik hAP ax3) will comfortably cover a 90-100 m² flat or a small open-plan house. Mesh is a solution to a specific problem: signal that has to travel through too many walls or up to a second floor.
The fingerprint of a home that needs mesh:
- Total floor area over 120 m².
- Double-storey or split-level. WiFi struggles vertically through concrete slabs.
- Long, narrow layouts. A 6-bedroom face-brick Sandton house with the fibre line in the garage cannot reach the master bedroom from a single router.
- Old SA homes with double-brick walls and steel reinforcing. Houses built before 1980 hit WiFi hard.
- Outdoor coverage to a patio, pool area or cottage.
- Multiple users streaming or working from home simultaneously across different rooms.
If none of those apply, save your money — a good single router gives equivalent or better performance than a budget mesh kit. Mesh is overkill for an 80 m² flat.
Mesh is a coverage solution, not a speed solution. If your single router has signal everywhere already, mesh won't make it faster.
Backhaul — the part nobody explains properly
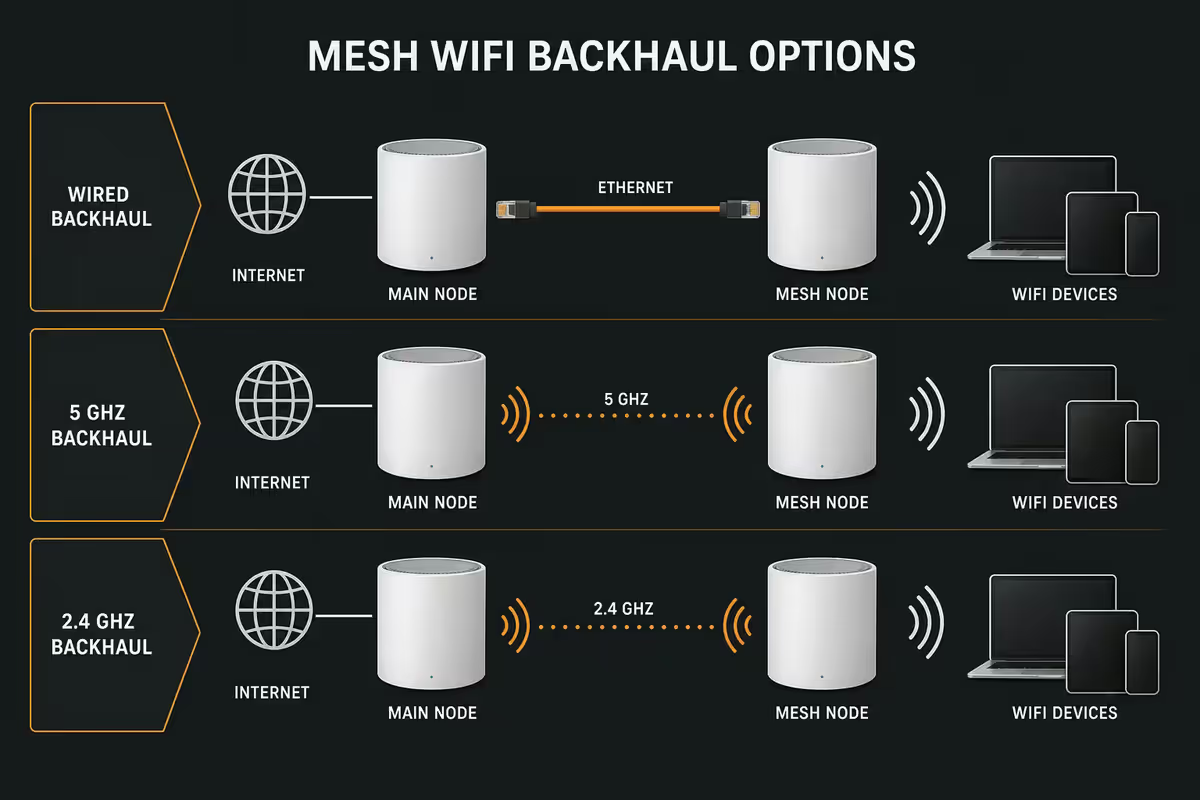
"Backhaul" sounds like networking jargon, but it's the most important concept in mesh. It's how data travels between mesh nodes — from the satellite in your bedroom back to the main router in the lounge, and out to your fibre line.
There are three backhaul options, and they perform very differently:
| Backhaul type | How it works | Performance |
|---|---|---|
| Wired (Ethernet) | CAT6 cable between nodes | Full speed. No hop penalty. |
| Dedicated wireless | Separate radio for inter-node traffic (tri-band/quad-band) | Excellent. Tri-band/quad-band mesh. |
| Shared wireless | Same radio as your devices (dual-band) | Halves bandwidth per hop. Avoid. |
Wired backhaul — always do this if you can
If your house has any Ethernet wall sockets, or you can run a CAT6 cable through the ceiling/skirting/conduit between rooms, wire your mesh backhaul. The performance difference is dramatic. A wired-backhaul mesh delivers full gigabit speeds at every node. A wireless-backhaul mesh loses 30-50% of bandwidth per hop.
A roll of CAT6 cable from Builders Warehouse or Communica is R250-R400. The crimping tool is R200. The job takes a Saturday morning. The performance improvement lasts forever.
Dedicated wireless backhaul — the next-best option
Tri-band or quad-band mesh systems include a dedicated 5GHz or 6GHz radio reserved for node-to-node communication. Your devices never touch this backhaul radio. TP-Link Deco BE65, Netgear Orbi RBE970, ASUS ZenWiFi BT8 all use dedicated backhaul. This is what you want if you can't wire.
Shared wireless backhaul — avoid this
Dual-band mesh systems (most budget kits, Eero 6, TP-Link Deco M5) share the 5GHz radio between your devices and backhaul. Every hop halves bandwidth. By the time data reaches the third node, you're getting maybe 100 Mbps from a 500 Mbps fibre line. If your fibre is 200 Mbps or above, never buy a dual-band mesh.
Node placement — the part most people get wrong
After tens of thousands of mesh customers, this is the #1 cause of "my mesh isn't working" complaints: bad placement. The rules are simple, mostly counterintuitive, and absolutely worth following.
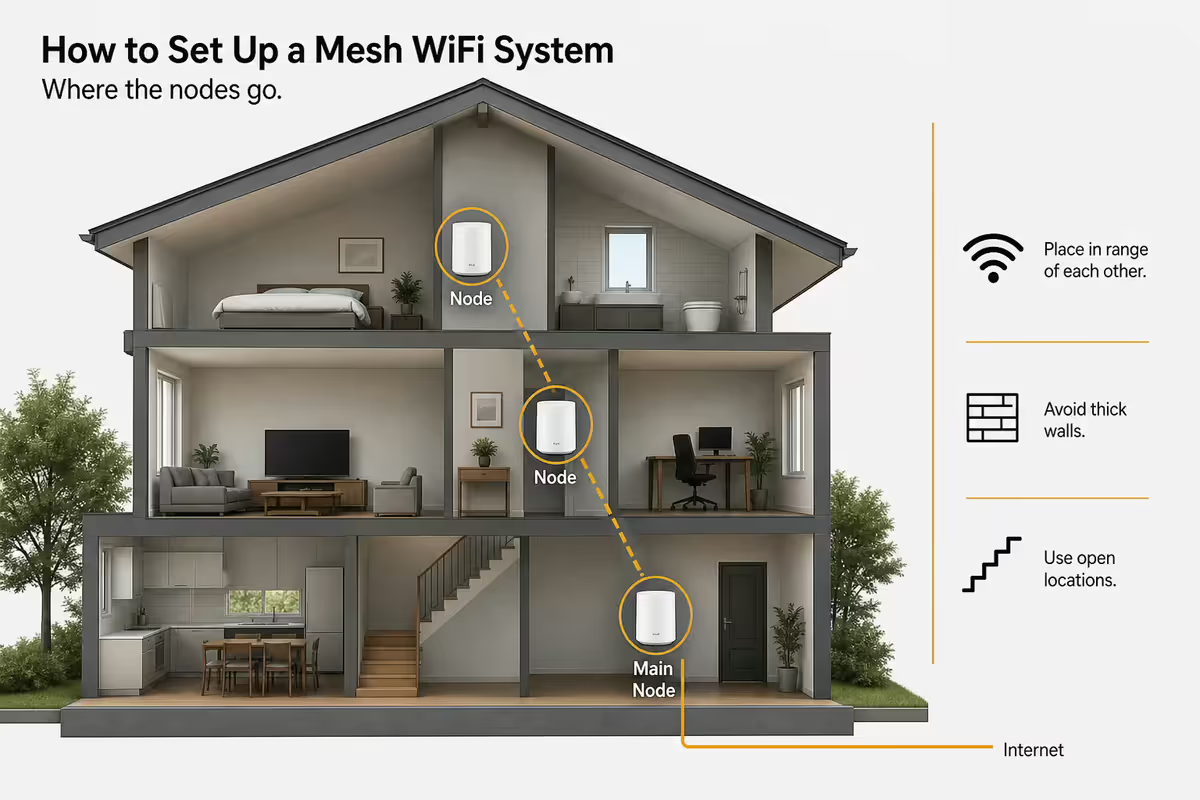
Rule 1 — Main node lives where the fibre arrives
Don't try to move the fibre line. Don't run long ONT-to-router Ethernet cables. The main router lives next to the ONT box, even if that means the lounge or under the stairs. Plan your satellites around this anchor.
Rule 2 — Satellites go halfway, not at the dead zone
If your master bedroom at the back of the house has no signal, the satellite doesn't go in the master bedroom. It goes in the passage outside the bedroom — somewhere with strong signal from the main, that then rebroadcasts that strong signal further. Halfway between strong and weak, never at the weak.
Rule 3 — Nodes need line-of-sight (mostly)
WiFi penetrates one or two interior drywalls fine. It loses 20-30% through a single brick wall. It loses 50-70% through a concrete slab (between floors). It bounces off metal completely. Mesh nodes should "see" each other as much as possible — not be tucked inside cabinets, behind TVs, in fridges or near aquariums.
Rule 4 — Chest height or higher
Mesh nodes on the floor send most of their signal into the floor and a metre of air around them. Mounted on a wall at 1.5m+, or sitting on a bookshelf or wall-mounted, the same node covers double the area. Aesthetically annoying, performance essential.
Rule 5 — Three nodes form a triangle, not a line
If you have three nodes in a row across one wall, the third node is hopping through the second, halving bandwidth twice. Arrange them as a triangle — main router, two satellites at angles from each other — so each satellite has a direct connection to the main. Triangle topology beats line topology by 40% in real-world tests.
Best mesh WiFi systems in SA — May 2026
SA mesh shelves have stabilised around four reliable brands. The picks below are based on tens of thousands of installations across Centurion, Joburg North and Cape Town suburbs.
TP-Link Deco BE65 — best for most
WiFi 7, tri-band, dedicated backhaul, 2.5 GbE ports, excellent app. Three-pack covers 250-280 m² comfortably. SA RRP R8,500-R11,000. TP-Link's SA distribution and support are best-in-class — RMA replacements via Vox, Pinnacle and Esquire are fast. The default mesh recommendation for fibre lines up to 1 Gbps.
ASUS ZenWiFi BT8 — best for tweakers
WiFi 7, quad-band, full ASUS Router OS features (VPN server, AiProtection Pro, Adaptive QoS, guest networks, traffic analyser). For users who want control beyond the consumer app. Three-pack SA: R12,000-R15,000.
Netgear Orbi RBE970 — best for big houses
Quad-band WiFi 7, dedicated 10 GbE backhaul radio, longest range in any consumer mesh. Three-pack covers 300+ m². The premium choice for double-storey or unusually large homes. SA: R28,000-R35,000. Expensive but earns it on tricky layouts.
Eero Pro 6E — best for Apple households
Effortless app, HomeKit integration, automatic firmware. WiFi 6E (not 7), but excellent for most homes. Three-pack SA: R10,000-R13,000. Note: requires Amazon login, which some users object to.
Budget pick: TP-Link Deco X55 (WiFi 6)
Skip WiFi 7 if your fibre line is under 200 Mbps. Three-pack covers a 200 m² house comfortably. SA: R3,500-R4,800. The right mesh for a Vodacom 100/100 fibre line in a normal SA home.
Step-by-step mesh setup
The exact app screens differ between TP-Link Deco, ASUS, Eero and Netgear, but the steps below apply to all of them.
- 01
Plan your node positions
Walk the house with your phone running a WiFi analyser (NetSpot, WiFi Analyzer). Note which rooms have weak signal. Decide main node location (where the fibre line enters) and satellite locations (halfway between strong and weak). - 02
Bridge your ISP router (or disable WiFi)
If your ISP supplies a router (Mikrotik, Huawei, TP-Link), put it in bridge mode — or at minimum, disable its WiFi radios. This avoids double-NAT and lets your mesh handle DHCP. Most SA ISPs walk you through this on their support page. - 03
Connect the main node to the ONT
Plug a CAT6 cable from the ONT's LAN1 port to the mesh main node's WAN port. Power it on. Wait 60 seconds for the indicator LED to settle (typically solid white or solid green). - 04
Download the manufacturer's app
TP-Link Deco, ASUS Router, Eero, or Netgear Orbi app. Create an account. Follow the in-app onboarding — the app will detect the main node via Bluetooth. - 05
Configure the main network
Set a single SSID (network name) for both 2.4GHz and 5GHz — mesh handles band steering automatically. Set a strong password. Skip the "guest network" for now (set it up later). - 06
Place and power the satellites
Place each satellite in its planned position (halfway between strong and weak). Power it on. The app should detect it within 60-90 seconds. Add it to the mesh. Wait for the LED to confirm "good signal" — usually solid white/green/blue depending on brand. - 07
Wire backhaul if possible
If you have or can run Ethernet between nodes, connect each satellite's LAN port to the main router's LAN port via CAT6. The mesh app should detect "Ethernet backhaul connected" and switch automatically. Performance improves immediately. - 08
Test coverage with a phone
Walk the house with your phone. The signal bar should stay strong everywhere. Run a speed test (Speedtest.net) in the room with the weakest signal — you should still see at least 200-300 Mbps of your line speed. - 09
Enable auto-firmware updates
In the app settings, enable automatic firmware updates. Mesh kits get monthly security patches that matter — especially for SA networks where botnets actively scan local IPs.
Common mesh WiFi mistakes
Hiding nodes inside cabinets. Mesh nodes need line-of-sight. Hiding them inside a TV unit, behind books, or in the cupboard under the stairs adds 10-20 dB of signal attenuation. Beautiful house, terrible WiFi.
Placing the satellite at the dead zone. If the satellite can't get a strong signal from the main router, it rebroadcasts weak signal. Halfway between strong and weak — always.
Buying too many nodes. Three nodes is enough for almost every SA home. Four or five adds channel congestion that hurts more than it helps.
Mixing brands. A TP-Link Deco won't mesh with an ASUS ZenWiFi. Different vendors' mesh protocols are incompatible. Buy the whole system from one brand.
Leaving the ISP router doing WiFi too. Double WiFi networks compete on the same channels and degrade each other. Disable the ISP router's WiFi (or bridge the router entirely) and let the mesh handle WiFi exclusively.
Using a dual-band mesh on a gigabit fibre line. Shared-backhaul dual-band mesh loses 50% of bandwidth per hop. Buy tri-band or wire the backhaul.
Troubleshooting roaming and dropouts
Devices stuck on the main router when they should roam
This is normal behaviour and surprisingly hard to fix at the device level. Devices choose which node to associate with — the mesh can't force them. Most modern phones, laptops and TVs roam well; older IoT devices (printers, cameras, smart plugs) often stick to their original node forever.
In the mesh app, enable any "fast roaming" (802.11r), "aggressive roaming" or "BSS transition" settings. If issues persist, set the device to "forget network" and re-add it while standing close to the closest node.
Random dropouts on Zoom/Teams calls
Usually band steering kicking the device between 2.4GHz and 5GHz at the wrong moment. In the app, find your device and "pin" it to 5GHz, or disable smart connect on that specific device.
Slow speeds at the far satellite
Wired backhaul is the answer 95% of the time. If wireless backhaul is your only option, try moving the satellite slightly closer to the main router, or repositioning to a clear line-of-sight position.
One node showing "weak backhaul"
The node is too far from its parent or there's an obstruction (brick wall, large appliance, metal cabinet). Move it 1-2 metres toward the main router, or relocate it onto a wall mount at chest height.
Mesh keeps rebooting itself
In SA, almost always related to load shedding tripping the power. Add a small UPS (R800-R1,500) to the ONT and main mesh node. The mesh shouldn't reboot more than once a month otherwise — if it does, the unit is faulty and should be RMA'd.
Key takeaways
- Mesh is a coverage solution. If your single router covers the house already, mesh won't make it faster.
- Wire your backhaul (CAT6 or MoCA over coax) whenever possible. Twice the performance of wireless backhaul.
- Place satellites halfway between strong signal and the dead zone — not at the dead zone.
- For most SA homes: TP-Link Deco BE65 (R8.5-R11K) is the default. Big house: Netgear Orbi RBE970.
- Bridge or disable your ISP router's WiFi. Let the mesh handle DHCP and routing.
Frequently asked questions
When does mesh WiFi beat a single router?
When you have dead zones a single router can't reach — homes over 120 m², double-storey, thick brick walls (common in older SA homes), or with the router in a corner. For an open-plan 80 m² flat, a quality single router still wins.What is mesh WiFi backhaul?
How data travels between nodes. Wired (CAT6) is best — full speed. Dedicated wireless (tri/quad-band) is excellent. Shared wireless (dual-band) halves bandwidth per hop and should be avoided on fast fibre.Where should I place mesh WiFi nodes?
Main node next to the fibre ONT. Satellites halfway between strong-signal and weak-signal areas (not at the dead zone). Chest height or higher. Out in the open. Three-node systems in a triangle, not a line.Which mesh WiFi system is best in South Africa?
Most homes: TP-Link Deco BE65 (R8.5-R11K). Tweakers: ASUS ZenWiFi BT8. Big house: Netgear Orbi RBE970. Apple house: Eero Pro 6E. Budget: TP-Link Deco X55 WiFi 6.How many mesh nodes do I need?
100-150 m² single-storey: 2 nodes. 150-250 m² or double-storey: 3 nodes. 250-400 m² or large garden: 3-4 nodes. More isn't better — too many overlapping signals hurt performance.What's the most common mesh mistake?
Placing the satellite at the dead zone, not halfway to it. A satellite that can't get strong signal from the main just rebroadcasts weak signal. Hiding nodes inside cabinets is a close second.Will mesh WiFi work with my fibre router?
Yes. Bridge the ISP router (or disable its WiFi) and let the mesh handle DHCP/routing. Vumatel, Openserve, MetroFibre and Frogfoot all support this. Avoids double-NAT.Does mesh help with load shedding?
Indirectly. Pair the ONT + main node + main satellite with a small UPS (R800-R2,500). Add a 4G/5G backup on the main router for fibre outages. The smart SA networking setup.
Get the Evetech app
Exclusive app-only prices, daily flash sales, and free delivery on orders over R4,000 — download the app and start saving.