PC Building Guide
How to cable manage your PC build.
— Behind the tray. Through the grommet. Done.
- behind-tray clearance
- ≥20mm
- beats zip ties
- Velcro
- is your friend
- PSU shroud
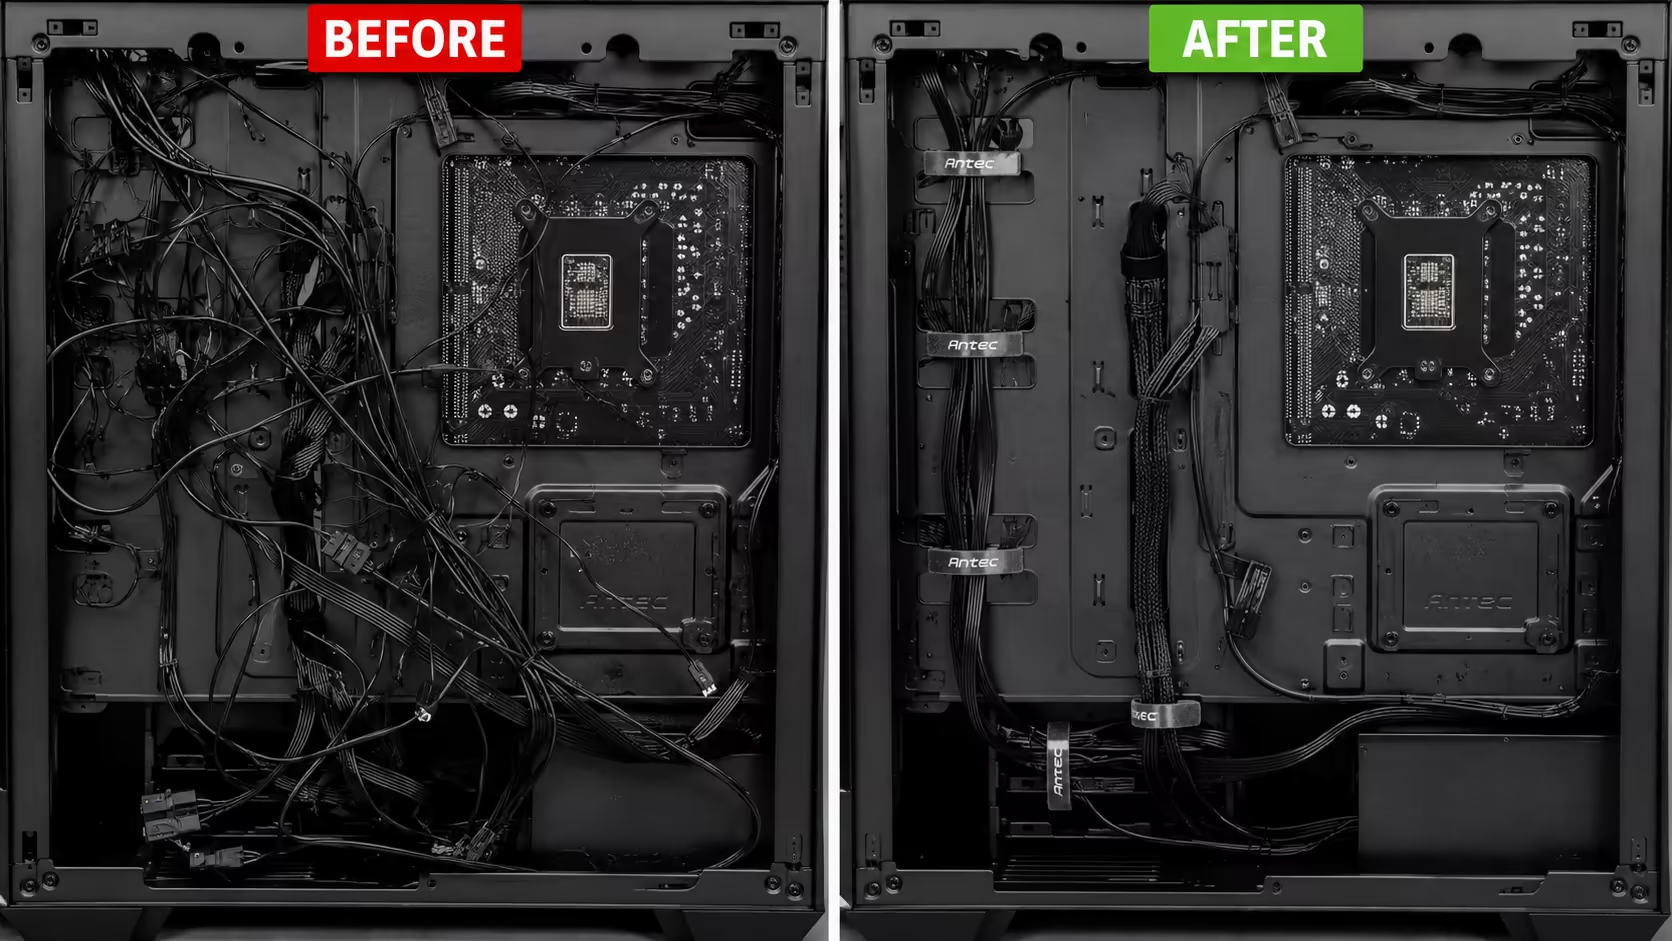
Why cable management actually matters
Cable management has a reputation as cosmetic — something you do to make your build look pretty on Reddit. The visual angle is real, but it isn't the main reason. The practical reasons are temperature, dust, and the cost of every future upgrade.
Airflow obstruction. A tangle of cables sitting in the intake fan path can reduce effective airflow by 15-25%, raising CPU and GPU temps 5-10°C under load. The chassis fans are pushing through whatever is in the way — and a fat bundle of 24-pin and SATA cables is very much in the way.
Dust accumulation. Tangled cables form a mesh that catches every dust particle the front filter misses. Within 12-18 months a poorly-managed build looks like a small wildlife reserve, and the dust insulates components and chokes airflow further.
Future upgrades. When you eventually swap the GPU, add a second SSD, or replace a fan, you need access to cables. A properly-managed build takes 5 minutes to swap a part. A spaghetti build takes 30 minutes of untangling first.
Aesthetics, last. Yes — if you've spent R45,000 on a build with a tempered glass side panel, you want it to look like a R45,000 build. But this is the cherry on top, not the reason.
The rear-tray channel — where the bulk of cabling lives
Modern PC cases have a space between the back of the motherboard tray and the right side panel — typically 20-30mm in mid-towers, 35mm+ in premium cases. This is the rear-tray channel, and it's where 80% of your cables should live.
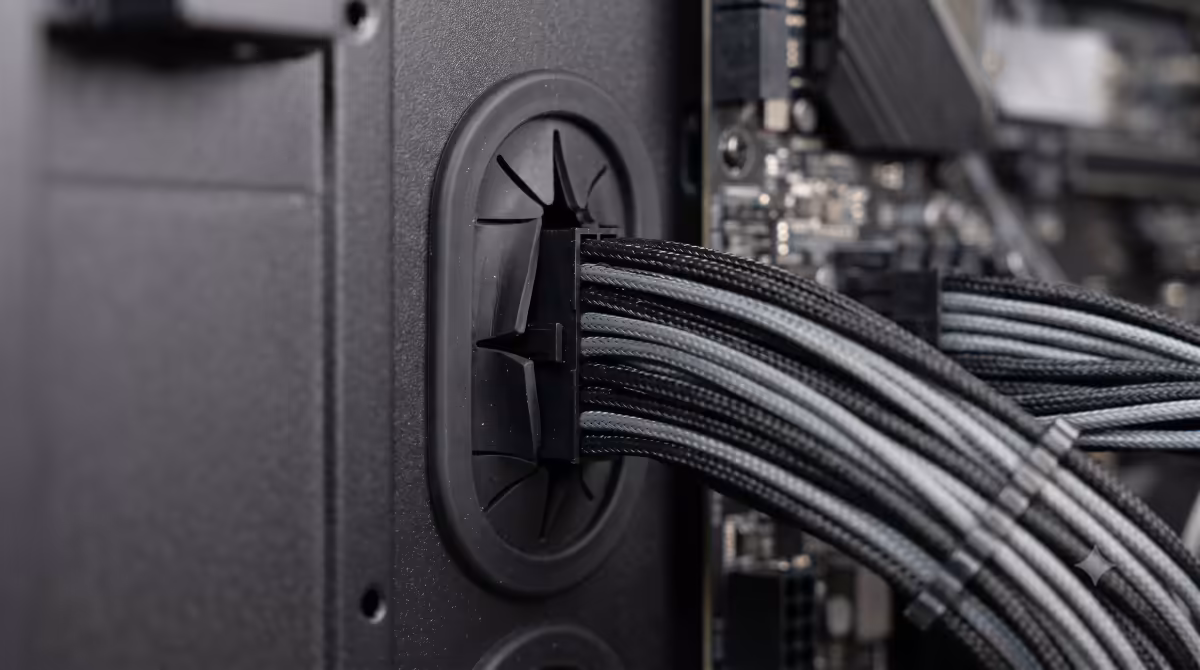
The motherboard tray has cut-outs (grommets) — usually 4-7 of them — at specific positions where cables can pass from the rear channel through to the motherboard. Your goal is to route each cable along the rear channel, then up through the grommet closest to its destination on the front side.
Behind-tray clearance matters enormously. A budget case with 15-18mm clearance forces you to flatten the 24-pin cable into a thin ribbon — which is awkward and stresses the connector. A 25-30mm channel lets the cable sit naturally with room for velcro on top.
Pre-installed velcro and channel guides
Premium cases (Lian Li Lancool 216, NZXT H7 Flow, Fractal North, Phanteks XT Pro) ship with velcro straps already attached along the rear channel at convenient intervals. Budget cases give you bare metal and a packet of zip ties. Worth knowing before you buy.
The PSU shroud — your friend
The PSU shroud is a metal cover over the bottom-mounted PSU. From the glass side panel you see the motherboard, GPU and RAM only — the PSU and any excess cables disappear under the shroud.
Nearly every modern mid-tower has one. The shroud usually has a single cable cut-out near the right side, where the 24-pin and 8-pin cables emerge to route up to the motherboard. Some shrouds also have a top vent for an optional bottom GPU intake fan setup.
What goes under the shroud: the PSU itself, any unused modular cables, the spare length of in-use cables that won't reach further, and (in some cases) bottom-mounted SSDs or a small drive cage.
Velcro vs zip ties — when to use which
Both work. They just work differently.
| Use case | Velcro straps | Zip ties |
|---|---|---|
| Reusability | Reusable indefinitely | Cut once, single use |
| Profile / bulk | Slightly bulkier | Nearly invisible |
| Adjustability | Loosen / re-tighten any time | Fixed at install |
| Damage risk | Won't pinch cables | Overtighten = damage insulation |
| Best for | GPU power, fan headers, future upgrades | Permanent PSU runs, hidden bundles |
The rule of thumb: if you're going to touch this cable again in the next 24 months, use velcro. If it's a permanent hidden bundle (the PSU-side 24-pin run inside the shroud, for example), zip ties are fine and invisible.
GPU power cable routing
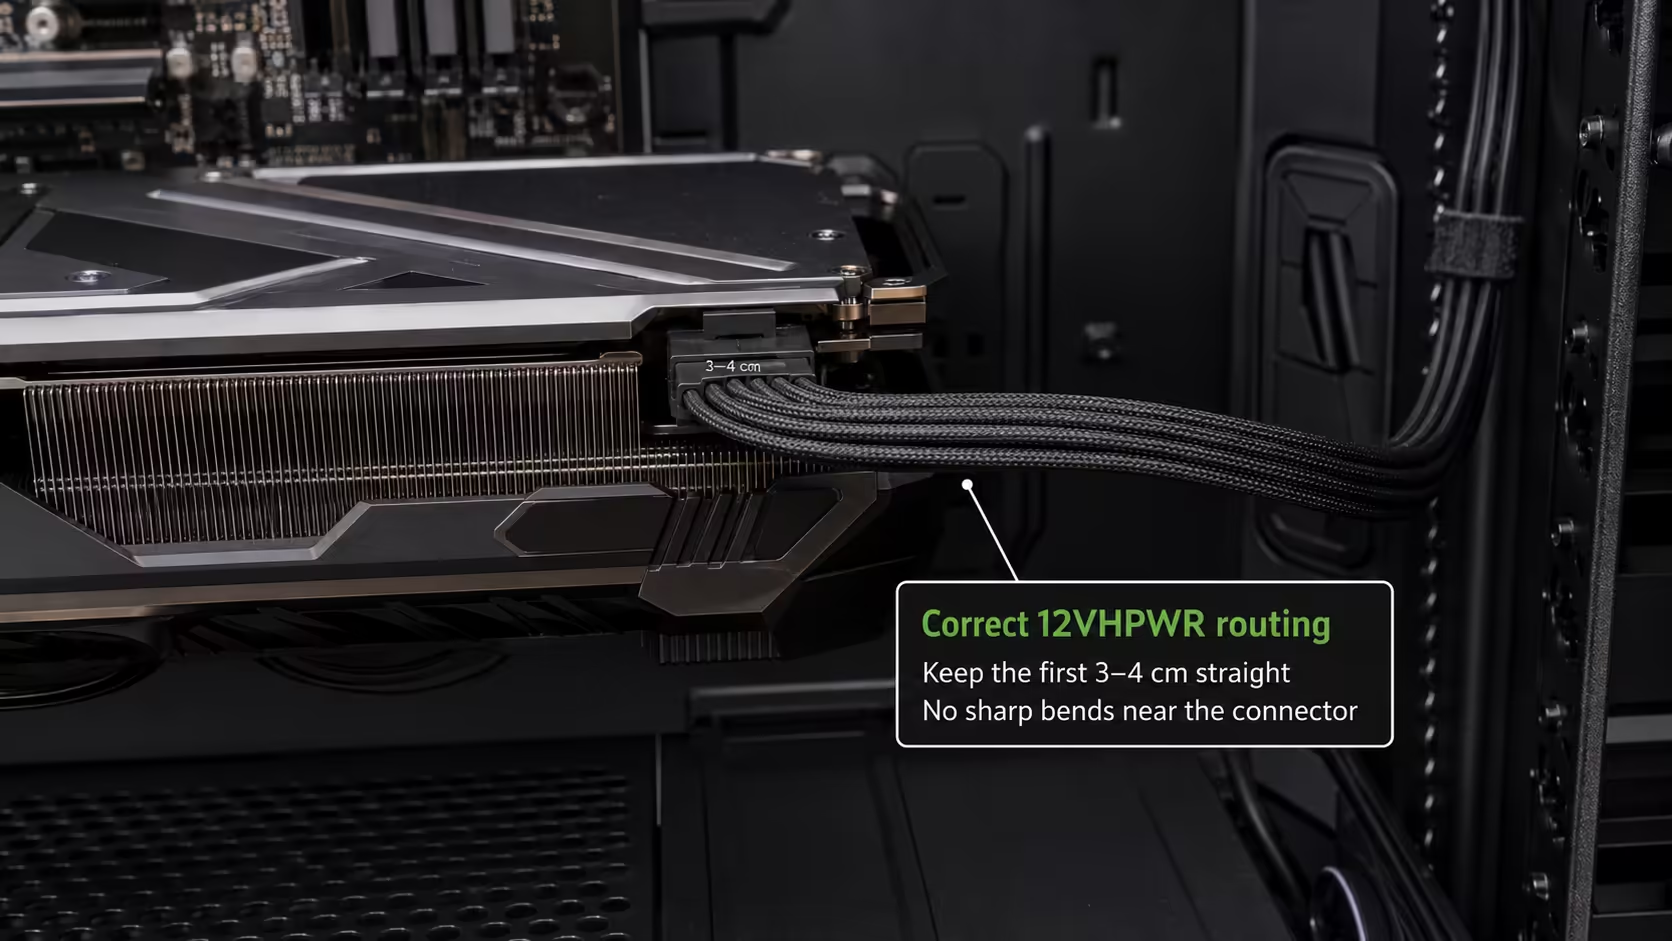
The GPU power cable is the highest-stakes route in the build — modern Nvidia 40-series and 50-series cards use the 12VHPWR (or revised 12V-2x6) connector, and bad routing has been linked to melting incidents.
Standard route: from the PSU (bottom of case, inside shroud) up through the rear channel, then through the upper-right grommet on the motherboard tray, into the GPU's power connector at the top edge of the card.
The 35mm rule for 12VHPWR: avoid any sharp bend within 35mm of the GPU power connector. The connector is fragile if cables are forced into tight angles right at the plug. Leave a gentle natural curve.
For multi-cable GPUs (3x 8-pin)
Older cards or current AMD high-end (RX 9070 XT etc.) often use 2-3 separate 8-pin PCIe connectors. Bundle these together with a single velcro strap behind the tray to keep the run clean, then split apart for the last 80mm before the card.
24-pin and CPU 8-pin routing
24-pin ATX (motherboard main power). Routes from the PSU up through the rear channel, then through the right-side grommet level with the motherboard's 24-pin socket (always on the right edge of the board). This is the fattest cable in the build — make sure your case has enough behind-tray clearance for it to sit without buckling.
CPU 8-pin (EPS). Routes from the PSU all the way up through the rear channel to the top grommet — the cable then emerges at the top of the case and plugs into the EPS socket at the upper-left of the motherboard. This is the longest cable run in most builds; make sure the included cable is long enough (most PSUs ship with 650mm+ EPS cables, but some shorter ones won't reach in larger cases).
SATA cables, fan cables and front panel
SATA data and power. If you have SSDs/HDDs mounted in a drive cage under the shroud or behind the tray, route SATA cables along the rear channel from PSU to drive, then a short SATA data cable from drive up through whichever grommet is closest to the motherboard SATA ports. Secure with velcro along the way.
Case fan cables. Each case fan ships with a 4-pin PWM cable about 400mm long. Route each fan's cable to the nearest motherboard fan header through the closest grommet. If you have more fans than headers (common with 6+ fan builds), use a fan hub like the included one on Lian Li UNI fans or the Corsair iCUE Commander Core.
Front panel cables. The USB 3.2 header, USB-C header, audio HD AC'97, and the front panel switch/LED ribbon all emerge from the front of the case and need to reach motherboard headers along the bottom edge. Bundle these together and route through the bottom-right grommet. The little switch/LED individual leads (PWR, RST, LED+, LED-) are fiddly — most modern motherboards include a quick-connect adapter (ASUS Q-Connector, MSI EZ Front Panel) that lets you wire them up outside the case first, then push the whole block onto the motherboard pins in one move.
Modular PSU advantage
A fully modular PSU only ships with cables connected on the device end; you plug in only the cables you actually need. Non-modular ships with all cables permanently attached — including the SATA and Molex cables you may never use.
| PSU type | Cabling situation | Best for |
|---|---|---|
| Non-modular | All cables permanently attached | Budget builds under R12,000 |
| Semi-modular | 24-pin and EPS hardwired, rest detachable | Most mid-range builds |
| Fully modular | Every cable detachable | R20,000+ builds, glass panel builds |
The bonus with modular: you can buy custom-sleeved replacement cables (CableMod, Phanteks Revolt) in any colour — a popular upgrade for showcase builds. Custom cables are usually R800-R2,500 per set in SA.
The 80/20 rule of cable management
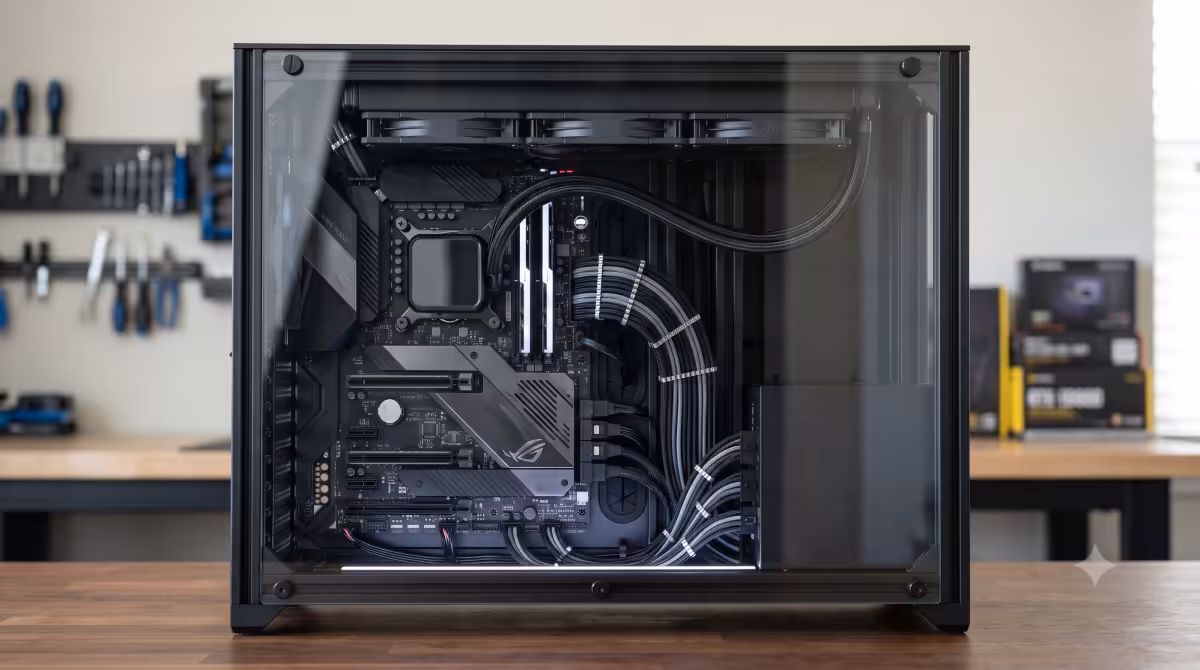
A simple rule that turns OK builds into great ones: 80% of cables hidden behind the motherboard tray; 20% visible on the front side. The visible 20% should look intentional.
The visible cables in a typical build are: the 24-pin entering the right edge of the motherboard, the EPS 8-pin at the top-left, the GPU power cable, and 2-3 fan cables (those connecting fans on the front intake to motherboard headers).
Everything else — SATA cables to drives in cages, USB headers, front panel ribbons, RGB controller cables, fan hub bundles — belongs behind the tray and inside the shroud.
SA case quality factor
Case quality dramatically affects how easy cable management is. The same builder, the same cables, in two different cases can produce wildly different results because the case does (or doesn't) help you.
| Case tier | What you get for cable management | SA price band |
|---|---|---|
| Budget (under R1,000) | 15-18mm behind-tray, 3-4 grommets, no pre-installed velcro | R600-R950 |
| Sweet spot (R1,500-R2,500) | 25-30mm clearance, 5-7 grommets, pre-installed velcro | R1,500-R2,500 |
| Premium (R3,500+) | 35mm+ clearance, dedicated cable bar, quick-release glass | R3,500-R7,500 |
Common cable management mistakes
Plugging everything in first, routing second. Always plug cables into the motherboard before routing them through the rear channel. Trying to push a connector through a grommet first, then plug in, is harder and risks bending pins.
Forgetting the EPS 8-pin before cooler install. The CPU 8-pin connector sits at the top-left of the motherboard. Once a large air cooler is mounted, you may not be able to reach it. Plug it in first.
No service slack. Pulling every cable taut and zip-tying tight feels satisfying — until you upgrade the GPU and discover the 8-pin connector won't reach 20mm further forward. Leave 30-50mm spare at each destination.
Bending 12VHPWR sharp at the GPU. Forcing the new Nvidia power connector into a tight 90° bend at the card has caused melted connectors in some cases. A gentle curve, no sharp bends within 35mm.
Forgetting to plug front panel I/O. The USB 3.2 header, audio header and the tiny switch/LED leads are easy to forget until you press the power button and nothing happens. Always check these before screwing on the side panels.
Cable combs without a flat-cable PSU. Combs only work with flat ribbon-style cables (most modern modular PSUs ship with these). Round cables won't sit straight in a comb.
Key takeaways
- 80% of cables hidden behind the tray; 20% visible on the front, looking deliberate.
- Velcro for cables you'll touch again; zip ties for permanent hidden bundles only.
- GPU 12VHPWR: gentle curve, no sharp bends within 35mm of the connector.
- Plug 24-pin and EPS into the motherboard before mounting the CPU cooler.
- A R1,500-R2,500 mesh-front mid-tower makes cable management dramatically easier than a R750 budget case.
Frequently asked questions
Does cable management actually affect PC temperatures?
Yes — 5-10°C measurable difference under load, plus a long-term effect as dust builds up on tangled cables and progressively chokes airflow.Velcro straps or zip ties?
Velcro for anything you might touch again (GPU power, fans, upgrades). Zip ties for permanent hidden bundles. Most modern cases ship with velcro pre-installed along the rear channel — use those first.How much clearance do I need behind the motherboard tray?
20mm minimum, 25-30mm comfortable, 35mm+ luxury. Premium cases (Lian Li Lancool 216, NZXT H7 Flow, Fractal North) deliver 25-30mm with dedicated channels and pre-installed velcro.What is the PSU shroud and do I need one?
A metal cover over the bottom-mounted PSU hiding excess cabling. Nearly every modern mid-tower ships with one — and the visible front-side build looks much cleaner because of it.How should I route the GPU power cable for the cleanest look?
PSU → rear channel → upper-right grommet → GPU. Gentle curve only — no sharp bends within 35mm of a 12VHPWR connector.What is the 80/20 rule of cable management?
80% of cables hidden behind the tray; 20% visible on the front side. The visible 20% should look intentional — usually 24-pin, EPS, GPU power and 2-3 fan cables.Do I need a modular PSU for good cable management?
Strongly recommended above R20,000 builds. Semi-modular is fine for mid-range; non-modular works but you'll spend extra time hiding unused cables.How long should I leave service slack on each cable?
30-50mm extra at the destination — enough to swap the connector without re-routing everything. Too tight and every future upgrade is a fight.