CPU Cooler Installation
How to install a CPU cooler.
Tower or AIO. Bracket first, paste second, BIOS third.
- then cooler
- Bracket
- paste dot
- Pea-sized
- header
- CPU_FAN
Pre-installation checklist
Before opening the cooler box, make sure the rest of the build is in the right state. Skipping the prep step is the most common reason a 30-minute job turns into a 90-minute job.
State of the build before cooler install:
- CPU installed in the socket, latch closed, no bent pins.
- RAM installed in the correct slots (typically A2/B2 — second and fourth from the CPU).
- Motherboard either still on its anti-static foam mat (for air tower installs) or already mounted in the case (for AIO installs — easier to align the pump head).
- M.2 NVMe SSDs installed under their heatsinks if they sit near the CPU socket (some Z890/X870E boards have an M.2 slot directly under the cooler footprint).
- Cooler unboxed and inventoried — bracket parts, screws, fan clips, thermal paste sachet (if included), instruction manual.
Tools you need: Phillips #2 screwdriver, anti-static wristband (or touch the bare PSU shell to ground), microfibre cloth, 99% isopropyl alcohol (for cleaning paste if you reposition). That's it.
Removing the stock bracket (if needed)
Whether you remove the stock retention bracket depends on the platform:
- Intel LGA 1700 / LGA 1851 — there is no stock retention bracket on the motherboard. Aftermarket coolers ship with a backplate that goes behind the motherboard (typically requires removing the motherboard from the case if it's already installed, unless your case has a backplate cutout — which all modern mid-towers do).
- AMD AM5 — most boards ship with the stock plastic retention bracket installed. Many aftermarket coolers (Arctic Freezer, Be Quiet Dark Rock series, Noctua mid-tier) use this stock bracket and don't need it removed. Premium AM5 coolers (top Noctua, Thermalright Phantom Spirit, certain large Thermalright models) require removing the stock bracket and installing their own.
To remove the AMD stock bracket: unscrew the four cross-head screws (two on each side), lift the plastic bracket off, set the backplate aside (you'll reuse it). Don't lose the screws — sometimes the aftermarket cooler manual says to reuse them with a different bracket.
Installing the aftermarket bracket
The bracket is the foundation. Get this wrong and the cooler will sit at an angle, paste won't spread evenly, and your temps will be 10-15°C higher than they should be.
For Intel LGA 1700 / LGA 1851:
- Identify the correct standoff height for your socket (usually marked on the standoff itself — LGA 1700 vs LGA 1851 may use different heights).
- Screw the standoffs into the backplate.
- Place the backplate behind the motherboard (your hand from the back of the motherboard, motherboard flat on a soft surface or in the case via the cutout).
- Pass the standoffs through the four mounting holes around the CPU socket.
- From the front, secure the bracket arms with the included thumb nuts or screws.
For AMD AM5 (when using cooler's own bracket):
- Remove the stock plastic retention bracket (described above).
- The AM5 backplate behind the motherboard usually stays in place — verify with cooler manual.
- Place the cooler's metal bracket arms above the socket, aligning with the four mounting holes.
- Secure with the included screws into the backplate.
- Tighten in a star pattern (opposite corners) until snug, then a quarter-turn more.
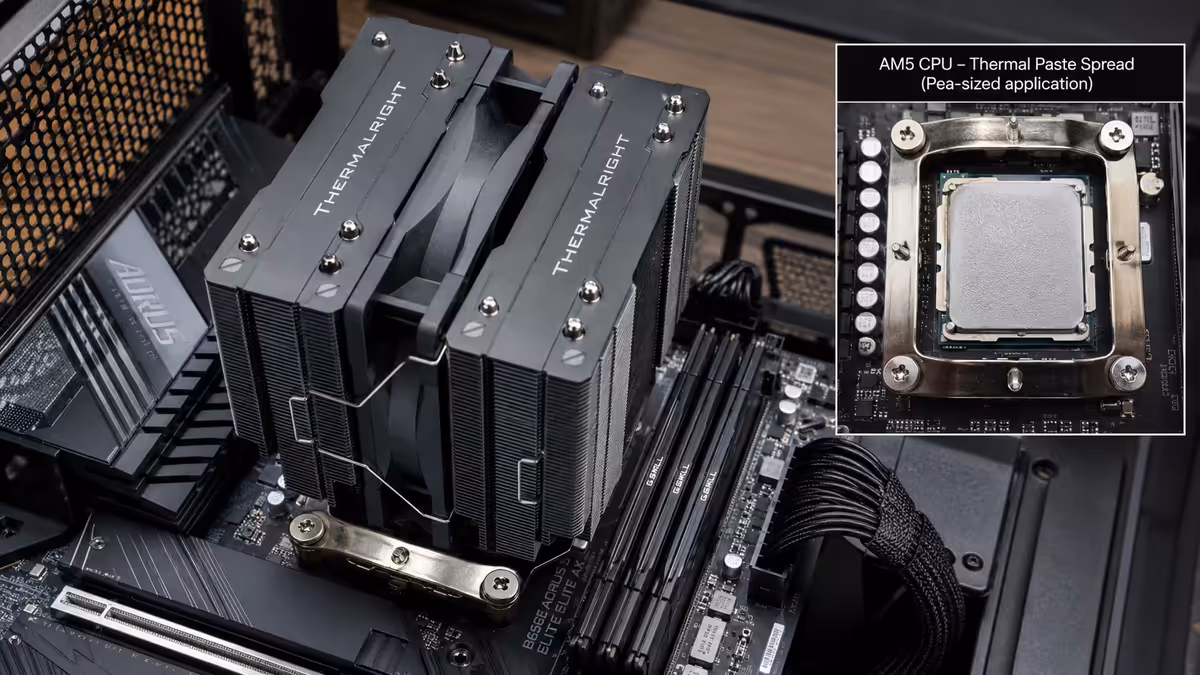
Thermal paste — pea method wins
There are a hundred forum threads arguing about paste application methods. In tens of thousands of builds, the answer is simple:
Apply a pea-sized dot in the geometric centre of the CPU heat spreader. The cooler's downforce will spread the paste into a thin, even layer when mounted.
Why pea is best:
- Even spread from centre outward — the desired pattern
- Too much paste squeezes out and pools at IHS edges (can short components on cheap motherboards)
- Pre-spreading with a card introduces air pockets that hurt thermal transfer
- X-pattern, line method, dot-in-corners all converge to essentially the same result — pea is just easier and consistent
If your cooler shipped with pre-applied paste (common on Arctic Freezer, Deepcool AK, mid-tier bundled coolers), use it as-is for the first install. Skip the manual paste step. Pre-applied paste is good for one mount cycle — if you ever remove the cooler, clean and apply fresh paste.
Installing an air tower cooler
Air towers (Noctua NH-D15, Thermalright Phantom Spirit 120 EVO, Deepcool AK620, Be Quiet Dark Rock Pro 5) are the workhorses of the cooler world. Up to 230W TDP capacity, near-silent operation, no failure points.
Step-by-step:
- Verify bracket orientation. Most coolers have an arrow on the bracket — points towards the rear case exhaust, so the heatsink fans push air front-to-back.
- Remove the centre fan from the heatsink (if pre-attached) so you can access the mounting screws between the fin stacks. Most twin-tower coolers require this.
- Apply the pea-sized paste dot.
- Lower the heatsink onto the bracket until the spring-loaded screws line up with the threaded posts. Don't drop it — gentle descent.
- Tighten the screws finger-tight in a star pattern, then quarter-turn each with a long Phillips screwdriver until they stop turning easily.
- Re-attach the centre fan using the wire clips. Ensure fan blows in the same direction as airflow (towards rear exhaust).
- Plug fan cable into CPU_FAN header.
Common air tower issue — RAM clearance. Big twin-tower coolers (especially NH-D15, Phantom Spirit 120 EVO) hang over the closest RAM slot. If your RAM has tall heatspreaders or RGB modules, the cooler centre fan may need to be raised 5-10mm or moved to the rear of the heatsink. Check cooler manual for the "tall RAM" mode.
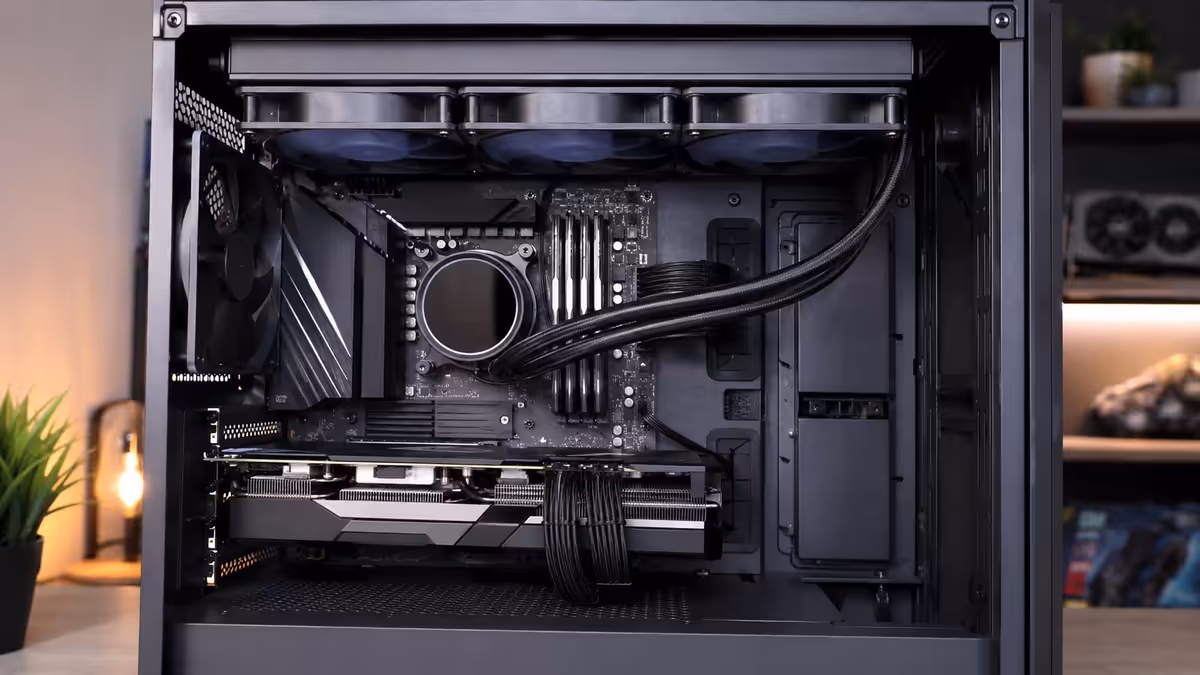
Installing a 240mm / 360mm AIO
AIO liquid coolers (Arctic Liquid Freezer III, Corsair iCUE H150i, NZXT Kraken Elite, Lian Li Galahad) handle 230-300W+ TDP and stay quieter than air at high sustained loads. Installation is more involved than air but follows the same principles.
Step-by-step:
- Decide radiator location. Top of case (preferred — easier, better airflow path), front of case (cooler intake air but radiator heat dumps into case), bottom (only Lian Li O11 Dynamic and similar — fine if supported).
- Mount fans on the radiator first. Decide push (fans below radiator pushing air through it upward to exhaust) or pull (fans above radiator). For top-mounted exhaust, fans go below the radiator, on the inside of the case. Use the longer screws included with the AIO (typically 30mm) to pass through the fans into the radiator threads.
- Mount the radiator + fan assembly into the case using the shorter case screws into the radiator's outer mounting holes.
- Install the pump head bracket on the motherboard as per the cooler manual (similar to air bracket procedure).
- Apply the pea-sized paste dot on the CPU IHS.
- Drop the pump head onto the bracket — most AIOs use a click-rotate-lock mechanism or spring-loaded screws.
- Route the tubes so they don't kink, don't block RAM, and the radiator inlet/outlet matches the orientation specified (some AIOs require pump-below-radiator orientation to avoid air pockets).
- Plug the pump cable into CPU_FAN, radiator fans into CPU_OPT or AIO_FAN headers, RGB cable if present.
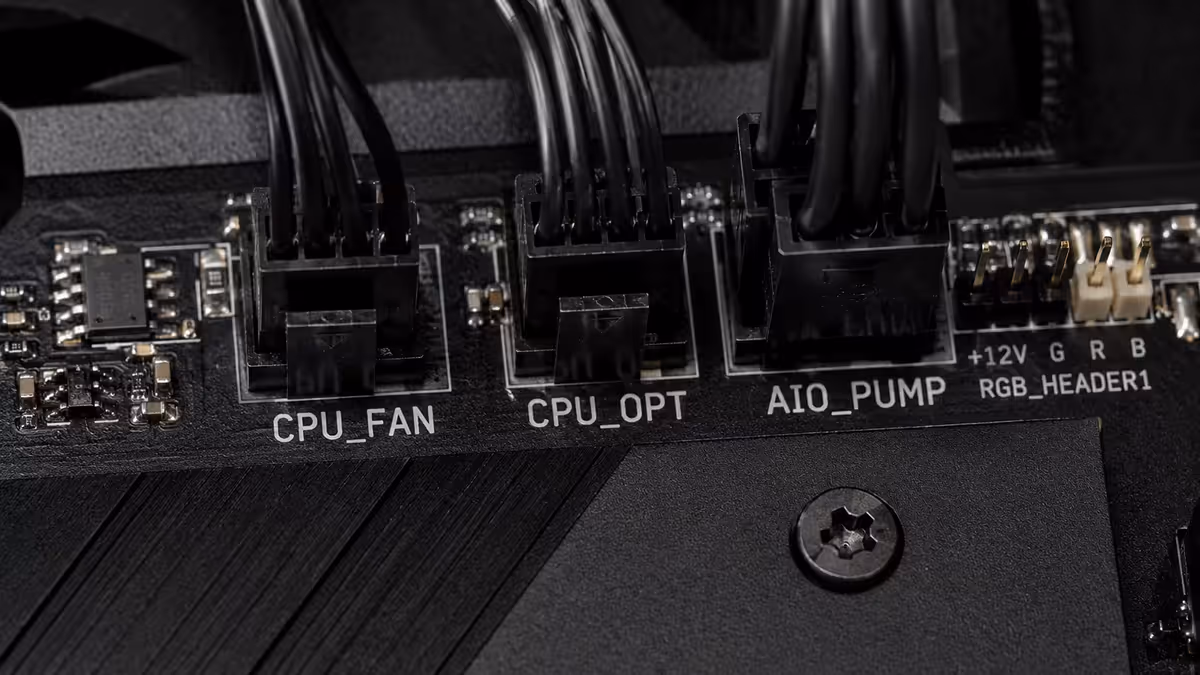
Cable management — CPU_FAN vs CPU_OPT
Where you plug each cable matters more than people realise. The motherboard's BIOS uses CPU_FAN to monitor cooler health — if it sees no RPM signal on CPU_FAN at boot, it logs a fan-fail warning every time you turn the PC on.
The header map (typical modern motherboard):
- CPU_FAN — air tower fan, OR AIO pump cable. The one cable the BIOS pings for the boot-time fan-fail check.
- CPU_OPT — optional CPU fan, typically second air tower fan (if dual-fan), or AIO radiator fan #1. Same PWM curve as CPU_FAN.
- AIO_FAN / WATER_PUMP+ — premium boards may include dedicated AIO headers. Pump goes to AIO_PUMP (always full PWM), fans to AIO_FAN (curve-controlled).
- SYS_FAN / CHA_FAN / CHASSIS_FAN — case fans (intake, exhaust). NOT for CPU cooler use.
For an AIO with 3 radiator fans: daisy-chain the fans using a fan-splitter cable (often included with the AIO), plug the splitter into CPU_OPT. This way all three fans share the same PWM signal and rev together.
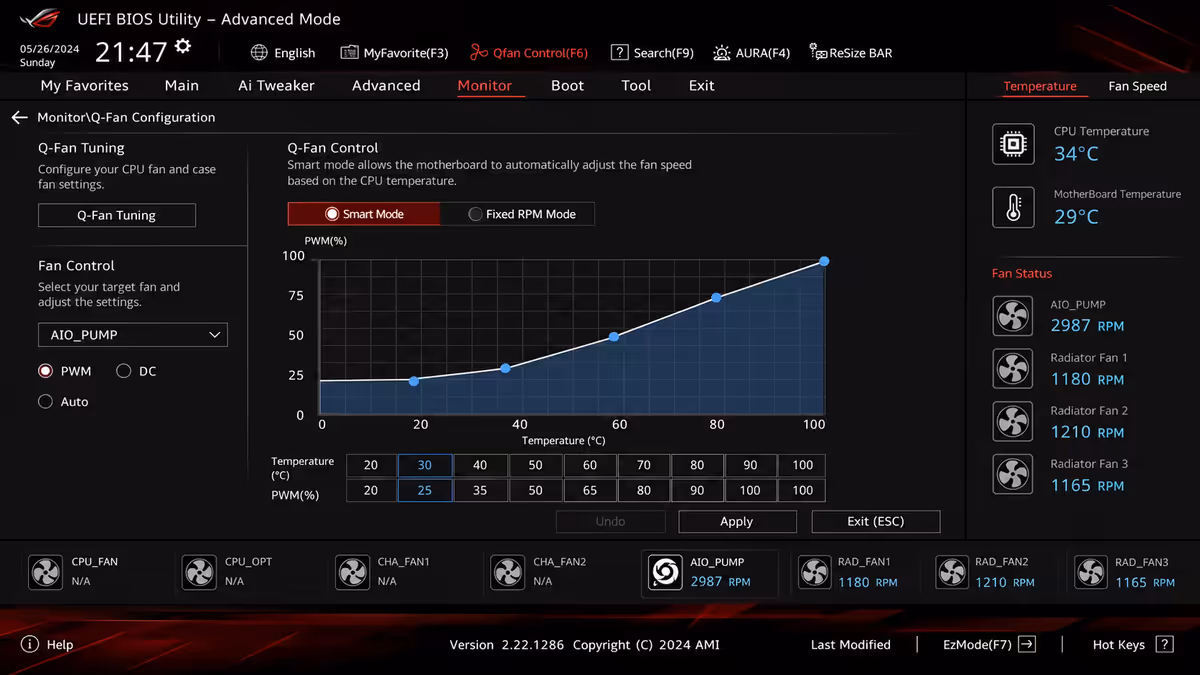
Verifying pump RPM in BIOS
First boot after install — go directly into BIOS (press DEL or F2 repeatedly at POST). Find the hardware monitor / fan control / Q-Fan / Smart Fan section.
What to check:
- CPU_FAN RPM — should show a reading. For air cooler fan, typically 600-1500 RPM idle. For AIO pump, typically 2500-3500 RPM at full PWM.
- CPU temperature — at idle in BIOS, should be 35-50°C for most modern CPUs. Above 70°C in BIOS suggests poor mounting or paste issues.
- Fan curve settings — for AIO pumps, set the pump header to "Full Speed" or "Performance" mode (never PWM curve below 80%). For radiator fans, a moderate curve like 30% at 40°C ramping to 100% at 80°C is a good starting point.
If CPU_FAN shows 0 RPM: shut down, check the cable is fully seated on the CPU_FAN header (not CPU_OPT). Verify the cable is the pump cable, not just a fan power cable. Most pump cables have 3 pins that go onto a 4-pin header — that's correct, the 4th pin is PWM signal which the pump may not use.
Re-paste if you remove the cooler
If for any reason you lift the cooler off after first mount — to fix a cable, reposition the radiator, swap RAM — you must apply fresh thermal paste before remounting. This is non-negotiable.
Why: once paste has been compressed and heated, its microstructure changes. The polymer carrier separates slightly, the conductive particles redistribute, and the spread pattern won't re-form correctly on remount. You'll get patchy contact and temperatures 5-10°C higher than with fresh paste.
The remount procedure:
- Lift the cooler straight up (don't twist if you can avoid it — twisting helps if it's stuck, but only after first lifting straight).
- Wipe the cooler cold plate with 99% isopropyl alcohol on a microfibre cloth.
- Wipe the CPU IHS the same way.
- Wait 30-60 seconds for IPA to fully evaporate.
- Apply a fresh pea-sized dot.
- Remount per the original instructions.
Common CPU cooler mistakes
Plugging the pump into CPU_OPT instead of CPU_FAN. Single most common warranty intake reason. BIOS posts a fan-fail warning on every boot, AIO still works, but the warning persists until corrected. 90-second fix: unplug from CPU_OPT, replug into CPU_FAN.
Over-tightening mounting screws. Modern coolers have spring-loaded screws that bottom out — once they stop turning easily, stop. Continuing to crank can warp the motherboard PCB and cause subtle electrical issues that surface months later.
Too much thermal paste. A generous blob is not "extra insurance" — it's actively worse. Excess paste squeezes out around the IHS edges, pools on the motherboard surface, and can short SMD components below the socket. Pea-sized dot. Never more.
Bracket orientation wrong. Aircooler bracket arrow points wrong direction, AIO tubes go up instead of down. Both are easy to misread on first install. Re-read the cooler manual page-by-page before tightening.
Forgetting to remove the protective plastic from the cold plate. Some AIOs and air coolers ship with a thin protective film on the cold plate. If you mount the cooler with that film still on, you'll get terrible thermal contact. Always check the cold plate is bare metal/copper before applying paste.
Not setting AIO pump to full PWM in BIOS. Most boards default the AIO_PUMP header to a PWM curve. AIO pumps should run constant at full PWM (or "Performance" mode) — variable pump speed introduces micro-stuttering of coolant flow and inconsistent CPU temps.
Mixing up which header is CPU_FAN. Some motherboards have CPU_FAN labelled clearly; others have it in a tight cluster of similar headers. Use the motherboard manual to verify before plugging anything in.
Key takeaways
- Bracket first, paste second, cooler third. Read the manual before opening packaging.
- Pea-sized paste dot in the centre. Never more. Cooler pressure spreads it.
- Tighten in a star pattern, finger-tight + quarter-turn. Stop when screws stop turning.
- Pump or main fan to CPU_FAN. Radiator fans to CPU_OPT. Set pump header to Full Speed in BIOS.
- Re-paste every time you remove the cooler. No shortcuts — 30 seconds saves 10°C.
Frequently asked questions
Should I install the CPU cooler before or after putting the motherboard in the case?
Bracket and (for AIO) pump head before motherboard goes in the case for easier access. Air tower coolers — fit after the motherboard is in the case. AIO radiators — mount in the case first, then pump head onto motherboard.How much thermal paste do I apply for a CPU cooler?
A pea-sized dot in the centre. The cooler pressure spreads it evenly. Too much pools at the IHS edges and risks shorting socket components.Which fan header does the CPU cooler plug into?
Air tower fan → CPU_FAN. AIO pump → CPU_FAN. AIO radiator fans → CPU_OPT or AIO_FAN. Wrong header causes BIOS fan-fail warning on every boot.How tight should the CPU cooler mounting screws be?
Finger-tight + quarter-turn in a star pattern. Modern spring-loaded screws bottom out — once they stop turning easily, stop. Over-tightening warps the motherboard.Do I need to remove the stock AMD or Intel bracket before installing an aftermarket cooler?
Intel LGA 1700/1851 — no stock bracket; aftermarket cooler ships with backplate. AMD AM5 — most coolers use the stock retention bracket; premium aftermarket may require removing it. Always check cooler manual.What's the best AIO radiator mounting position — top or front of case?
Top mount with radiator-as-exhaust is preferred for SA's warmer ambient temperatures. Front mount is fine but recirculates hot radiator air into the case.How do I verify the AIO pump is running after installation?
In BIOS, hardware monitor / Q-Fan tab. Pump RPM should read 2500-3500 at full PWM. If 0 RPM shown, the cable is on the wrong header — usually CPU_OPT instead of CPU_FAN.Do I need to repaste if I remove the cooler to check the orientation?
Yes, always. Once paste has been compressed, the microstructure changes and won't re-spread evenly. Clean with 99% IPA, apply fresh pea-sized dot, remount.