Install How-To · RAM
How to install RAM. — A2 and B2. Both clips lock. XMP on.
Two clicks and a BIOS toggle. The step that seems trivial but is the #1 "PC won't boot" cause when done wrong — almost always because the RAM looks seated but isn't.
- 2-stick slots
- A2 + B2
- both must lock
- 2 clips
- install time
- 60 sec
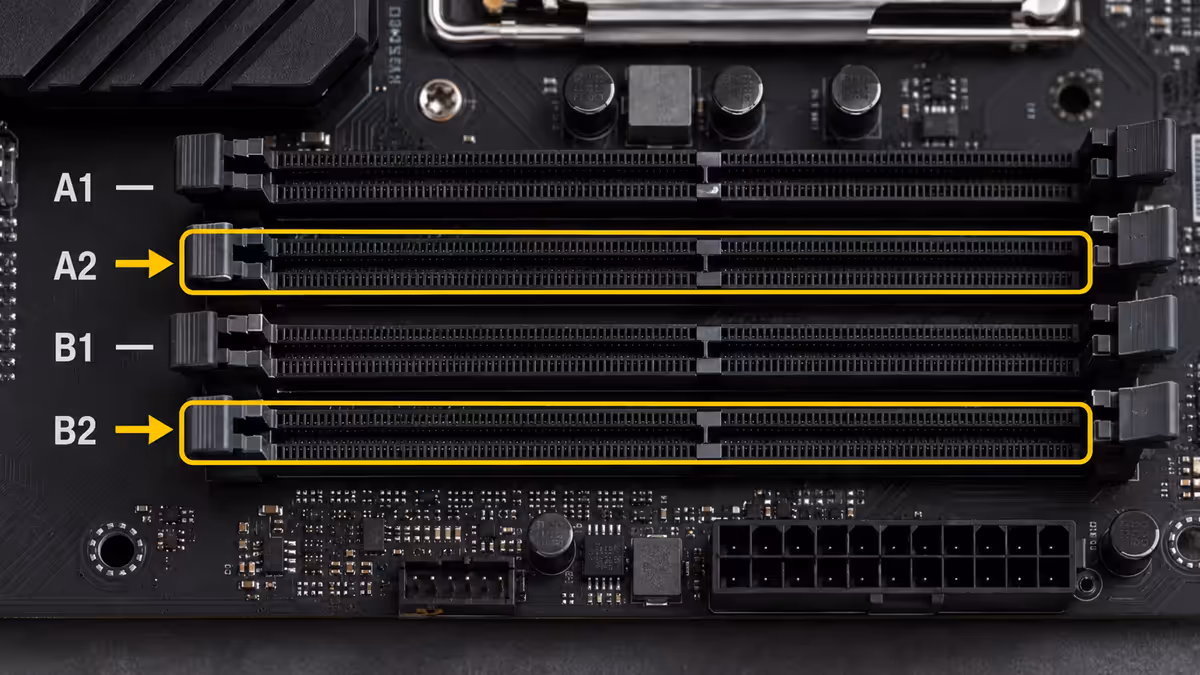
Which slots to use — A2 and B2 for 2-stick kits
Modern desktop motherboards have four DIMM slots in a row, labelled (depending on brand) as A1, A2, B1, B2 or DIMM_A1, DIMM_A2, DIMM_B1, DIMM_B2. When counting from the CPU outward, the typical pattern is:
| Position from CPU | Slot label | 2-stick kit | 4-stick kit |
|---|---|---|---|
| 1st (closest to CPU) | A1 / DIMM_A1 | Empty | Use |
| 2nd | A2 / DIMM_A2 | Use | Use |
| 3rd | B1 / DIMM_B1 | Empty | Use |
| 4th (furthest from CPU) | B2 / DIMM_B2 | Use | Use |
Why A2 and B2 specifically? The A2/B2 slots have shorter signal traces to the CPU's memory controller, improving signal integrity at the high DDR5 speeds modern kits run at. Running 2 sticks in A1/B1 still works but may limit maximum stable RAM speed — your DDR5-6000 kit might only run stably at DDR5-5600 in the wrong slots.
Why dual-channel matters
Dual-channel memory doubles your memory bandwidth versus single-channel. With 2 sticks correctly placed in A2/B2, the CPU reads from both sticks simultaneously through 2 separate 64-bit memory channels — effectively a 128-bit total bus.
| Configuration | Bandwidth | Gaming impact | Productivity impact |
|---|---|---|---|
| 1 stick (single-channel) | 32 GB/s | -10 to -15% FPS | -20 to -40% perf |
| 2 sticks A2/B2 (dual-channel) | 64 GB/s | Baseline | Baseline |
| 2 sticks A1/B1 (dual-channel, slow) | ~60 GB/s | -1 to -3% FPS | Same |
| 4 sticks A1/A2/B1/B2 | 64 GB/s + capacity | Same as 2-stick | More headroom |
Real-world impact: in CPU-bound games (CS2, Cyberpunk 2077 with RT, Baldur's Gate 3), the difference between single-channel and dual-channel can be 15-25% lower FPS. In productivity (DaVinci Resolve, Premiere Pro, Blender, large web apps), single-channel often runs 30-40% slower than dual-channel.
The 5 install steps
- 1
Locate slots A2 and B2 on the motherboard
Find the four DIMM slots (a row of long thin slots near the CPU). Identify the 2nd and 4th slot from the CPU. Some boards print "DIMM_A2" and "DIMM_B2" directly on the PCB next to the slots. - 2
Open the side clips on both target slots
At each end of slots A2 and B2, find the side clip — a small plastic lever that holds the RAM in place. Press it outward to open. Some motherboards have clips on only one side (the other side has a fixed pivot point) — that's normal. - 3
Match the RAM notch to the slot key
Look at the RAM's gold contact edge — there's a notch (gap) at one specific position. The DIMM slot has a matching key (raised bump) in the same position. The notch and key only align in one orientation — if it doesn't match, flip the RAM 180°. - 4
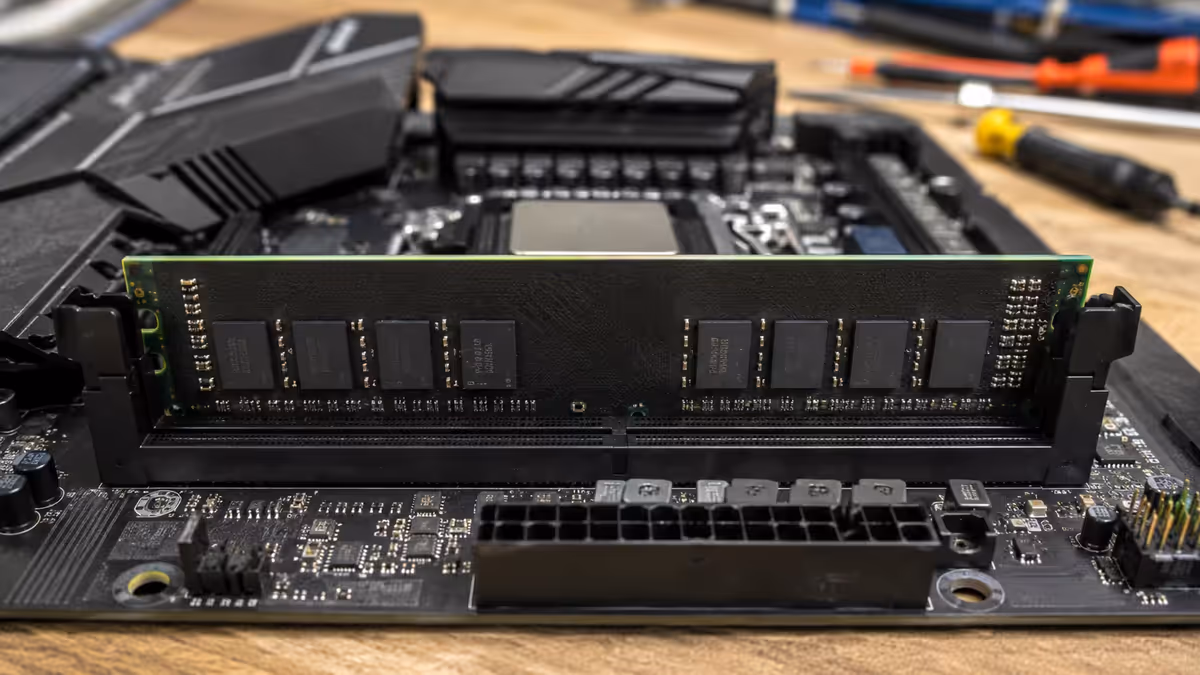
Press down on both ends until both clips lock
With notch aligned, push down evenly on both ends of the RAM. It needs firm pressure — much more than first-time builders expect. You'll feel resistance as contacts engage, then a click as each clip snaps upright. Both clips MUST end up upright and parallel to the slot edge. Half-locked = won't boot. - 5
Enable XMP / EXPO on first boot
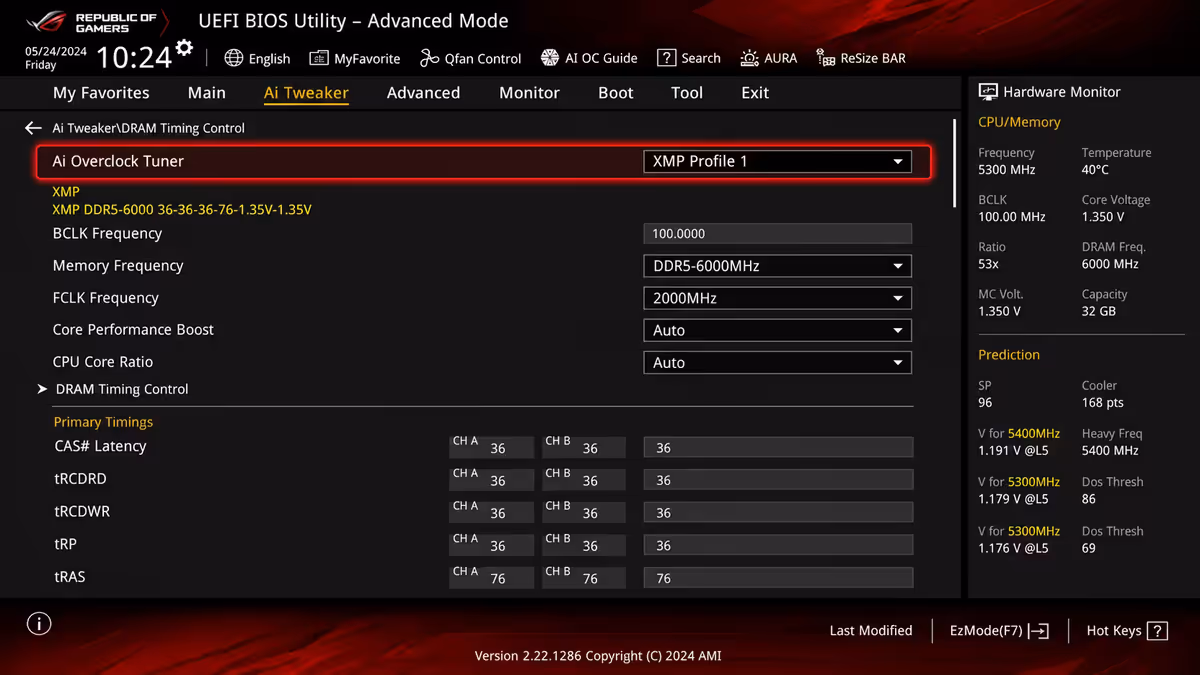
On first boot, press Del during POST to enter BIOS. Find the XMP (Intel) or EXPO (AMD) setting — usually on the front page or under "Memory" / "OC". Set to "Profile 1" or "Enabled". Save and reboot. Your RAM now runs at its rated speed. Without this step, fast RAM runs at slow JEDEC defaults.
XMP / EXPO — the BIOS step you can't skip
Modern RAM kits (DDR5-6000, DDR5-7200, etc.) are sold with rated speeds far above the JEDEC standard. JEDEC is the "guaranteed safe" speed every motherboard runs RAM at by default — typically DDR5-4800 or DDR5-5200. Your DDR5-6000 kit runs at DDR5-4800 until you enable XMP/EXPO.
Where to find it:
- ASUS / ASRock motherboards: "AI Tweaker" or "OC" tab → "Ai Overclock Tuner" → set to "XMP I" or "EXPO".
- MSI motherboards: "OC" tab → "DRAM Setting" → "XMP" or "EXPO" → enable.
- Gigabyte motherboards: "Tweaker" tab → "Extreme Memory Profile (X.M.P.)" → set to Profile 1.
After enabling: save and exit BIOS. The PC reboots. Re-enter BIOS to verify the new speed is shown (your DDR5-6000 kit should now read 6000 MT/s or close). If the PC fails to boot after enabling XMP, the RAM kit may not be on your motherboard's QVL — try EXPO Profile 2 if available, or manually tune lower.
Verify it's installed correctly
Three checks:
- Both side clips upright and parallel. Look at each end of each RAM stick. Clip should be at 90° to the motherboard surface, not at any angle.
- RAM sits flush in the slot. No visible gap on either end between the RAM and the slot edge.
- BIOS reports correct total capacity. If your kit is 2×16GB = 32GB, BIOS should show 32GB total. Less = a stick isn't being detected.
Common RAM install mistakes
Half-locked clips. RAM looks seated but clips are at an angle. PC won't boot. Look closely at every clip before powering on.
Wrong slots. Using A1/B1 instead of A2/B2. PC boots and works but RAM may not hit rated speed. Always check the manual.
Forcing wrong orientation. If the notch doesn't align, the RAM is backwards. Flip 180° and try again. Forcing can damage the slot or the RAM contacts.
Mixing kits. Two different kits of the same brand and speed often won't work together. Buy a single matched kit (2 sticks or 4 sticks).
Forgetting XMP / EXPO. Your DDR5-6000 kit runs at DDR5-4800 until you enable the profile. Most common "my fast RAM doesn't feel fast" complaint.
If the PC won't boot after RAM install
Work through these in order — one of them is your issue:
- Reseat the RAM. Open clips, remove RAM, reseat with firmer pressure. Verify both clips lock upright. This fixes ~70% of post-RAM-install boot failures.
- Try one stick at a time. Install just one stick in slot A2. Try to boot. If it boots, the other stick may be defective or seated wrong.
- Move to different slots. Try A1+B1 instead of A2+B2 to rule out a faulty slot. If it boots in A1/B1, contact retailer about the A2/B2 slot issue.
- Clear CMOS. Use the motherboard's CLR_CMOS jumper, or remove the CR2032 coin battery for 30 seconds, then reinstall. This resets BIOS to defaults — sometimes a stuck XMP setting prevents POST.
- BIOS update. If using newest CPU + newer RAM kit on an older motherboard, the BIOS may not support the RAM's profile. Use BIOS Flashback feature if available.
Key takeaways
- Slots A2 and B2 for 2-stick kits. A1+A2+B1+B2 for 4-stick kits. Check the motherboard manual to confirm.
- RAM requires firmer pressure than first-time builders expect. Both clips must lock upright and parallel.
- Notch on RAM = key in slot. Only one orientation fits. Never force.
- Enable XMP (Intel) or EXPO (AMD) in BIOS on first boot to unlock rated RAM speed.
- ~28% of post-build "won't boot" calls trace to half-seated RAM. Always verify both clips visually.
Frequently asked questions
Which RAM slots do I use for 2 sticks?
A2 and B2 — the 2nd and 4th DIMM slots from the CPU. Confirms dual-channel and maximises stable RAM speed.Why use A2 and B2 instead of A1 and B1?
A2/B2 have shorter signal traces to the CPU's memory controller, improving signal integrity at high DDR5 speeds. A1/B1 still works but may limit max stable speed.How hard should I press RAM into the slot?
Firmly with even pressure on both ends. Much firmer than first-timers expect. Motherboard PCB flexes slightly — normal. Both clips MUST lock upright.What's the difference between dual-channel and single-channel?
Dual-channel doubles bandwidth. Single-channel costs 10-15% FPS in games and 20-40% in productivity. Always run dual.Can I mix different RAM kits?
Strongly not recommended. Even same-brand same-speed mixed kits can boot-fail or default to slowest speeds. Buy matched kits.What is XMP / EXPO and why do I need to enable it?
Pre-tuned overclock profiles built into your RAM. Without them, DDR5-6000 defaults to DDR5-4800. Enable on first boot in BIOS to unlock rated speed.How do I know my RAM is installed correctly?
Both clips upright and parallel, no gap between RAM and slot, BIOS reports correct total capacity (e.g., 32GB for a 2×16GB kit).My PC doesn't boot after RAM install — what now?
Reseat with firmer pressure (70% of cases). Try one stick at a time. Move slots. Clear CMOS. BIOS update if needed.