First-Boot Guide
Install Windows on a new build. — USB stick to desktop. Step by step.
Your fresh PC has no operating system. Power-on shows a black screen and a BIOS beep. Here's the path from blank SSD to working Windows 11 desktop — without confusion, without guesswork.
- USB Installer
- 15 min
- Windows Install
- 20-30 min
- Drivers (2026)
- Auto
Before you start: what you need
A fresh PC build doesn't ship with an operating system. The first power-on takes you to BIOS or a "No bootable device" error — that's normal. Before the new PC boots Windows, you need to give it the installer. Gather:
- A second working PC or laptop (Windows, Mac or Linux all work) for creating the installer.
- A USB stick — 8 GB minimum, ideally 16 GB. The Media Creation Tool wipes the stick completely, so use a spare or empty one.
- A Windows 11 product key (Home or Pro OEM, R1,500-R2,400 from authorised SA retailers).
- Ethernet cable or Wi-Fi credentials ready for first boot — Windows Update and activation need internet.
- Your monitor connected to the GPU (not the motherboard's HDMI/DP unless you have no discrete GPU).
Buy a legitimate Windows licence
SA Windows 11 pricing in May 2026 from authorised sources:
| Source | Edition | SA price |
|---|---|---|
| Evetech (with PC build) | Windows 11 Home OEM | R1,500-R1,800 |
| Evetech / Wootware / Rebel Tech | Windows 11 Pro OEM | R2,000-R2,400 |
| Microsoft Store direct | Windows 11 Home retail | R2,800-R3,000 |
| Microsoft Store direct | Windows 11 Pro retail | R3,200-R3,500 |
| Takealot tech specialists | Windows 11 Home/Pro OEM | R1,600-R2,400 |
OEM vs Retail: OEM keys are bound to the first PC they activate on (tied to the motherboard) — fine for a new build you don't plan to migrate. Retail keys can transfer between PCs by deactivating on the old machine first. For a single build, OEM is cheaper and sufficient.
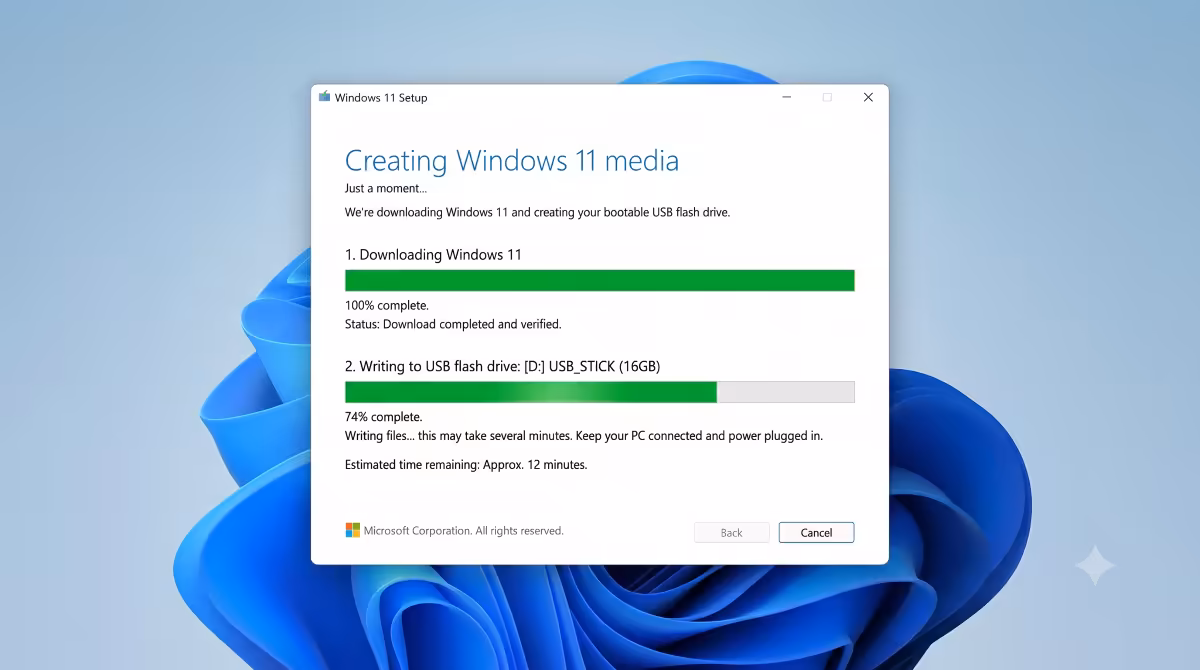
Create the USB installer
Microsoft's Media Creation Tool does everything — downloads Windows, formats the USB, writes the bootable image. Free, official, no third-party tools needed.
- On your working PC, visit microsoft.com/en-gb/software-download/windows11.
- Scroll to "Create Windows 11 Installation Media" and click Download Now.
- Run
MediaCreationTool.exe. Accept the licence terms. - On the "Select language and edition" screen, pick English (United Kingdom) or English (United States) — there's no separate SA English ISO. We'll set region during install.
- Choose USB flash drive as the media type.
- Insert your USB stick. Pick it from the list. Confirm — all data on the stick will be erased.
- Tool downloads ~7 GB of Windows files (15-20 minutes on decent ADSL/fibre), writes them to USB, finishes. Stick is now bootable.
Eject the USB safely (Safely Remove Hardware), unplug from source PC, plug into the new PC's rear USB port (front-panel USB sometimes has slower data lines).
BIOS boot priority — get the PC to boot the USB
Out of the box, the new PC tries to boot from its empty NVMe SSD, fails, and sits at "No bootable device" or "Reboot and select proper boot device". You need to tell BIOS to try the USB first.
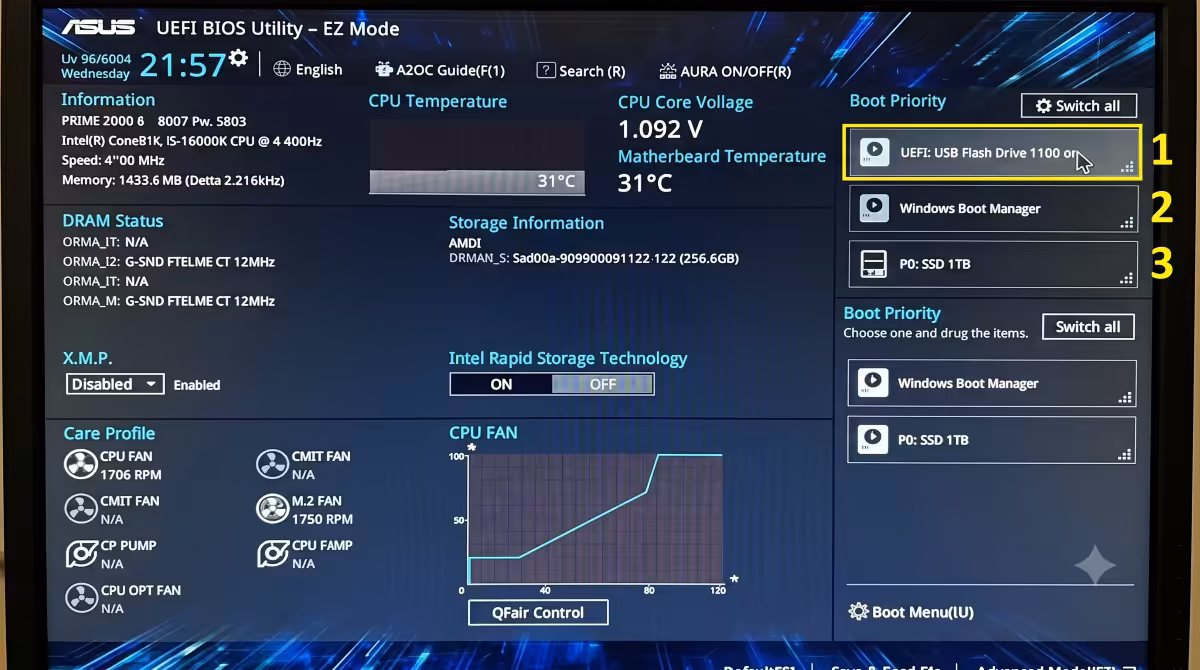
- With USB installer plugged in, power on the PC.
- During the boot logo (motherboard brand splash), hammer Del (ASUS, Gigabyte, MSI, ASRock standard) or F2 (some Intel boards). One of them enters BIOS.
- BIOS opens in a friendly EZ Mode on most modern boards. Find the Boot Priority or Boot Order section — usually a list of drives.
- Drag the USB drive (often shown as the manufacturer's name — "SanDisk", "Kingston", "PNY") to the top of the boot order.
- Press F10 to save and exit. Confirm. The PC reboots.
After reboot, you'll see "Press any key to boot from USB". Press any key within 5 seconds. The Windows 11 installer's blue logo appears.
Faster alternative: instead of editing boot order permanently, hit F8 (ASUS, Gigabyte) or F11 (MSI, ASRock) during boot logo to open a one-time boot menu. Pick the USB, hit Enter — boots USB just this once and leaves BIOS settings untouched.
Windows 11 installer — step by step
From the USB boot screen, the installer flow is:
- Language, time format, keyboard: Pick English (United Kingdom), Time format English (South Africa), keyboard United Kingdom (SA uses UK layout). Click Next.
- Install Now — click the big button.
- Product key: Either enter your 25-character key now, or click "I don't have a product key" to skip and activate later (does not skip the licence — you still have to activate).
- Edition selection: Pick the edition matching your licence — Windows 11 Home or Windows 11 Pro. Pick wrong and activation fails.
- Licence terms: Tick "I accept", Next.
- "Which type of installation?": Pick Custom: Install Windows only (advanced). Never pick Upgrade on a fresh build.
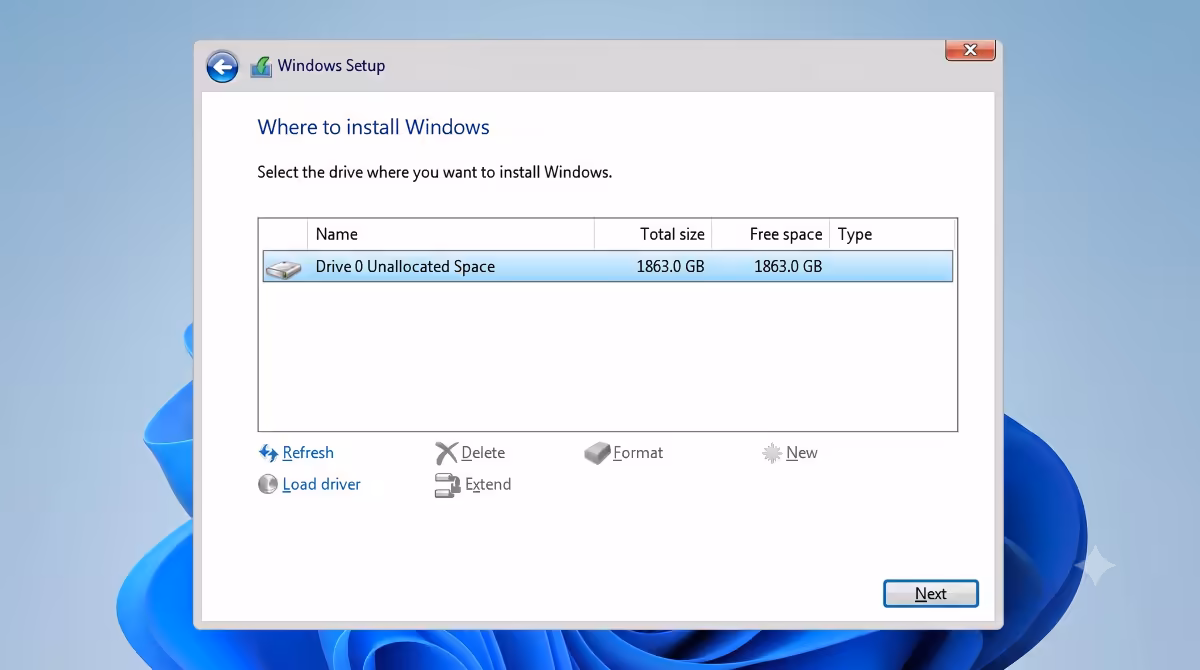
- "Where do you want to install Windows?": Your new NVMe SSD shows as "Drive 0 Unallocated Space". Click it once to select. Click Next. Don't manually create partitions — let Windows do it.
- Installation runs: 20-30 minutes copying files, installing features, restarting twice. The PC reboots itself; leave the USB in for now, but when the Windows logo appears with a spinning circle (not the installer), the USB has finished its job.
Custom Install vs Upgrade
The installer offers two install types:
- Upgrade: Installs a newer Windows version over an existing one, keeping files, apps and settings. Requires an existing Windows install on the drive. On a fresh build the SSD is blank — Upgrade will either fail immediately or hang at file copy. Don't pick it.
- Custom: Install Windows only (advanced): Treats the drive as blank, lets you choose install location and partitioning. Always pick this on a new build.
Drive partitioning — let Windows handle it
On the "Where do you want to install Windows?" screen, an empty SSD shows as a single row: "Drive 0 Unallocated Space, 1863.0 GB" (for a 2TB drive). Click the row to select, click Next. Done.
Don't manually create partitions. Windows 11 needs a specific GPT/UEFI layout with an EFI boot partition, Microsoft Reserved Partition, primary Windows partition and recovery partition. The installer creates all four correctly when you give it Unallocated Space. Manually partitioning with the wrong format (MBR instead of GPT) makes the install fail.
If you have multiple SSDs: the installer shows Drive 0, Drive 1, Drive 2 etc. Pick the one you want Windows on (usually the fastest NVMe, often Drive 0). The others stay blank for now — you can format them after install via Windows Disk Management.
Setup Assistant (OOBE) — the post-install wizard
After the final reboot, Windows shows the cheerful Setup Assistant — region, language, account creation. Steps in order:
- "Is this the right country or region?" Pick South Africa.
- Keyboard layout: United Kingdom is closest to SA layout — Yes.
- "Add a second keyboard layout?" Skip unless you actually use one.
- Network connection: Plug in ethernet or connect Wi-Fi. Windows 11 Home insists on internet; Windows 11 Pro lets you skip with a "I don't have internet" button.
- Naming your device: Pick a hostname (e.g., "Kamran-PC"). Skip if you want a default name.
- Sign in to Microsoft account — or use the bypass trick (next section) for a local account.
- Privacy settings: Decline diagnostic data sharing, location, advertising ID unless you specifically want them.
- Cortana, OneDrive, Game Pass offers: Skip / decline.
- "Setting up your PC": 2-5 minutes of "Just a moment" screens, then desktop appears.
Microsoft account vs local account
Windows 11 Home strongly pushes you to sign in with a Microsoft account. Pros: cloud sync of settings, OneDrive integration, Edge bookmark sync, easier reinstall later (your licence lives in your Microsoft account). Cons: requires online sign-in every PC reset, ties your PC identity to Microsoft.
To create a local account on Windows 11 Home (Pro lets you do it directly):
- At the "Let's connect you to a network" Setup screen, disconnect from internet (unplug ethernet, decline Wi-Fi).
- Press Shift + F10 to open a Command Prompt overlay.
- Type
OOBE\BYPASSNROand press Enter. - PC reboots and returns to Setup. This time, at the network prompt, click "I don't have internet".
- Click "Continue with limited setup".
- Create a local username + password. Skip Microsoft account entirely.
You can always add a Microsoft account later in Settings → Accounts → Email & accounts if you change your mind.
Windows Update + GPU driver — post-install routine
First desktop appears. You're not done yet. Two essential post-install tasks:
Run Windows Update until "no updates available": Settings → Windows Update → Check for updates. Install all updates, reboot, check again, install again. Repeat 3-4 times — the cumulative update + .NET update + driver updates all need separate cycles. Takes 30-90 minutes depending on internet speed.
Install the latest GPU driver:
- Nvidia: Download Nvidia App from nvidia.com/nvidia-app — it auto-installs the latest Game Ready Driver. Replaces the old GeForce Experience.
- AMD: Download AMD Adrenalin from amd.com/support — picks the right driver for your card automatically.
- Intel Arc: Use Intel Arc Control from intel.com/support.
Windows Update may have installed an older Nvidia/AMD driver automatically. The vendor's standalone driver is usually 1-2 versions newer with game-day patches. Install over the Windows Update version — it'll cleanly replace it.
Optional but recommended:
- Install your motherboard's vendor utility (ASUS Armoury Crate, MSI Center, Gigabyte Control Center) only if you need RGB control or fan tuning. Skip if you don't — they're bloated.
- Run cpu-z (free, cpuid.com) to verify your CPU, RAM speed and motherboard chipset match your spec.
- Set up Windows Defender exclusions for your game install folder for slightly faster shader compilation.
Product key activation
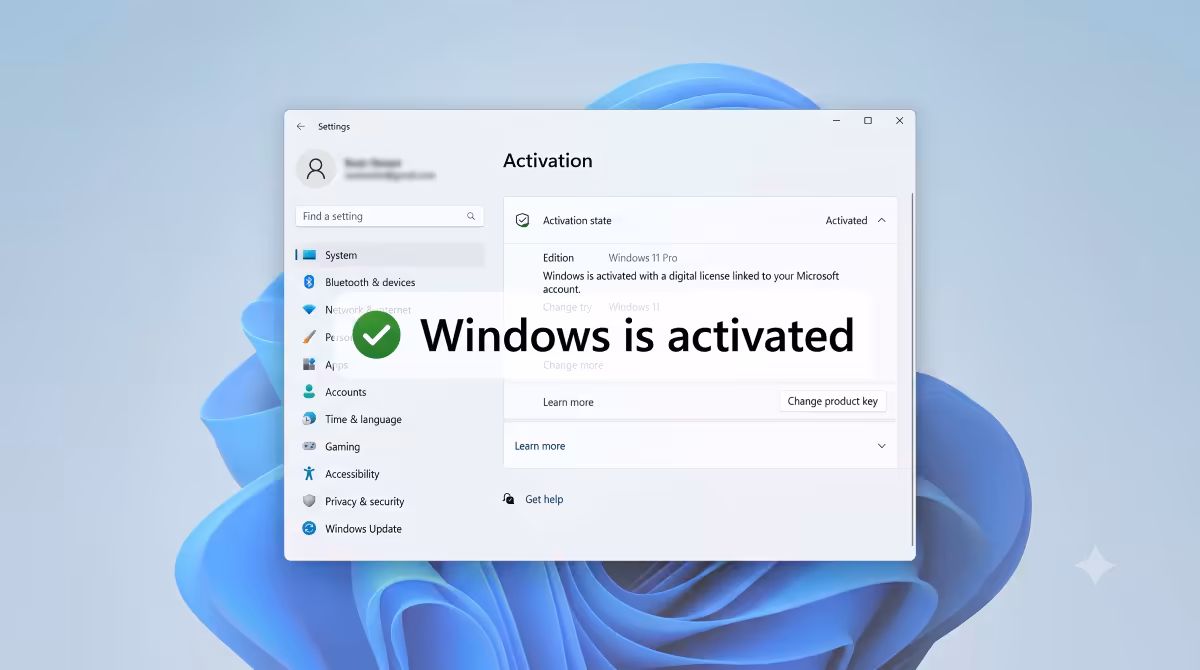
If you skipped the key during install, activate now:
- Settings → System → Activation.
- Click Change product key.
- Enter the 25-character key from your Evetech receipt or Microsoft purchase email.
- Windows phones home to activation servers (needs internet), validates, shows "Windows is activated with a digital licence" within 30 seconds.
If you bought a digital licence linked to a Microsoft account (Microsoft Store purchase), signing in with that account automatically activates Windows — no manual key entry needed.
Common Windows install mistakes
Skipping the activation step. "I'll do it later" turns into "Activate Windows" watermark for months. Activate during install or immediately after — it's a 60-second job.
Buying a Kinguin / G2A key. Works initially, fails 3-6 months later when Microsoft audits the source. You have no recourse. Buy authorised SA keys.
Picking Upgrade instead of Custom Install. Fails or hangs on a fresh build. Always Custom.
Manually partitioning the SSD. Wrong format (MBR instead of GPT) means install fails or won't boot. Let Windows handle partitioning.
Using a USB stick made with Rufus or third-party tools without proper UEFI settings. Rufus works if configured right (UEFI + GPT scheme), but novices misconfigure and the USB doesn't boot. Stick to Microsoft Media Creation Tool — it gets it right automatically.
Not connecting ethernet during install. Windows Update post-install drivers are critical. Wi-Fi works but ethernet is faster and more reliable for the first big update cycle.
Plugging the monitor into the motherboard. If you have a discrete GPU, the monitor must connect to the GPU's HDMI/DisplayPort, not the motherboard's. Motherboard ports only work if your CPU has integrated graphics AND you have no discrete GPU.
Key takeaways
- Create the USB installer with Microsoft Media Creation Tool on a second PC before unboxing your new build.
- BIOS via Del or F2. Set USB as first boot device or use F8/F11 one-time boot menu.
- Pick Custom Install — never Upgrade on a fresh build. Let Windows partition the SSD automatically.
- Buy authorised SA Windows keys (Evetech, Wootware, Microsoft Store). Skip Kinguin/G2A.
- Post-install: run Windows Update repeatedly, install Nvidia App / AMD Adrenalin, activate within 24 hours.
Frequently asked questions
How do I install Windows 11 on a new PC build?
Three stages: create USB installer on a second PC using Microsoft Media Creation Tool, boot the new PC and set USB as first boot device in BIOS (Del/F2), then follow the installer choosing Custom Install. Total time 30-45 minutes.How long does Windows 11 installation take?
USB creation 10-20 minutes. Install 20-30 minutes on NVMe. Setup Assistant 5-10 minutes. Windows Update first round 30-90 minutes. Total 1-2 hours from first boot to ready desktop.Where do I buy a legitimate Windows 11 key in South Africa?
Evetech, Wootware, Rebel Tech, Takealot or Microsoft Store direct. Home OEM R1,500-R1,800; Pro OEM R2,000-R2,400. Avoid Kinguin / G2A grey-market keys.Should I install Windows 11 with a Microsoft account or local account?
Microsoft account if you use OneDrive, Edge sync, Microsoft 365. Local account for offline-first setup. To force local account on Windows 11 Home, disconnect internet during setup, hit Shift+F10 and type OOBE\BYPASSNRO.Do I need to install motherboard drivers manually in 2026?
No — Windows 11 ships with AM5 / LGA1851 chipset drivers, Wi-Fi 7, 2.5GbE, NVMe and Realtek audio. Windows Update fetches the rest. Only GPU driver still needs manual download from Nvidia App or AMD Adrenalin.What if Windows installer can't see my NVMe SSD?
Rare in 2026. Check BIOS shows the SSD in Storage section, verify M.2 slot is enabled (some share lanes with SATA), update BIOS, reseat the drive. Almost always a physical seating issue when it happens.How do I activate Windows after installation?
Settings → System → Activation → Change product key. Enter the 25-character key, Windows validates online within 30 seconds. Digital licences tied to Microsoft account activate by signing in.Custom Install or Upgrade — which do I pick on a new build?
Always Custom Install. Upgrade is for installing a newer Windows over an existing install; on a blank SSD it fails or hangs.