Install How-To · GPU
How to install a GPU.
— Top x16 slot. Clip clicks. 12VHPWR home.
- slot · always
- Top x16
- install time
- 5 min
- retention & 12VHPWR
- Click
Which PCIe slot — always the top one
Modern motherboards have 2-3 PCIe x16-shaped slots. Only one of them gives the GPU full bandwidth — and using the wrong one is a quiet way to leave 2-7% FPS on the table without realising it.
| Slot position | Wiring | Speed | Use for GPU? |
|---|---|---|---|
| Top (closest to CPU) | CPU-direct | Gen 5 x16 or Gen 4 x16 | Yes — always |
| Middle (if present) | CPU-shared | Often x8 only | Only if you have 2 GPUs |
| Bottom (chipset) | Routed through chipset | Often x4 | No — never for primary GPU |
How to identify the top x16 slot: it's physically the slot closest to the CPU/cooler. Most modern boards print "PCIE_1" or "PCIEX16_1" near the slot. The motherboard manual's "PCIe Slot Allocation" page confirms it definitively — read it before installing.
The 5 install steps
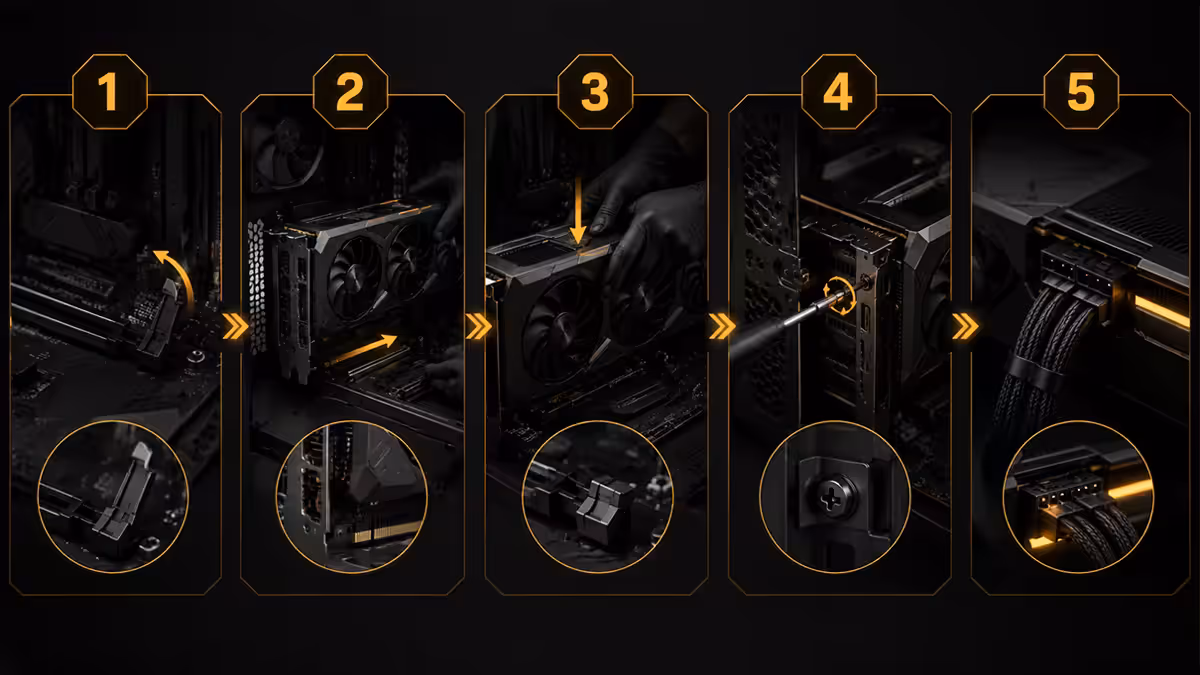
- 1
Remove the case expansion slot covers
Count your GPU's slot height — 2-slot, 2.5-slot, 3-slot, 3.5-slot, or 4-slot. Unscrew the matching number of slot covers on the rear of the case, starting at the position aligned with the top PCIe x16 slot. Save the screws — you'll use them to secure the GPU bracket. - 2
Open the PCIe retention clip
Find the retention clip at one end of the top PCIe x16 slot (usually the right end). Push it outward and down to open the latch. Some clips are spring-loaded with a small lever; others slide. Read the motherboard manual if it's not obvious — never force it. - 3
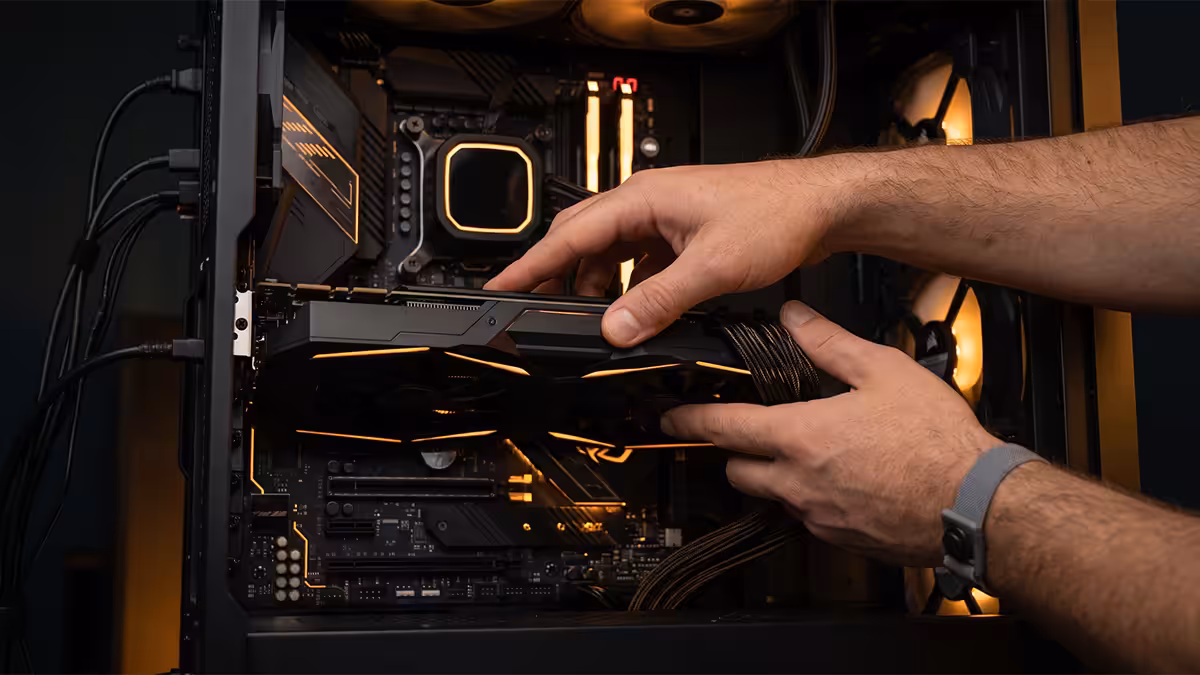
Lower the GPU horizontally into the slot
Hold the GPU level with both hands. Align the gold contact edge with the PCIe x16 slot, and the rear bracket with the case's removed slot covers. Lower slowly. Once the contact edge meets the slot, press down with even pressure along the full length — both ends of the contact edge engaging at the same time. You'll hear the retention clip click closed when the GPU is fully seated. - 4
Screw the GPU bracket to the case
Use the screws you saved from step 1 to secure the GPU's metal bracket to the case's slot positions. Hand-start each screw, then tighten snugly with a Phillips #2 driver. Don't over-torque — strip-resistant force is enough. The bracket should sit flush with the case rear, no gaps. - 5
Connect PCIe power cables
Plug the GPU power cables from the PSU. For 8-pin cards: align tabs and push fully home until clip clicks. For 12VHPWR (16-pin) cards: push the connector straight in with firm pressure until you hear/feel the locking tab engage. Wiggle gently to confirm it's locked.
12VHPWR — done safely
The 16-pin 12VHPWR connector replaced the old 3× 8-pin layout on flagship GPUs (RTX 4090 onwards). It carries up to 600W on a single cable. The headline-grabbing "melting connector" incidents on RTX 40-series almost entirely traced to half-seated connectors — not a fundamental design flaw.
The fix is straightforward:
- Push fully home in a single motion. Don't insert partway then push more — that's how the connector ends up at an angle.
- Listen / feel for the click as the locking tab engages.
- Wiggle gently after seating. The connector should not move. If it pops out, reseat with more pressure.
- Don't bend the cable sharply within 35mm of the connector. The 12V-2x6 revision (on RTX 50-series) is more tolerant of bending, but caution still applies.
- If using the included 8-pin adapter cable (the rectangular adapter that ships with the GPU), connect 3-4 separate 8-pin PCIe cables from your PSU into the adapter. Don't daisy-chain a single 8-pin to multiple connectors.
GPU sag & support brackets
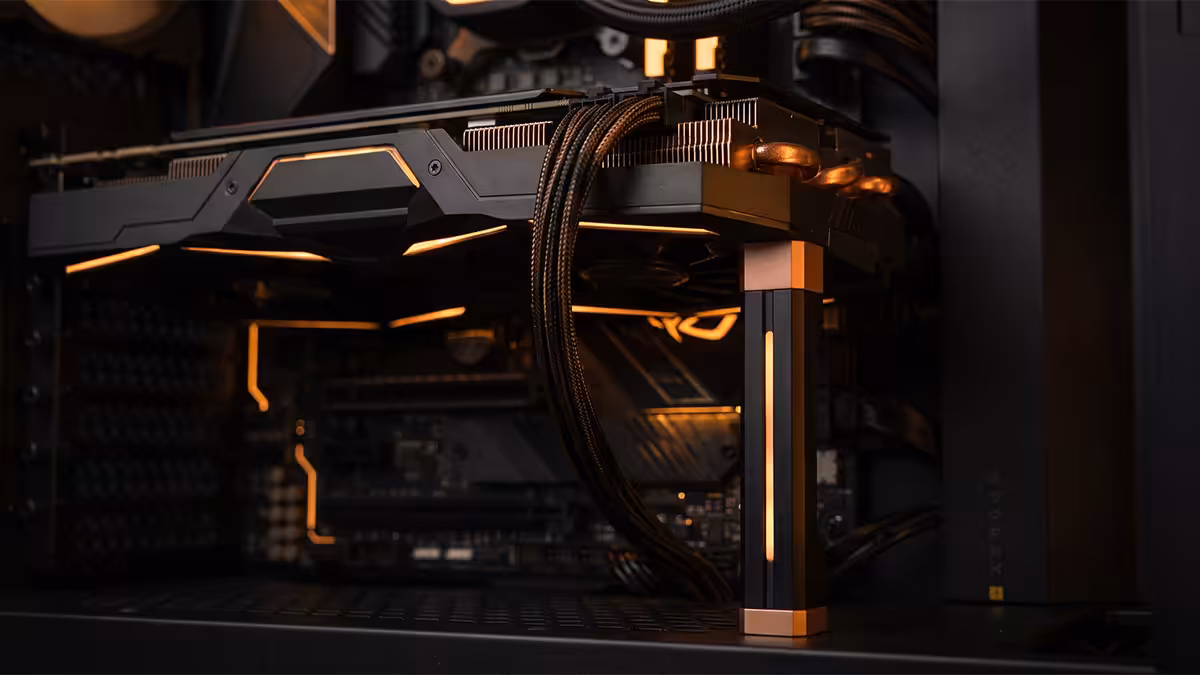
Flagship 2025-2026 GPUs are physically large and heavy. The RTX 5080 weighs around 2.0kg; the RTX 5090 hits 2.5kg+. The PCIe slot and 2-3 bracket screws weren't designed for that mass long-term.
Why it matters: over months, the unsupported end of the GPU sags downward, flexing the PCB and the PCIe slot connector. Eventually this can cause:
- Micro-cracks in the GPU PCB
- PCIe slot connector damage on the motherboard
- Intermittent display failures or flickering
- In extreme cases, complete GPU failure
Most flagship GPUs (RTX 5070, 5080, 5090; RX 9070 XT) ship with an anti-sag bracket in the box. Install it. If yours doesn't, R200-R400 buys an aftermarket version from local SA retailers. The bracket is a small adjustable post that sits below the GPU's free end, transferring weight to the case floor instead of the PCIe slot.
Plug the monitor into the GPU — not the motherboard
The most common new-build oversight: monitor plugged into the motherboard's HDMI/DisplayPort instead of the GPU's. The whole system runs on integrated graphics with a R12,000-R55,000 discrete GPU sitting unused.
The check: after installing the GPU, the monitor cable goes into the GPU's rear bracket — the ports facing out the back of the case. Modern GPUs typically have 3× DisplayPort + 1× HDMI. The motherboard's video outputs (which would be at the top of the rear I/O area) should be unused.
If your monitor was previously plugged into the motherboard, unplug it and move the cable to the GPU. On first boot, Windows automatically detects the GPU and uses it.
Common GPU install mistakes
Using the wrong PCIe slot. Lower slots run x8 or x4 — costing FPS. Always top slot.
GPU not fully seated. Retention clip didn't click. Reseat with even pressure along full length until clip locks.
12VHPWR half-seated. The dangerous one. Push fully home until click. Wiggle to verify. Check warmth after stress test.
Missing GPU bracket screws. Bracket loose against case = GPU more prone to sag. Always secure with the slot screws.
Skipping the anti-sag bracket. Flagship GPUs need it. Install the included one or buy aftermarket.
Monitor plugged into motherboard. Running on iGPU instead of the new GPU. Move cable to the GPU's output bracket.
If the GPU isn't being detected
- Reseat the GPU. Open retention clip, lift GPU out, reseat with even pressure until clip clicks. Most common fix.
- Verify power cables. 8-pin connectors clicked in fully. 12VHPWR fully home with locking tab engaged.
- Confirm monitor on GPU output. Not on the motherboard's HDMI / DisplayPort.
- Try a second PCIe slot. If your board has another x16-physical slot, briefly test there to rule out a damaged primary slot.
- Clear CMOS. CLR_CMOS jumper or CR2032 battery removal for 30 seconds. Resets BIOS defaults.
- BIOS update. A newer GPU on an older motherboard may need BIOS update. Use BIOS Flashback feature if needed.
Key takeaways
- Always the top PCIe x16 slot — CPU-direct. Lower slots route through chipset and cost FPS.
- Even pressure along the full length when seating. Retention clip must click closed.
- 12VHPWR pushed fully home until the locking tab engages. Wiggle to verify. Check warmth after stress test.
- Flagship GPUs need anti-sag bracket — included in the box or R200-R400 aftermarket.
- Move the monitor cable from motherboard to GPU output. 41% of "GPU not working" calls trace here.
Frequently asked questions
Which PCIe slot do I install the GPU in?
Top PCIe x16 slot — closest to CPU, wired directly to CPU's PCIe lanes for maximum bandwidth. Lower slots run x8 or x4 and cost 2-7% FPS.What is 12VHPWR and do I need it?
16-pin power connector on RTX 40+/50-series and some RX 7900+ cards. Carries up to 600W. Requires ATX 3.0 PSU with native cable or adapter shipping with GPU.How firmly do I press the 12VHPWR connector?
Fully home until the locking tab clicks. Half-seated 12VHPWR causes the "melting connector" incidents. Wiggle gently to verify it doesn't move.Do I need a GPU support bracket?
Yes for flagship cards. RTX 5080/5090 weigh 1.8-2.5kg. Most include anti-sag brackets; if not, R200-R400 aftermarket prevents long-term PCB damage.How many bracket screws to secure the GPU?
One per available bracket position — usually 2-3 screws. Hand-start, tighten snugly, don't over-torque.Does the GPU need separate power cables from the PSU?
Yes for every modern gaming GPU. 8-pin for mid-range, 12VHPWR (16-pin) for flagship. Only cards under 75W skip auxiliary power.What about the motherboard's video output after GPU install?
Disconnect monitor from motherboard, plug into GPU's output. Your monitor MUST connect to the GPU to use the GPU. Common new-build oversight.My GPU isn't being detected — what do I check?
Reseat GPU. Confirm power cables. Monitor on GPU output (not motherboard). Try different PCIe slot. Clear CMOS. Last resort: BIOS update.