Install How-To · SSD
How to install an SSD. — M.2_1 slot. 30° angle. One tiny screw.
Ninety seconds of precision work on a part the size of a stick of gum. The slot you pick determines whether you get rated speed or 30% less without realising it.
- CPU-direct slot
- M.2_1
- insertion angle
- 30°
- install time
- 90 sec
Which M.2 slot — pick M.2_1 for the boot drive
Modern motherboards have 2-4 M.2 NVMe slots. They're not all the same. The right slot determines whether your Gen 4 SSD runs at full 7,000 MB/s or gets bottlenecked to Gen 3 speeds.
| Slot | Wiring | Speed support | Use for |
|---|---|---|---|
| M.2_1 (closest to CPU) | CPU-direct | Gen 5 x4 or Gen 4 x4 | Boot drive — fastest |
| M.2_2 / M.2_3 | Chipset-routed | Gen 4 x4 typically | Secondary storage |
| M.2_4 (some boards) | Shared lanes | May drop to Gen 3 x4 or x2 | Bulk storage only |
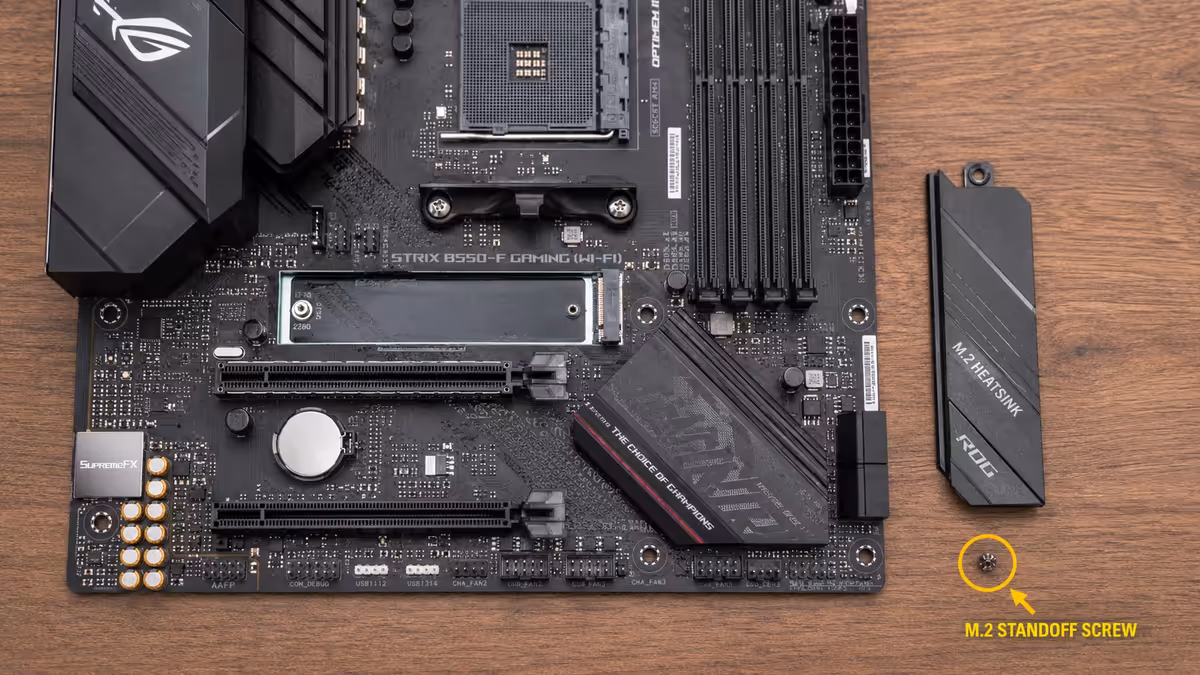
How to identify M.2_1: the slot physically closest to the CPU — usually with the most prominent heatsink. The motherboard PCB labels each M.2 slot ("M2_1", "M2_2", etc.). The motherboard manual's "M.2 Configuration" page is the authoritative source.
The M.2 NVMe install steps
- 1
Remove the motherboard's M.2 heatsink
Most modern motherboards have a metal heatsink covering each M.2 slot. Unscrew it (1-2 small screws, usually PH0 or PH1) and lift it off. Set the heatsink aside — you'll reinstall it after the SSD is in place. - 2
Locate and remove the tiny mounting screw
At the far end of the M.2 slot (away from the PCIe connector), find the small standoff post with a tiny screw on top. Remove this screw and place it somewhere you'll find it — this screw is small enough to vanish into the case carpet and is unique to your motherboard. Don't lose it. - 3
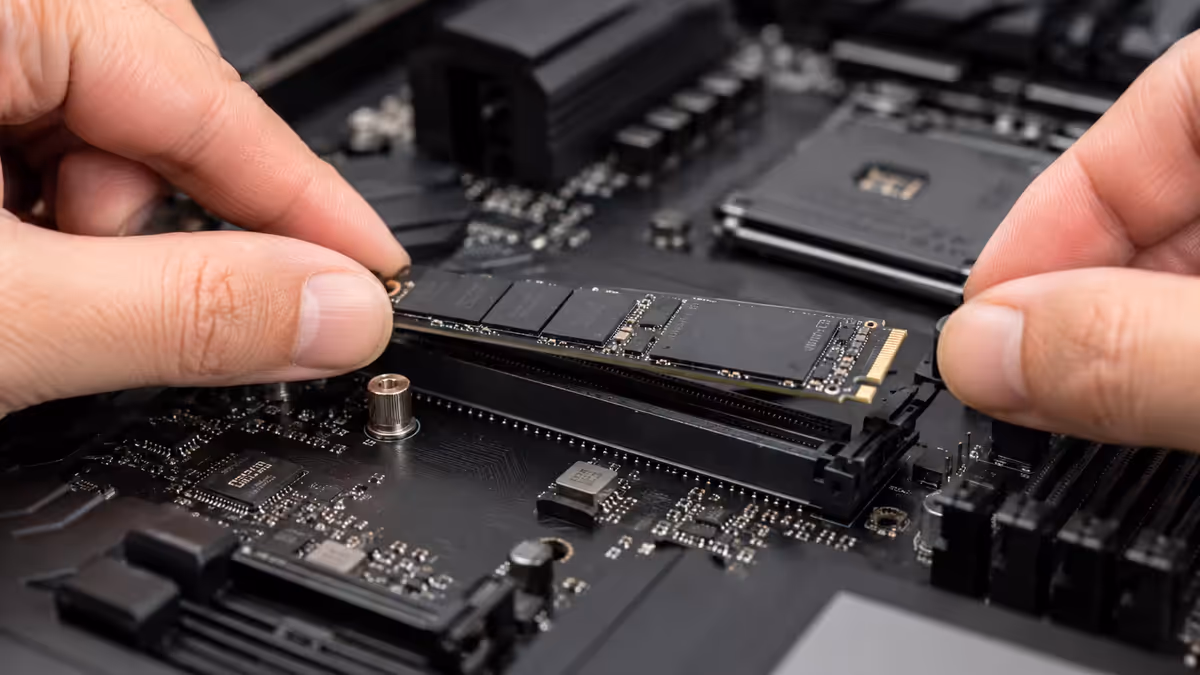
Insert the SSD at a 30° angle
Hold the M.2 SSD at approximately 30° to the motherboard. Find the notch on the SSD's gold contact edge and the matching key in the M.2 slot — these align in only one orientation. Slide the SSD into the slot with steady firm pressure. It should glide in smoothly. If it resists, lift out and check the notch position. - 4
Press the SSD flat and reinstall the tiny screw
Press the free end of the SSD down toward the standoff. The screw hole on the SSD's far end should align with the standoff post. Insert the tiny mounting screw and turn it gently with a PH0 or PH1 driver until it's snug. Don't over-tighten — the SSD PCB and the standoff threads are easy to damage. - 5
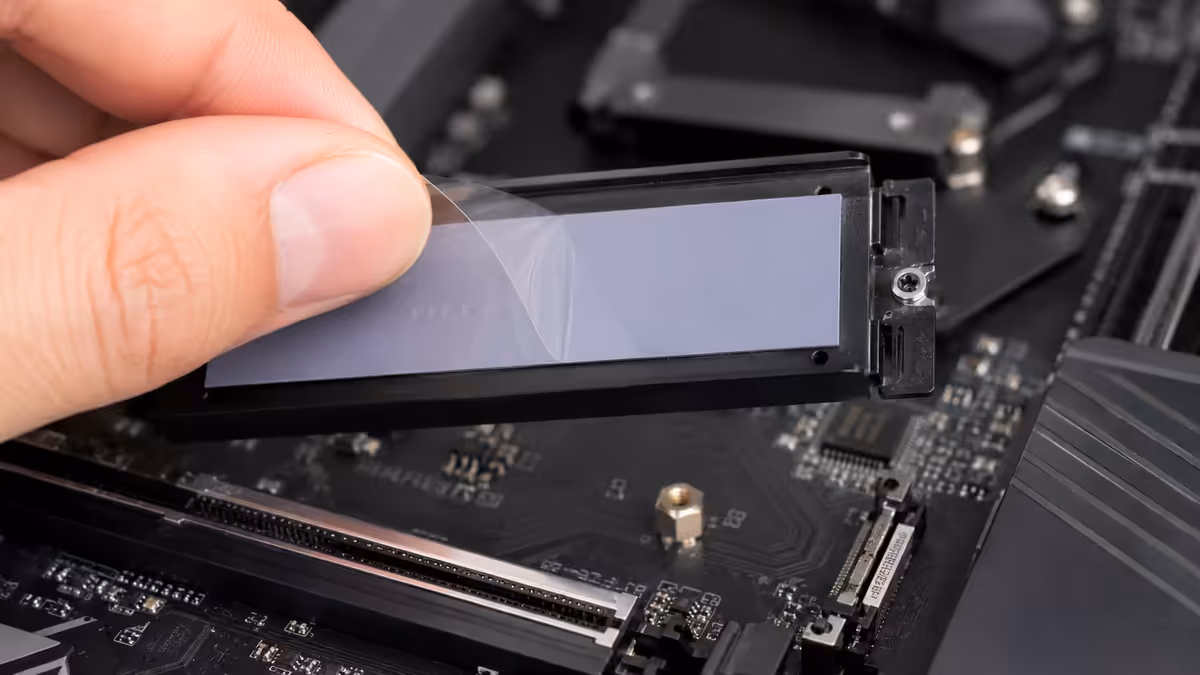
Peel thermal pad film, reinstall heatsink
Look at the underside of the motherboard's M.2 heatsink — there's a thermal pad covered with protective plastic film. Peel the film off (don't skip this — it's the most-forgotten step). Place the heatsink back over the SSD, screw it back down. The thermal pad transfers heat from the SSD's controller chip to the heatsink. - 6
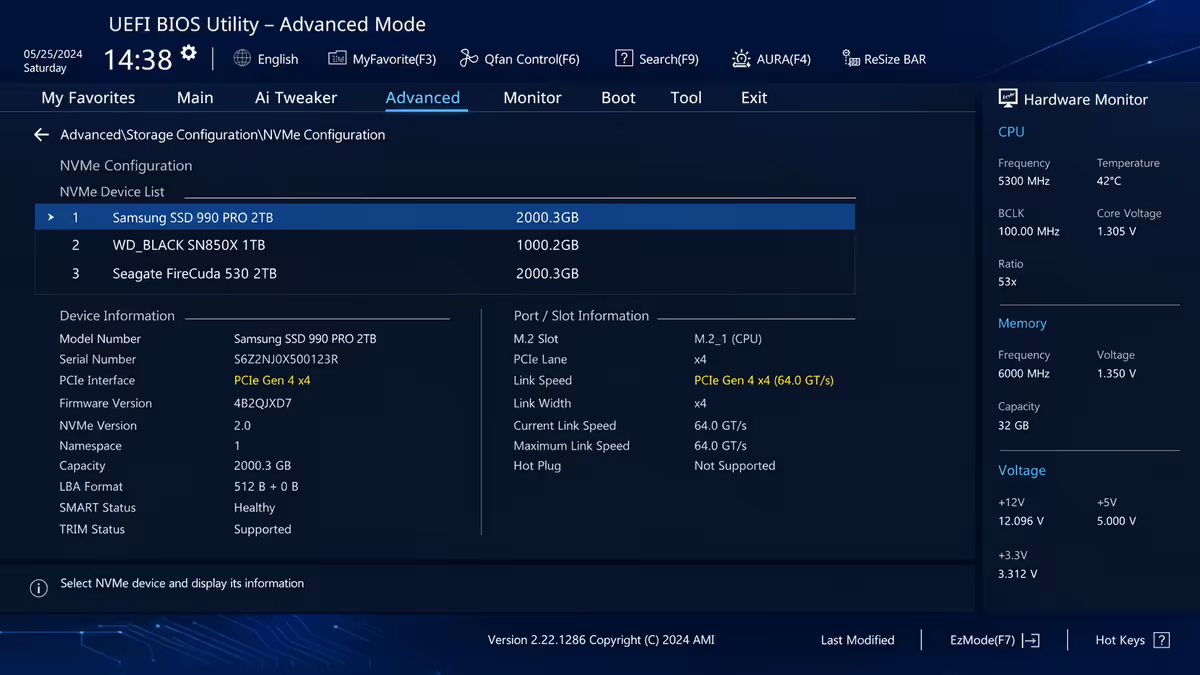
Verify in BIOS at first boot
Boot the PC and enter BIOS (Del key). Navigate to Boot or Storage. Your new SSD should appear at its full speed (e.g., "Gen 4 x4" for a Gen 4 NVMe drive). If it shows Gen 3 or lower, check the slot wiring or try a different M.2 slot.
Heatsink — Gen 4 vs Gen 5
| SSD generation | Heatsink need | Recommendation |
|---|---|---|
| SATA 2.5" SSD | None | Slow enough to need no cooling |
| Gen 3 NVMe | Optional | Motherboard heatsink sufficient |
| Gen 4 NVMe | Yes — passive | Motherboard built-in heatsink covers it |
| Gen 5 NVMe | Yes — often active | Motherboard heatsink + sometimes the SSD's own heatsink |
For Gen 4 NVMe SSDs (the 2026 sweet spot), the motherboard's built-in heatsink is sufficient. Don't add an aftermarket heatsink if the motherboard already has one — adding another layer can actually reduce cooling.
For Gen 5 NVMe SSDs (Samsung 990 Pro Gen5, Crucial T705, WD Black SN8100), heat is a real issue. Many ship with their own large heatsink or a heatsink + fan combo — install that instead of the motherboard's stock heatsink if it's larger. Without proper cooling, Gen 5 SSDs thermal-throttle within minutes of sustained writes.
SATA 2.5" SSD install — the alternate path
If you have a SATA 2.5" SSD (rare for new builds in 2026, common for secondary drives or upgrading older PCs), the install is different:
- Find a 2.5" mount point in the case. Most cases have either a small 2.5" drive cage or screw holes on the case interior surface for 2.5" drives. Pick a spot.
- Mount the SSD with 4 screws. The SSD has 4 screw holes (2 on each side or on the bottom). Use the screws that came with the case or the SSD.
- Connect the SATA data cable. One end into the SSD's SATA port, the other into a SATA port on the motherboard.
- Connect the SATA power cable. The PSU has SATA power cables (a long L-shaped connector). Plug one into the SSD's power port.
- Verify in BIOS. SATA SSDs appear under the SATA controller section. They're slower than NVMe (~550 MB/s vs 7,000 MB/s) but still much faster than HDD.
BIOS verification — what to look for
After install, enter BIOS on first boot:
- Storage / Boot section. Your new SSD should appear in the device list.
- NVMe Configuration. Check the SSD is listed at the right generation — "PCIe Gen 4 x4" for a Gen 4 drive, "PCIe Gen 5 x4" for a Gen 5 drive.
- If listed at lower speed: the slot may be wired at lower bandwidth, or lane sharing may be reducing it. Check the motherboard manual.
- Boot order. Set the new SSD as the primary boot device if you're installing Windows fresh.
Common SSD install mistakes
Wrong M.2 slot. Using a chipset-routed slot for the boot drive when M.2_1 is free. Costs 10-15% on read speeds.
Forgetting the thermal pad film. Heatsink reinstalled with the protective film still on. SSD throttles under sustained writes.
Losing the tiny mounting screw. The screw is unique to your motherboard and often impossible to find replacements for. Place it on a magnetic mat or in a small container during install.
Over-tightening the M.2 screw. The tiny screw is easy to over-torque, damaging both the SSD PCB and the standoff threads. Snug only.
Mixing form factors. 2280, 2242, and 2230 are different sizes. The motherboard's standoff position needs to match. Most desktop boards support 2280 only.
If the SSD isn't being detected
- Reseat the SSD. Remove and reinsert at proper 30° angle. Verify it slides fully into the slot.
- Try a different M.2 slot. If M.2_2 detects the drive but M.2_1 doesn't, the primary slot may be faulty (rare) or set to a different mode.
- Check lane sharing. If you populated a secondary PCIe slot, it may be stealing lanes from the M.2 slot. Remove the PCIe card temporarily to test.
- Verify M.2 vs SATA mode. Some older M.2 slots only support SATA drives, not NVMe (rare in modern boards but possible). Check the motherboard manual.
- BIOS update. If using newest SSD on an older motherboard, BIOS may not recognise it. Update via the manufacturer's site.
Key takeaways
- M.2_1 for the boot drive — CPU-direct, full speed. Secondary M.2 slots are slower.
- 30° insertion angle. Notch aligns with slot key in only one orientation.
- Don't lose the tiny mounting screw. It's unique to your motherboard.
- Always peel the thermal pad film before reinstalling the heatsink. Most forgotten step.
- Verify in BIOS the SSD is at full rated speed (Gen 4 or Gen 5 x4). If slower, check slot wiring.
Frequently asked questions
Which M.2 slot do I install my SSD in?
M.2_1 — closest to CPU, wired CPU-direct for Gen 5 x4 or Gen 4 x4 full speed. Secondary slots route through chipset and are slower.How firmly should I push an M.2 NVMe SSD into the slot?
Smoothly and firmly at 30° angle, never forced. Should glide in once notch and key are aligned.Do I need a heatsink on my M.2 NVMe SSD?
Gen 4: motherboard's built-in heatsink is sufficient. Gen 5: heatsink essentially mandatory, often active cooling.What's the difference between 2280, 2242, and 2230?
Physical dimensions in mm. 2280 (22×80mm) is desktop standard. 2230 used in Steam Deck / ROG Ally. 2242 in some compact laptops.How do I install a SATA 2.5" SSD?
Mount with 4 screws in case 2.5" tray. Connect SATA data cable to motherboard. Connect SATA power cable from PSU. Verify in BIOS.My SSD isn't showing up in BIOS — what's wrong?
Reseat SSD at proper angle. Check slot supports NVMe (most do). Check lane sharing. Try a different M.2 slot to rule out faulty slot.Can I install Windows directly to a fresh M.2 NVMe SSD?
Yes. Boot Windows 11 USB installer. Select the unallocated NVMe SSD when prompted. 10-20 minute install on Gen 4 NVMe.How do I migrate Windows from old drive to new M.2 NVMe?
Macrium Reflect Free or Samsung Data Migration. Both drives installed, select source and destination, click Clone. 30-90 min depending on data.