GPU Overclocking Guide
How to overclock your GPU. — Memory first. Cores second. Power limit last. Free FPS.
Modern GPUs ship pre-tuned aggressively — the days of 30% manual gains are over. But 3-8% extra FPS is still on the table, and the memory clock is where most of it lives in 2026.
- typical gain
- 3-8% FPS
- often best
- Memory OC
- = +5°C temp
- +30W
MSI Afterburner — the universal standard
Despite the name, MSI Afterburner is brand-agnostic. It works on every NVIDIA, AMD and Intel discrete GPU — ASUS, Gigabyte, Sapphire, Zotac, MSI, EVGA, PowerColor, Palit — they all expose the same overclocking interface to Afterburner.
Vendor tools exist (ASUS GPU Tweak III, Gigabyte Aorus Engine, Sapphire TriXX, Zotac FireStorm) and some have nice extra features, but Afterburner is the reference. Most tutorials, forum posts and YouTube videos use Afterburner. Use it.
Download Afterburner from msi.com (search "MSI Afterburner"). It bundles RivaTuner Statistics Server (RTSS) for on-screen overlays. Install both.
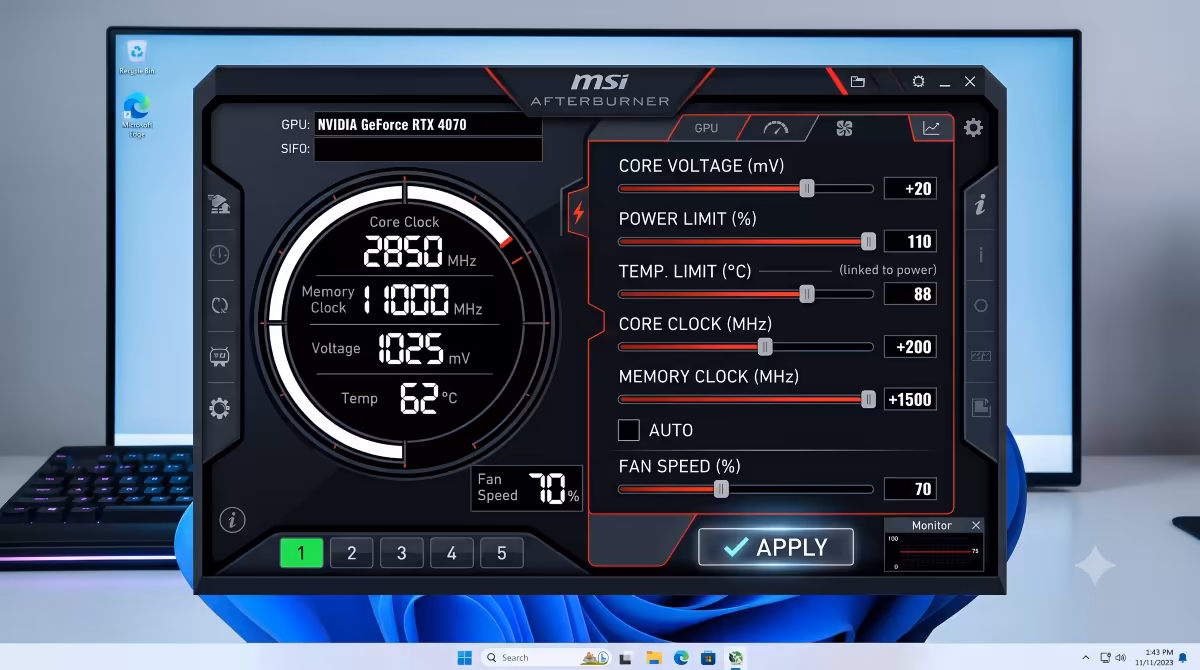
What each slider does
| Slider | What it does | Typical safe range |
|---|---|---|
| Core Clock (MHz) | Raises base GPU chip speed | +100 to +300 MHz |
| Memory Clock (MHz) | Raises VRAM speed | +500 to +1500 MHz |
| Power Limit (%) | Raises max power draw ceiling | +110% to +115% |
| Temperature Limit (°C) | Caps thermal throttle | Default 87°C (don't change) |
| Core Voltage (mV) | Locked on most NVIDIA | Slider often does nothing |
| Fan Speed (%) | Aggressive curve = bigger OC | Custom curve recommended |
The slider that matters most in 2026: Memory Clock. Modern games like Cyberpunk 2077, Alan Wake 2 and Indiana Jones with Path Tracing are cache-bound — they choke waiting for VRAM, not for GPU compute. A +1000 MHz memory OC on these titles routinely gives 8-12% FPS gain.
The slider that does less than it used to: Core Voltage. NVIDIA locked manual voltage control on consumer cards since RTX 20-series. The slider in Afterburner appears to work but is essentially cosmetic on most cards. For real voltage control, use the Voltage/Frequency Curve editor (Ctrl+F).
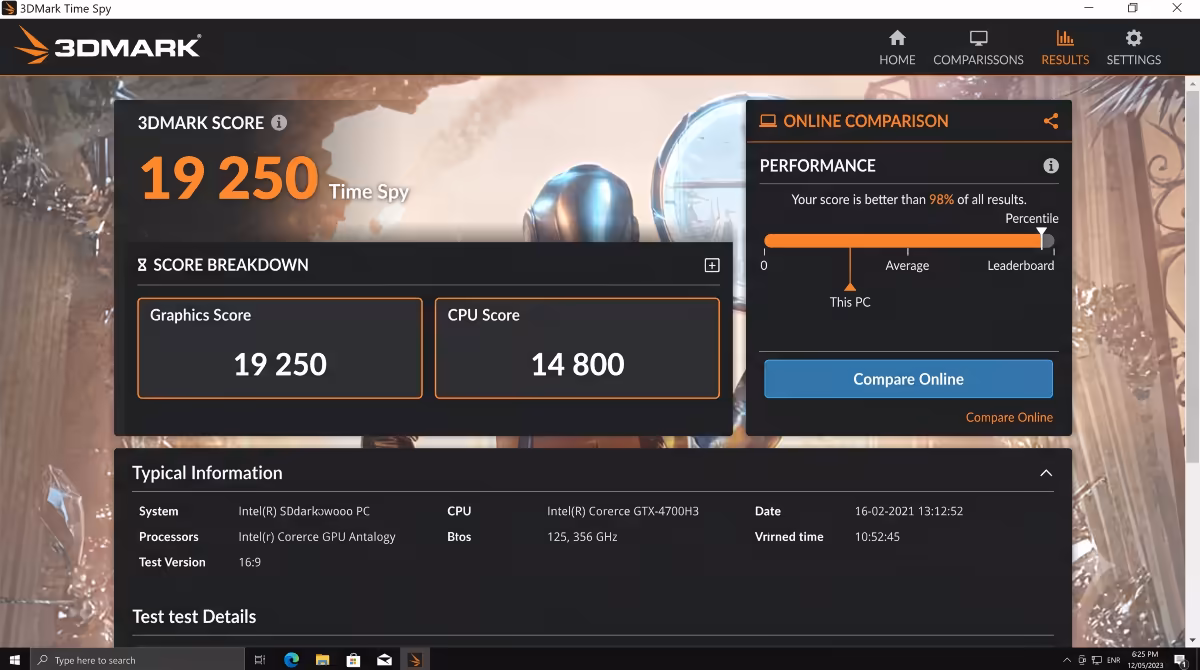
Baseline benchmark first
You can't measure improvement without a reference point. Before touching any slider, benchmark the card at stock.
Recommended baseline tools:
- 3DMark Time Spy (or Time Spy Extreme for high-end cards) — standardised, comparable to global scores.
- Unigine Superposition — free, looped stress mode useful for stability testing.
- Cyberpunk 2077 built-in benchmark — real-world game representative.
- The actual game you play most — record FPS at known settings/scene.
Run each twice at stock. Note: average FPS, max temperature, max power draw. Save the 3DMark Time Spy score — that's your reference number.
Memory OC iteration (start here)
Memory overclocking is where the biggest gains hide in 2026. It's also the safest place to start — VRAM artefacts appear visually before any crash, giving you clear "back off" signals.
Step-by-step:
- Open MSI Afterburner.
- Increase Memory Clock by +500 MHz. Click Apply.
- Run 3DMark Time Spy (full test, ~10 min). Watch for artefacts during the test — flickering, weird coloured polygons, snow patterns.
- If clean, increase by +200 MHz. Run test again.
- Continue in +100 MHz steps until you see artefacts OR the test crashes OR the score goes DOWN (memory error correction kicking in to compensate, slows performance).
- Drop back 100 MHz from last clean point.
- Run a 30-min Unigine Superposition loop at the locked-in value. If stable, this is your memory OC.
Typical safe memory OC values:
- RTX 4060 / RTX 5060: +1000 to +1300 MHz (GDDR6)
- RTX 4070 / RTX 5070: +800 to +1200 MHz (GDDR6X)
- RTX 4080 / RTX 5080: +700 to +1100 MHz (GDDR6X)
- RTX 4090 / RTX 5090: +600 to +1000 MHz (GDDR6X/GDDR7)
- RX 7800 XT / RX 9070 XT: +600 to +1000 MHz (GDDR6)
- RX 7900 XT(X) / RX 9070 GRE: +400 to +800 MHz (GDDR6)
Core Clock iteration
Core OC adds less than memory OC in 2026 but still measurable. The big difference: core instability usually crashes the driver (black screen, "display driver stopped responding") rather than showing artefacts. Have your stress test ready to abort.
Step-by-step:
- Keep your memory OC locked in. Increase Core Clock by +100 MHz.
- Run 3DMark Time Spy or your benchmark game for 10 minutes.
- If stable, +50 MHz. Test again.
- Continue in +50 MHz steps. A driver crash, BSOD or test failure means you've found the limit.
- Drop back 50 MHz and run 30-min stress.
Typical safe core OC values:
- NVIDIA Ada (RTX 4000): +100 to +180 MHz
- NVIDIA Blackwell (RTX 5000): +120 to +200 MHz
- AMD RDNA 3 (RX 7000): +100 to +200 MHz
- AMD RDNA 4 (RX 9000): +100 to +180 MHz
Power Limit raise
The Power Limit slider doesn't directly increase clocks — it raises the ceiling that the card is allowed to draw under. If your card is already throttling at the stock power limit, raising it lets boost sustain higher clocks longer.
Recommended setting: raise to +110% to +115% (depending on what your card allows). Higher is rarely useful and just generates more heat.
Caveat: some lower-end cards (RTX 4060 / RX 7600) have a hard power limit at 100% — the slider is locked or maxes at 105%. That's a hardware design limit, not a software setting.
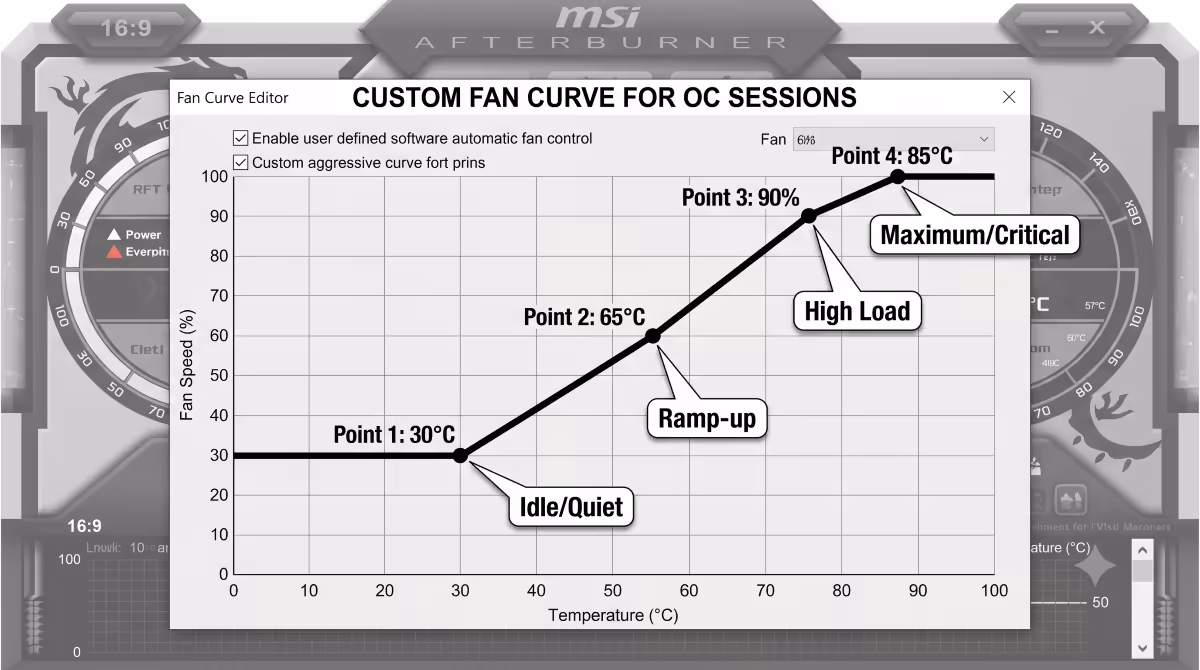
Fan curve adjustment
Cooler GPU = boost sustains higher clocks. An aggressive fan curve directly translates to higher OC headroom.
Recommended custom curve (gaming/OC sessions):
- 30°C → 30% fan (near silent at idle)
- 50°C → 50% fan (audible but moderate)
- 60°C → 65% fan
- 70°C → 85% fan
- 75°C → 100% fan
Open Afterburner → click the Fan icon → Enable user-defined fan curve → drag the points to match. Apply.
For desktop/media use, create a second "Quiet" profile in Afterburner (Profile 2) with stock fan curve. Switch profiles based on use — Afterburner supports automatic profile switching on app launch.
Real-world FPS gain reality
Be honest about what overclocking gives you in 2026.
| Workload type | Typical OC gain | Worth it? |
|---|---|---|
| Esports titles (CS2, Valorant) | 0-3% (already 240+ FPS) | No |
| Modern AAA (Cyberpunk RT) | 5-8% | Yes (more headroom for RT) |
| Path Tracing / heavy RT | 8-12% | Yes (genuine playability gain) |
| 1440p ultra non-RT | 3-5% | Sometimes |
| 4K / 8K rendering | 5-10% | Yes (productivity) |
| AI workloads (Stable Diffusion) | 3-7% | Sometimes (small batches) |
| 3DMark Time Spy score | 5-10% | Bragging rights |
The headline: GPU OC is most valuable when you're GPU-bound at the edge of playability — path tracing, 4K ultra, sustained workloads. It's least valuable when you're already running hundreds of FPS or the CPU is the bottleneck.
Lifespan and OC longevity
Modern GPUs are designed for 5-10 years of operation under specification. A mild overclock within power limit doesn't meaningfully shorten that. The combinations that DO shorten lifespan:
- Sustained +120% Power Limit for years — degrades capacitors and VRM components over time.
- Sustained 80°C+ at full load — accelerates thermal cycle wear on solder joints (the "GPU bake" failure mode of old cards).
- BIOS-flashed XOC firmware — pushes voltage past safe limits for benchmark records, kills cards within months.
- Hardware modifications (vMod, shunt mod) — bypass safety circuits, cards typically fail in 6-18 months.
Conservative OC (memory +800 MHz, core +120 MHz, power limit +110%) on a well-cooled card: zero meaningful lifespan impact.
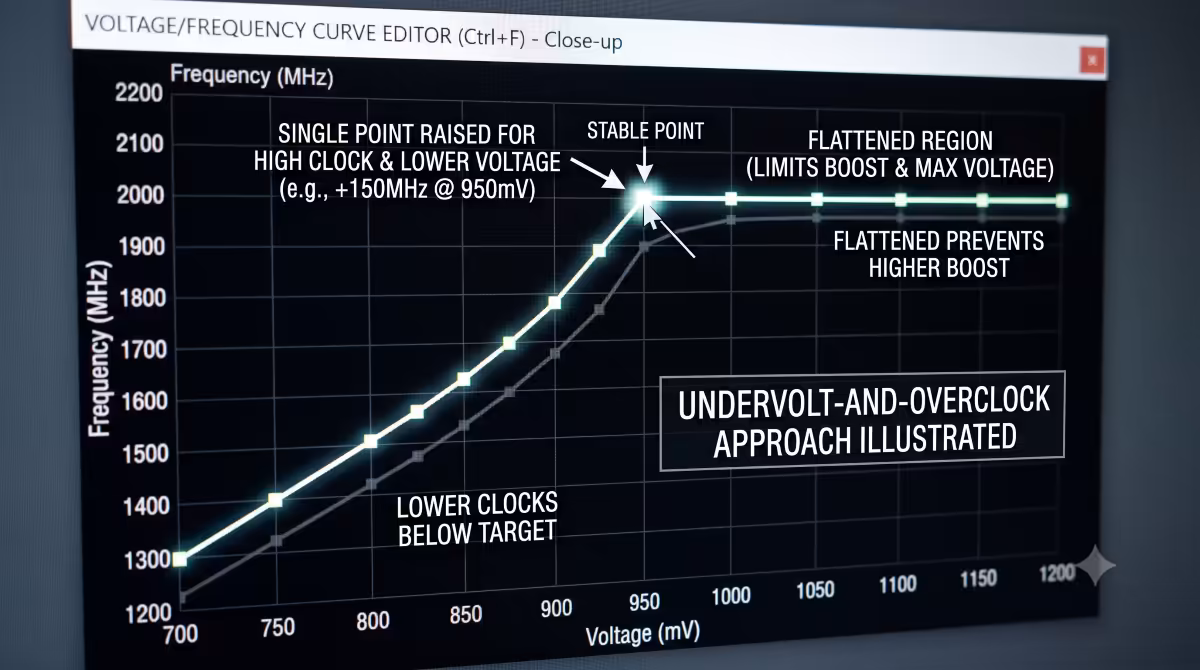
Undervolt + overclock combo (modern best practice)
The single best modern GPU optimisation is combining a slight undervolt with the overclock. Same performance with lower temps, less power and quieter fans — pure win.
How it works:
- Open Afterburner. Press Ctrl+F to open the Voltage/Frequency Curve editor.
- Find the point at your card's typical voltage (e.g. 1050mV for an RTX 4070).
- Drag it up to a higher clock (e.g. from 2700 MHz at 1050mV to 2850 MHz at 1050mV).
- Drag down all points to the right of that voltage so they don't go higher — this caps your max voltage at 1050mV.
- Apply.
You've just locked the GPU to its overclocked frequency at a lower-than-stock voltage. Result: same or better FPS, 30-50W lower power draw, 5-10°C cooler. See our GPU undervolt guide for the full deep-dive.
What NOT to do
Don't flash modified XOC BIOS unless you're a professional benchmark person with a backup card ready. Custom BIOSes bypass safety limits and can brick cards. The performance gain over normal Afterburner OC is minimal.
Don't apply vMod or shunt mod modifications. Hardware-level voltage modifications kill modern GPUs within months. These were 2015-era hacks for unlocked Pascal cards — modern Ada/Blackwell/RDNA architectures have entirely different power delivery designs and the mod is destructive.
Don't run at +120% power limit constantly for productivity workloads. Months of sustained max power draw accelerates capacitor wear in the VRM. If your work is productivity-heavy (Stable Diffusion, video render farms), use stock or undervolted settings — they're more efficient anyway.
Don't ignore visible artefacts. If you see flickering or coloured snow, that's the silicon telling you it's at its limit. Sustained use at that point degrades the chip. Always drop back 50-100 MHz from the artefact point.
Common GPU overclocking mistakes
Pushing all sliders at once. If you raise memory, core and power limit together and it crashes, you don't know which one caused it. Test independently, then stack.
Skipping the baseline benchmark. Without a reference score, you can't tell if the OC actually helped — or whether you accidentally made the card slower (memory error correction can drop performance below stock).
Running stress test for 2 minutes. Many OC instabilities only show after 15-30 minutes when VRAM saturates. Use Superposition's stress mode (looped) for 30+ minutes.
Treating the Voltage slider as functional on NVIDIA. It's locked. Move it all you want — nothing changes. Use the Curve Editor (Ctrl+F) for real voltage control.
Not enabling auto-apply at startup. Without ticking "Apply at startup" in Afterburner settings, your OC vanishes after every reboot.
Key takeaways
- MSI Afterburner is the universal tool — works on every NVIDIA, AMD and Intel GPU.
- Memory OC first — biggest gains on modern cache-bound titles. +500 to +1500 MHz typical.
- Core OC second in +50 MHz steps. Power Limit +110-115%. Iterate one variable at a time.
- Realistic gain: 3-8% in AAA, up to 12% in path-traced titles. 0-3% in esports.
- Combine with undervolt (Ctrl+F curve editor) for the modern best-practice approach.
Frequently asked questions
What software do I need to overclock my GPU?
MSI Afterburner — universal, works on all GPU brands. Pair with 3DMark or Unigine Superposition for benchmarking and stress testing.What does each slider in MSI Afterburner do?
Core Clock = chip speed. Memory Clock = VRAM speed (often biggest gain). Power Limit = max draw ceiling. Voltage = locked on most NVIDIA. Fan = curve = headroom.How much FPS will I gain from overclocking my GPU?
3-8% in modern AAA, up to 10-12% in cache-bound games like Cyberpunk 2077 Path Tracing. Memory OC drives most of the gain.Should I overclock memory or core clock first?
Memory first — biggest gains and artefacts show before crash. Core second. Power Limit last. Test each independently.Will overclocking shorten my GPU's lifespan?
Mild OCs within power limit and stock voltage don't meaningfully shorten lifespan. Extreme combinations (max power + max temp sustained) can shorten it 1-2 years.What's the safest way to overclock a modern GPU?
Undervolt-and-overclock combo using Afterburner's Curve Editor (Ctrl+F). Same performance, lower temps, less power, longer GPU life.When should I stop pushing the overclock further?
First sign of artefacts, crashes or score regression. Drop back 50-100 MHz from that point. Don't push past visible glitches even if no crash.Should I use a custom fan curve when overclocking?
Yes — aggressive curve = higher OC headroom. 30% at 50°C ramping to 100% at 75°C is a good starting point.