BIOS Update Safety Guide
How to update your BIOS safely.
— Flashback first. Power steady. No shortcuts.
- don't update
- If it works
- safest method
- Flashback
- no power loss
- UPS on
When to update (and when not to)
The most important question. Most "is my PC slow" or "why does this happen" troubleshooting threads online jump straight to "have you updated your BIOS?" — and most of the time, you shouldn't.
Update when:
- New CPU generation. Installing Ryzen 9000 on an older B650 board often needs a BIOS update before the CPU will POST. Same story with Intel Core Ultra on first-gen LGA1851 boards.
- Listed bug fix. The release notes specifically mention a problem you're experiencing — USB drop-outs, memory training timeouts, specific game crashes, etc.
- Memory compatibility. Your specific RAM kit is listed as supported only in a newer BIOS version on the manufacturer's QVL.
- Security advisory. A critical vulnerability has been disclosed (rare but real — e.g., the AMD INCEPTION advisory in 2023).
- New feature. A new BIOS adds a capability you actually want — DDR5 speed support, ReBAR on older boards, etc.
Don't update when:
- System is working fine and you don't have a specific problem.
- "Newer version available" is the only reason. Stable BIOSes don't need replacing on a calendar.
- Forum post said "try a BIOS update" without identifying a real cause.
- You're between major projects and have time to spare. ("Bored" is not a reason to update BIOS.)
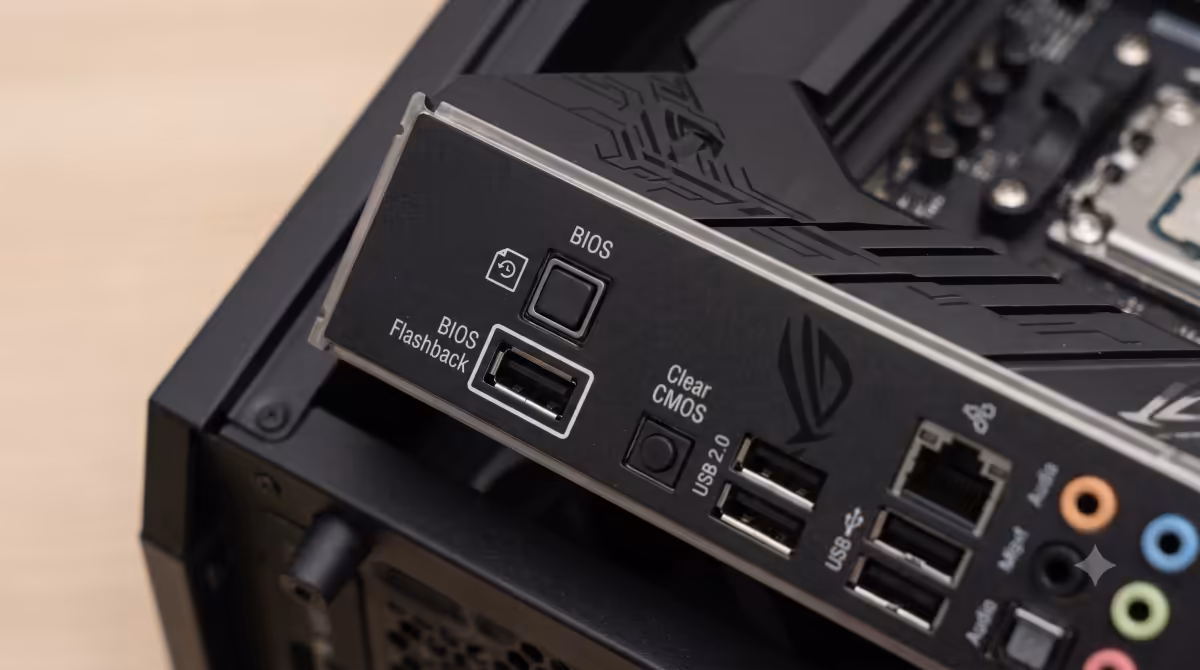
Method 1 — BIOS Flashback (safest)
BIOS Flashback — also called Q-Flash Plus (Gigabyte), M-Flash USB (some MSI), BIOS Flashback+ (ASUS) — is the safest method available. It works with only PSU power: no CPU, no RAM, no working OS required. The dedicated controller on the board handles the write independently.
- 1
Download BIOS file
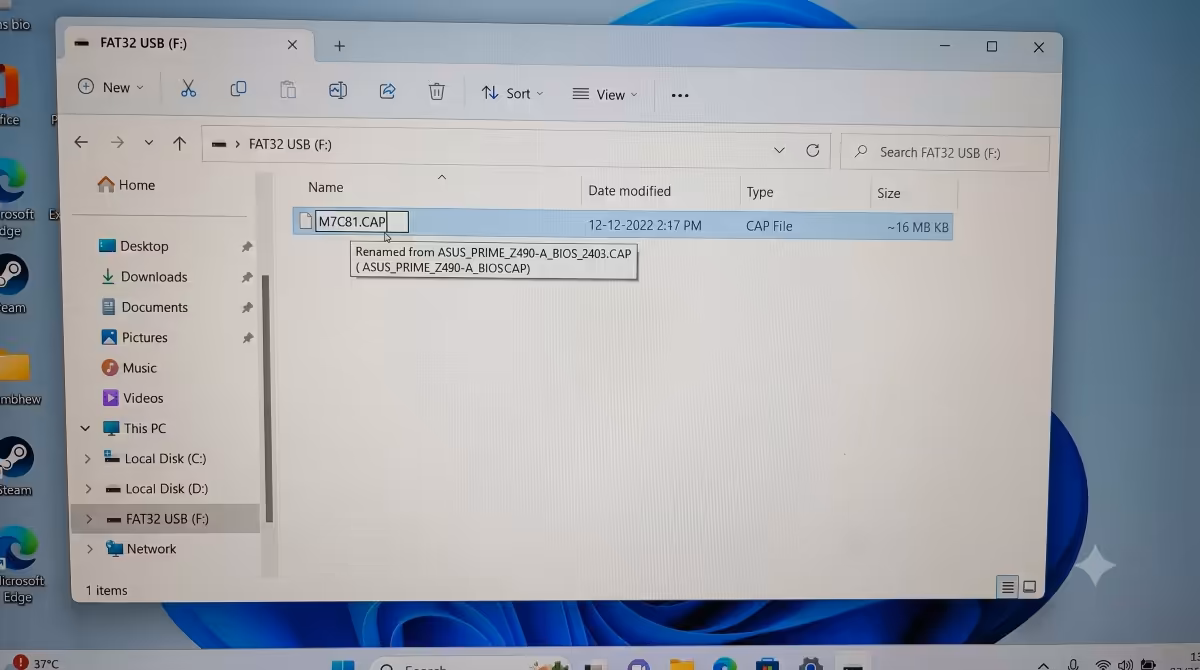
Download the BIOS file from the manufacturer's support page. Note the exact filename required for Flashback (often something like MSI.ROM, B650AORUSPRO.F25, or A.CAP on ASUS). - 2
Format USB stick
Format a USB stick as FAT32 (not exFAT, not NTFS). USB stick size doesn't matter — 4GB is fine. - 3
Copy and rename
Copy the BIOS file to the root of the USB stick. Rename to match the exact filename Flashback expects. - 4
Insert into Flashback port
With PSU connected and switched on but the system off, insert the USB into the dedicated BIOS Flashback port on the rear I/O (labelled "BIOS" or similar). - 5
Hold Flashback button
Hold the BIOS Flashback button (small button on rear I/O near the port) for ~3 seconds until the LED starts blinking. - 6
Wait for completion
Wait 5-10 minutes. The LED blinks while writing. When it stops blinking (turns off or goes solid), the flash is complete. - 7
Reconfigure
Power the system on normally and enter BIOS to reconfigure settings.
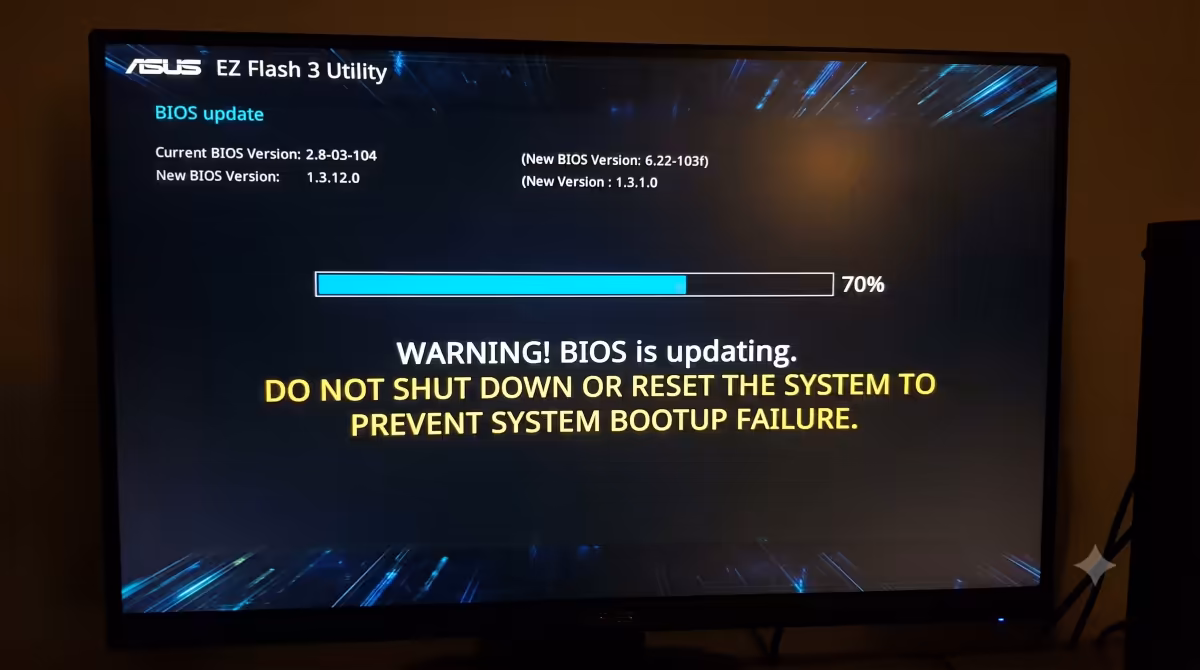
Method 2 — In-BIOS update (EZ Flash / Q-Flash / M-Flash)
If your current BIOS boots normally and the board doesn't have Flashback (or you'd rather not use it), update from inside the BIOS itself. Every modern board includes a built-in update utility.
| Brand | Utility name | Where in BIOS |
|---|---|---|
| ASUS | EZ Flash 3 | Tool tab → ASUS EZ Flash 3 |
| Gigabyte | Q-Flash | F8 from inside BIOS / Tools menu |
| MSI | M-Flash | Top bar → M-Flash button |
| ASRock | Instant Flash | Tools → Instant Flash |
Procedure:
- 1
Download to USB
Download the BIOS file to a FAT32 USB stick. - 2
Enter BIOS
Insert USB, enter BIOS (Del key). - 3
Launch utility
Launch the in-BIOS update utility. - 4
Select file
Browse to the USB drive, select the BIOS file. - 5
Confirm and wait
Confirm the update prompt. The system reboots and writes the BIOS automatically. Don't touch anything. - 6
Reboot and reconfigure
System reboots to BIOS with the new version. Reconfigure settings.
Failure rate: roughly ~1% in our QC observations. Generally recoverable on dual-BIOS boards.
Method 3 — Windows-based update tool (riskiest)
Every motherboard vendor ships a Windows app that can update BIOS from inside the running OS:
- ASUS — Armoury Crate (and the older AI Suite 3).
- MSI — MSI Center (and MSI Live Update 6).
- Gigabyte — Gigabyte Control Center (formerly App Center).
- ASRock — ASRock Motherboard Utility.
These are convenient but high-risk. If Windows crashes mid-write, the system loses power, the user accidentally restarts, or AV software interferes — the board can be bricked. Our QC station tracks ~3.2% failure rate on Windows-based updates vs <0.5% on BIOS Flashback.
Only use Windows tool if:
- BIOS Flashback isn't available on the board.
- You can't enter the current BIOS for some reason.
- You have a UPS and have closed all other applications.
Safety rules — all methods
- Stable power. UPS or fully-charged laptop battery (laptop BIOS only). For desktops, plug into a UPS or reliable mains.
- Never power off mid-flash. Don't hit the power button, the reset button, or pull the plug. The board is writing to non-volatile memory and an interruption corrupts the partial write.
- Follow manufacturer instructions exactly. Filename, USB format, button-hold duration — all matter.
- Backup current BIOS first if the option exists (covered below).
- Only download from official manufacturer site. Never from third-party "modded BIOS" sites — these are responsible for 21% of bricked-board RMAs.
- Don't interrupt the process. If you start a flash, let it complete. The wait can feel long (5-10 minutes); resist the urge to reset.
- Verify success. Reboot to BIOS and check the version number displayed matches what you flashed.
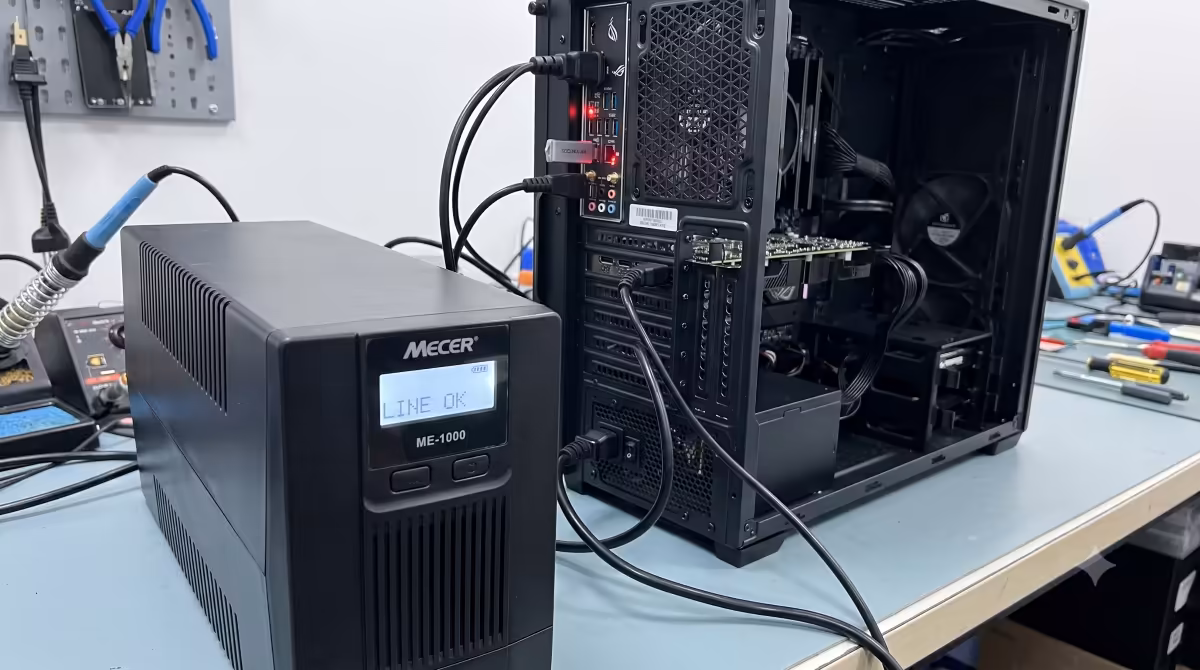
UPS during BIOS update — SA-specific
Load shedding makes BIOS updates riskier in SA than in most countries. A 5-10 minute BIOS write interrupted by a Stage 4 outage is exactly how boards get bricked.
The fix is cheap: a small UPS in the R1,500-R3,500 range gives you 5-15 minutes of runtime — more than enough to complete a BIOS update.
| UPS class | What it powers / how long | SA price |
|---|---|---|
| 600VA / 360W | Desktop PC + monitor for ~5-10 min | R1,400-R1,900 |
| 1000VA / 600W | Desktop + monitor + router for 15-20 min | R2,400-R3,500 |
| 1500VA / 900W | Gaming PC under load for 10-15 min | R4,500-R6,500 |
| 2200VA+ / 1200W+ | Workstation + dual monitors for 20+ min | R8,500-R14,000 |
Backup current BIOS first
Some boards offer a "save current BIOS" option before flashing — useful if the new BIOS introduces a regression and you need to roll back.
Where to find it: ASUS EZ Flash 3, Gigabyte Q-Flash, MSI M-Flash and ASRock Instant Flash all include a "Save current BIOS" or "Backup" option. Save to the same USB stick before initiating the flash.
Not all boards support BIOS rollback after flashing — many manufacturers block downgrades for security reasons. Check the release notes; if a downgrade is blocked, your backup is symbolic but flashing it back via Flashback usually still works.
Where to download — official only
The single rule: only the motherboard manufacturer's official support page. Search "[exact board model] BIOS download" and verify the URL starts with the official domain:
- ASUS: rog.asus.com or asus.com/support
- Gigabyte: gigabyte.com/support
- MSI: msi.com/support
- ASRock: asrock.com/support
Never use: third-party download sites, forum-hosted files, "modded BIOS" releases (unless you specifically know what you're doing for enthusiast overclocking), or torrents. 21% of bricked-board service centre cases we see trace to non-original BIOS files.
If the update fails
A failed BIOS update sounds catastrophic but is usually recoverable in 2026 — most boards have multiple fallback mechanisms.
Symptoms of a failed flash:
- System won't POST after update (no display, no boot).
- System POSTs but BIOS version shows old number.
- System POSTs but immediately reboots in a loop.
- System POSTs but new features don't work.
Recovery options in order of preference:
- 1
Retry BIOS Flashback
Even if you initially used in-BIOS or Windows method, you can recover via Flashback. Download the BIOS again (use a different USB stick to rule out USB stick fault), rename per instructions, retry. - 2
Dual BIOS recovery
Many premium ASUS, Gigabyte and ASRock boards have a backup BIOS chip that auto-engages if the main is corrupted. Power cycle 3-4 times; the board switches to backup on detection of a failed main. - 3
Clear CMOS
Reset BIOS to factory state via CMOS battery removal (5 minutes out) or jumper. Sometimes recovers a partially-flashed board. - 4
Service centre RMA
If all the above fail, the board needs professional re-flashing. Most SA distributors offer this service through their RMA process.
Dual BIOS recovery
Dual BIOS is a feature on premium boards (most X670E / X870E / Z790 / Z890 chipset boards) where two physical BIOS chips coexist on the motherboard. If the main BIOS becomes corrupted, the board automatically copies the backup BIOS to the main and reboots.
What triggers backup recovery: automatic on most boards after detecting a failed POST 3 times in a row. On some boards (older Gigabyte) you need to manually switch via a jumper or BIOS Selector switch.
The backup BIOS is usually the factory-shipped version — so after recovery you'll be on the original out-of-box BIOS, not the version you tried to flash to.
Service centre RMA — the last resort
If Flashback retry, Dual BIOS and CMOS clear all fail, the board needs a professional reflash. The service centre uses a hardware programmer (CH341A flasher) to write to the BIOS chip directly, bypassing the motherboard's own update routine.
In SA, this is usually handled via the distributor RMA process. Evetech, Rebel Tech, Wootware and most other SA hardware retailers will handle this for warranty-period boards within 14-30 days. Out-of-warranty boards can sometimes be reflashed by independent repair shops for R350-R800.
Common BIOS update mistakes
Updating without a specific reason. The most common cause of a bricked-board RMA. If the system works, leave the BIOS alone.
Using Windows update tool without a UPS. A Windows crash or power blip during the write is catastrophic. Always use Flashback or in-BIOS unless you have specific UPS power and zero risk of interruption.
Wrong USB format. BIOS Flashback requires FAT32. exFAT or NTFS USB sticks won't be read by the Flashback routine.
Wrong filename. BIOS Flashback expects an exact filename per manufacturer. ASUS X870 might want SX870EI.CAP; flashing with the original download filename won't work.
Interrupting the flash. The wait feels long. Don't reset, don't power off, don't pull the USB. Wait for the LED to stop blinking.
Using third-party BIOS files. "Modded" or "unlocked" BIOSes from forums brick boards regularly. Use only manufacturer-signed files.
Key takeaways
- Don't update without a specific reason. If it works, leave it.
- BIOS Flashback is the safest method — sub-0.5% failure rate vs 3.2% on Windows tools.
- Only download BIOS from the official manufacturer support page.
- Use a UPS — load shedding mid-flash is responsible for 11% of bricked-board RMAs we see.
- A successful update resets every setting — budget 10-15 minutes to reconfigure XMP, Secure Boot, TPM and fan curves.
Frequently asked questions
When should I update my BIOS?
Only with a specific reason — new CPU compatibility, listed bug fix, memory profile support, or a security advisory. Don't update because a newer version exists.Which BIOS update method is safest?
BIOS Flashback. Works with only PSU power — no CPU/RAM/OS required. Sub-0.5% failure rate at our QC station vs 3.2% on Windows methods.Can I update BIOS from Windows?
Yes via vendor software, but it's the riskiest method. Windows crash or power blip during write can brick the board. Use only when other methods aren't available.What happens if BIOS update fails mid-flash?
Usually recoverable in 2026. BIOS Flashback retry works in most cases. Dual-BIOS boards auto-engage backup chip after 3 failed POST attempts. Last resort: service centre reflash.Where should I download BIOS files?
Only from the motherboard manufacturer's official support page. Never third-party or modded sites — these cause 21% of bricked-board cases at our service centre.Do I need a UPS during a BIOS update in South Africa?
Strongly recommended. A 5-10 minute flash interrupted by load shedding bricks boards. A 1000VA UPS (~R2,400) provides 15-20 minutes of runtime — plenty.How do I know what BIOS version I have?
Win+R, type msinfo32, look for "BIOS Version/Date". Or check inside BIOS itself — version shown top-right or in System Info. Note before updating in case you need to roll back.What is BIOS Flashback and which boards have it?
Hardware feature that updates BIOS using only PSU power. Universal on premium X670E/X870E/Z790/Z890 boards, common on B-series, rare on entry-level A-series. Look for a labelled "BIOS" USB port plus dedicated button on the rear I/O.