Security & Windows · Step-by-Step
Enable Secure Boot.
Half the "Windows 11 won't install" and "Valorant won't launch" tickets we see in SA come down to one BIOS toggle. Here's the whole flow — check, prep, enable, and recover if it bricks boot.
- BIOS toggle
- 5 min
- requires it
- Win 11
- vanguard cutoff
- Jun 2024
What Secure Boot actually does (and doesn't)
Secure Boot is a UEFI firmware feature that runs once, during the few seconds between you pressing the power button and Windows showing the lock screen. In that window, the firmware checks every piece of software it's about to hand control to — bootloader, OS kernel, early drivers — against a database of cryptographic signatures stored on the motherboard.
If anything in that chain is unsigned, signed by a revoked key, or signed by a vendor not in the trust database, the firmware refuses to load it and either halts boot or skips to the next bootable device. The practical effect: rootkits and bootkits that try to embed themselves below Windows cannot run on a Secure Boot system.
What Secure Boot does not do is matter once Windows is loaded. Game performance, application speed, driver behaviour, network throughput — all identical with Secure Boot on or off. It's a startup-time check, not a runtime cost. The myth that Secure Boot tanks FPS comes from confusion with kernel anti-cheats like Vanguard, which are a separate thing that happen to require Secure Boot to function.
How to check if Secure Boot is already on
Before touching anything in BIOS, find out where you stand. There are two reliable ways:
Method 1 — System Information (the fast one)
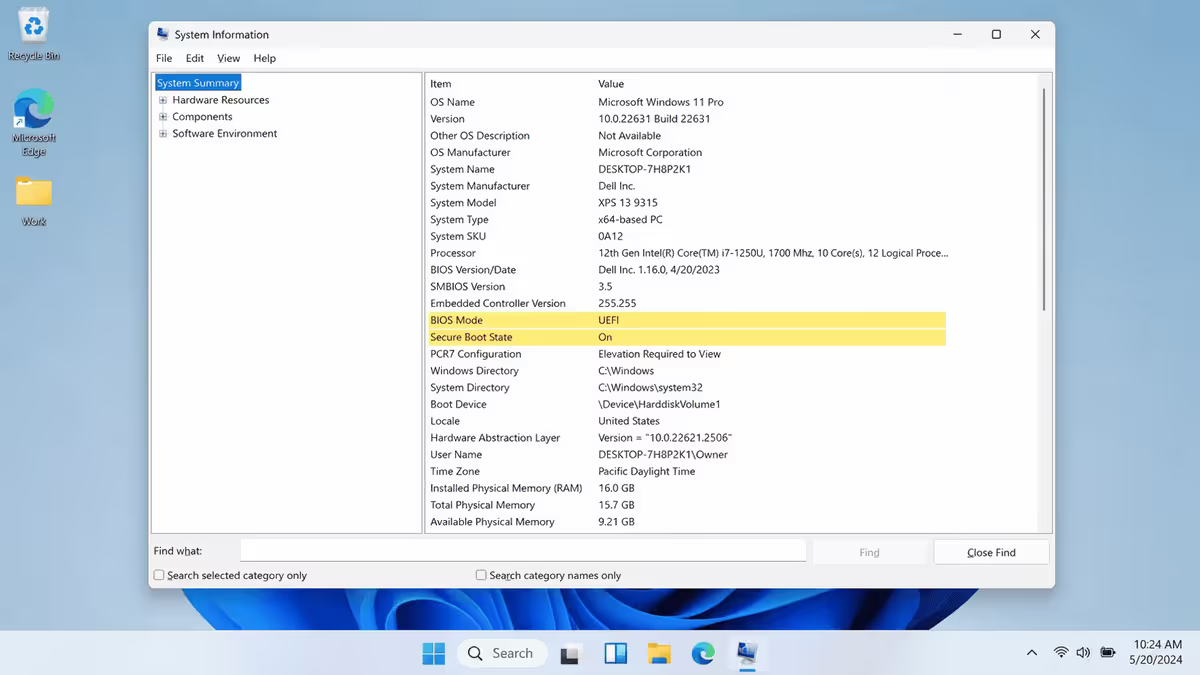
Press Win+R, type msinfo32 and hit Enter. On the System Summary page, look for two lines:
- BIOS Mode — should read UEFI. If it says Legacy, you're booted in CSM/Legacy mode and Secure Boot is impossible until you convert.
- Secure Boot State — three possible values: On (you're done), Off (capable but disabled — easy fix), or Unsupported (motherboard or boot mode is wrong, needs the prerequisites section below).
Method 2 — PowerShell one-liner
Open PowerShell and run Confirm-SecureBootUEFI. It returns True if Secure Boot is on, False if off but capable, or throws "Cmdlet not supported on this platform" if the system is in Legacy mode. Useful in scripts but msinfo32 tells you more.
Prerequisites: UEFI mode, GPT disk, TPM 2.0
Secure Boot is one of four interlocking requirements. Get them in the right order or you'll bounce off the toggle:
| Requirement | How to verify | Fix if missing |
|---|---|---|
| UEFI boot mode | msinfo32 → BIOS Mode = UEFI | Convert MBR→GPT, change BIOS to UEFI |
| GPT partition table | diskmgmt.msc → disk Properties → Volumes | mbr2gpt.exe /convert (Win 10+) |
| TPM 2.0 enabled | tpm.msc → Spec Version 2.0 | Enable fTPM (AMD) or PTT (Intel) in BIOS |
| CSM / Legacy disabled | BIOS → CSM Support / Launch CSM | Set to Disabled in BIOS |
The MBR-to-GPT sidebar. If your Windows install is still on an MBR disk (common on machines upgraded from Windows 7/8/10 without a clean install), Secure Boot is not available until you convert. Microsoft ships a tool for this — mbr2gpt.exe — which converts in-place without data loss:
- Open an admin Command Prompt.
- Run
mbr2gpt /validate /disk:0 /allowFullOSto confirm the disk is convertible. - If validation passes, run
mbr2gpt /convert /disk:0 /allowFullOS. - Reboot into BIOS, switch boot mode from Legacy/CSM to UEFI, and proceed to the Secure Boot toggle.
TPM 2.0. Almost every AMD Ryzen and Intel 8th-gen-or-newer board has a TPM 2.0 module built in. On AMD it's called fTPM, on Intel it's PTT — both live in the BIOS Security menu and just need to be set to Enabled. A discrete TPM module on the motherboard header counts too.
Enable Secure Boot in BIOS — vendor paths
Power down, then tap your motherboard's BIOS key during POST. On most boards that's Del; some laptops use F2, MSI laptops sometimes use F11. Once you're in the BIOS, the exact menu path depends on the brand. Here are the four big ones we see in SA every day:
- 1
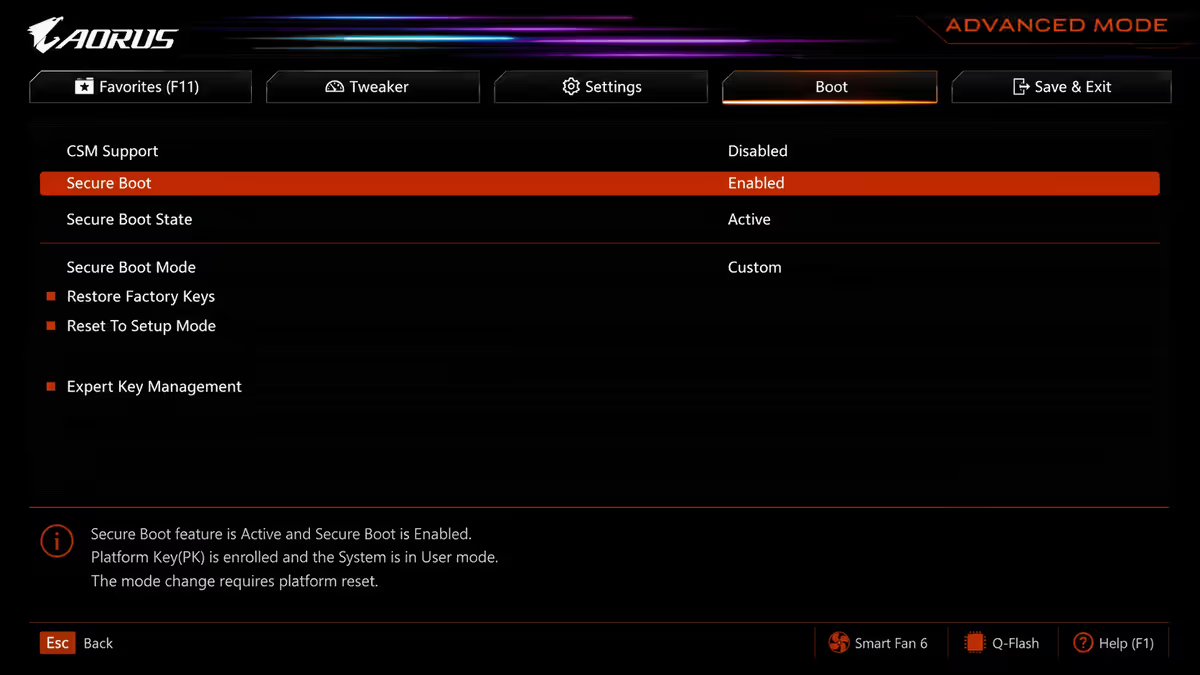
Gigabyte / Aorus
BIOS Features → CSM Support → Disabled BIOS Features → Secure Boot → Enabled F10 → Save & Exit - 2
MSI
Advanced Mode (F7) → Settings → Advanced Windows OS Configuration → BIOS UEFI/CSM Mode → UEFI Settings → Security → Secure Boot → Enabled - 3
ASUS / ROG
Advanced Mode (F7) → Boot → CSM → Disabled Boot → Secure Boot → OS Type → Windows UEFI Mode F10 → Save & Exit - 4
Asrock
Advanced (F6) → Security → Secure Boot → Enabled (CSM is auto-disabled when Secure Boot turns on) F10 → Save & Exit
After saving and exiting, the machine reboots. The first POST may take 10–20 seconds longer than usual while the firmware initialises the Secure Boot key database. Don't panic and hold the power button. Once Windows boots, verify with msinfo32 that Secure Boot State now reads On.
If Secure Boot remains greyed out after disabling CSM, look for a "Setup Mode" / "Custom" / "User Mode" sub-option. The toggle is usually User Mode — that loads Microsoft's default Platform Keys and allows enable. Setup Mode is for advanced users loading their own keys.
Valorant, Vanguard and the anti-cheat wave
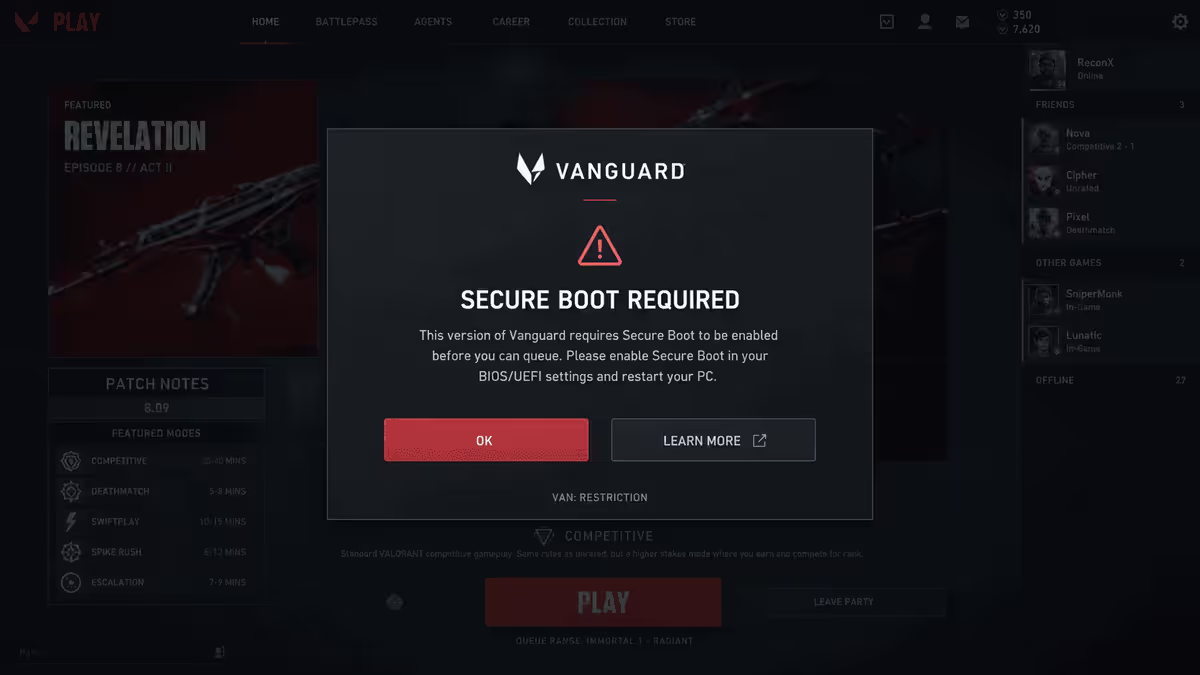
Riot's Vanguard anti-cheat is the headline reason most South African gamers end up reading guides like this one. Valorant exploded on Telkom and Vodacom fibre during 2023–2024, and since June 2024, Vanguard refuses to allow matches on Windows 11 systems without Secure Boot and TPM 2.0 active. The client launches, you can hit the menu — but the moment you queue, you get the Vanguard error and a hard kick.
Vanguard is a kernel-level driver. To trust the rest of the OS, it needs to know the boot chain wasn't tampered with — which is exactly what Secure Boot provides. The chain of trust runs: firmware verifies bootloader, bootloader verifies Windows kernel, Windows kernel verifies Vanguard, Vanguard trusts the integrity check and lets you queue. Break any link and Vanguard pulls the plug.
Vanguard isn't alone:
- Faceit Anti-Cheat (Counter-Strike 2 competitive ladders) requires Secure Boot since the 2024 platform refresh.
- EA Anti-Cheat (Battlefield 6, FC 25, Apex) checks Secure Boot state and refuses ranked play without it.
- Riot's League of Legends client doesn't yet hard-block on Secure Boot but logs the state and flags accounts that play with it disabled.
- Call of Duty Ricochet uses Secure Boot signals as one of multiple inputs to its trust score.
Linux dual-boot with Secure Boot on
A common misconception: Secure Boot blocks Linux. Not in 2026. The major distributions have shipped a Microsoft-signed Shim bootloader for years now, and that Shim is pre-trusted by every motherboard's Secure Boot key database. The chain works exactly like Windows: firmware verifies Shim, Shim verifies GRUB, GRUB verifies the signed Linux kernel.
Works out of the box with Secure Boot on:
- Ubuntu (22.04 LTS, 24.04 LTS and newer)
- Fedora (38+)
- Linux Mint (21+)
- openSUSE Leap and Tumbleweed
- Debian (12 Bookworm and newer)
- Pop!_OS, Zorin OS, elementary OS
Needs extra steps: Arch Linux and derivatives (Manjaro, EndeavourOS) — kernel modules must be signed with a Machine Owner Key (MOK) enrolled at first boot. Custom kernels (compiled yourself) — sign them with sbsigntool. Out-of-tree drivers (proprietary NVIDIA on certain distros) — DKMS modules need MOK signing.
If you're already running a dual-boot setup that worked with Secure Boot off and you've now turned it on, reboot into the Linux side. GRUB should come up normally. If the firmware refuses to launch the EFI entry, it usually means the distribution was installed in Legacy mode — the fix is reinstalling in UEFI mode, or re-running the distribution's bootloader installer (e.g. grub-install --target=x86_64-efi).
When Secure Boot blocks boot or features — recovery
Most enablements are uneventful. When they go wrong, it's almost always one of these patterns — each with a fix:
System won't POST after enabling Secure Boot
Usually because CSM was the active boot mode and the existing Windows install was MBR-mode. The new Secure Boot firmware can't find a bootable entry. Two recovery routes:
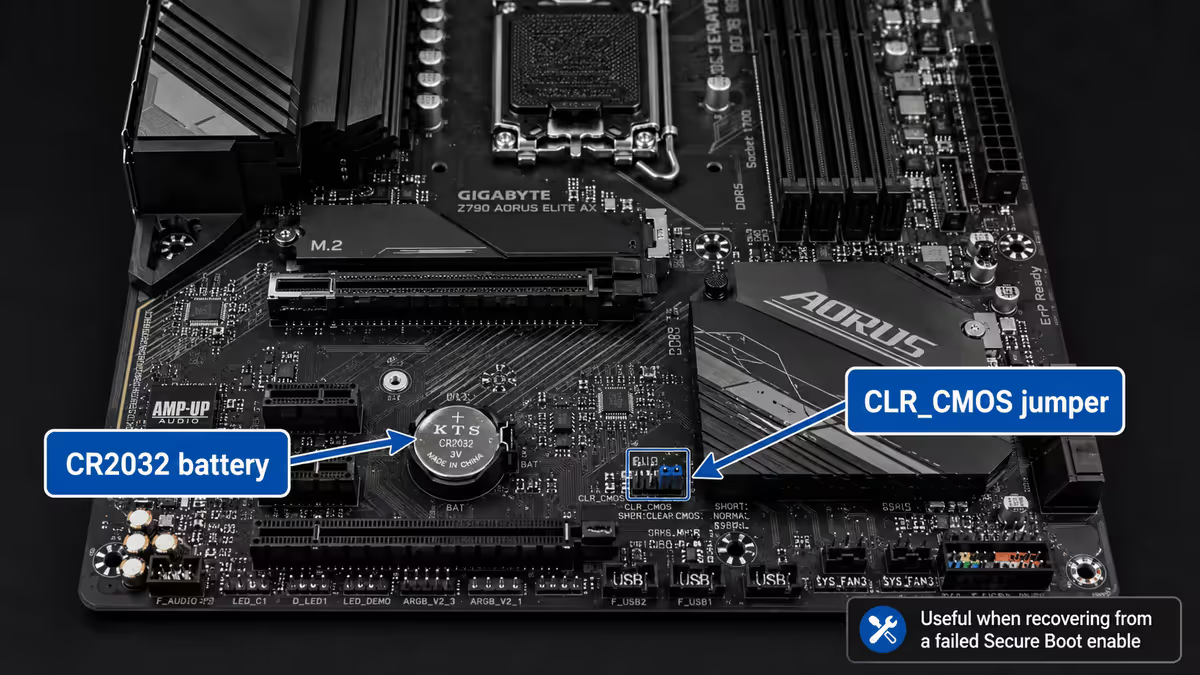
- Clear CMOS. Power off, unplug the wall socket, locate the CLR_CMOS jumper or button on the motherboard (refer to your manual). Short the jumper for 10 seconds or hold the button for 5. Reconnect power and boot — BIOS returns to defaults including CSM enabled, machine boots, and you can plan the conversion properly.
- Remove the CMOS battery. The CR2032 coin cell. Pull it for 60 seconds with the system unplugged, then replace. Same effect as the jumper.
Older NVIDIA / AMD GPU stuck at black screen
Some older NVIDIA cards (GTX 700-series and earlier) and pre-2017 AMD cards shipped with unsigned VBIOS that Secure Boot rejects during early POST. If the rest of the system seems alive but you see no display:
- Boot with motherboard iGPU if available — flash a signed VBIOS update from the manufacturer.
- If no iGPU, disable Secure Boot temporarily, update the VBIOS, then re-enable.
- Cards from 2018 onwards all ship signed VBIOS by default — this only affects much older hardware.
Unsigned overclocking tool refuses to load
Some niche tools (older MSI Afterburner builds, certain XTU utilities, vendor-specific RGB controllers from 2019 and earlier) ship unsigned kernel drivers that Secure Boot blocks. Update to the current version from the vendor's site — every major utility has been signed since 2022. If a tool genuinely cannot be replaced, disable Secure Boot only while using it.
"Invalid Signature Detected" at POST
The firmware found a signed entry but the signature doesn't match any key in its database. Most often caused by a USB stick with a tampered or self-signed bootloader. Remove all USB drives, reboot. If it persists, enter BIOS → Secure Boot → Key Management → Reset to Setup Mode → Install Default Keys. This reloads Microsoft's standard Platform Key set.
Key takeaways
- Secure Boot is a startup-only signature check — zero runtime cost, zero FPS impact, full bootkit protection.
- Check first with
msinfo32— BIOS Mode must read UEFI and Secure Boot State must read On or Off (not Unsupported). - Prerequisites in order: GPT disk, UEFI boot mode, TPM 2.0 enabled, CSM disabled — only then will the Secure Boot toggle work.
- Vanguard, Faceit AC and EA AC require Secure Boot on Windows 11 since June 2024 — no toggle, no ranked matches.
- If Secure Boot bricks boot, clear CMOS via the jumper or coin-cell battery — defaults restore CSM and the machine boots again.
Frequently asked questions
What is Secure Boot?
A UEFI firmware feature that verifies every piece of boot-time software against a signature database. Unsigned or untrusted code is refused. The result: rootkits and bootkits that try to load before Windows can't run.Do I need Secure Boot for Windows 11?
Yes — Microsoft requires Secure Boot capability as part of the Windows 11 hardware floor alongside TPM 2.0 and a supported CPU. The installer refuses to proceed without it.Does Secure Boot affect gaming performance?
No. Secure Boot runs only during firmware-to-OS handover at startup. Once Windows is loaded it's dormant. FPS, frame times and input latency are identical with it on or off.Can I dual-boot Linux with Secure Boot on?
Yes — Ubuntu, Fedora, Mint, openSUSE and Debian ship a Microsoft-signed Shim bootloader that's pre-trusted by motherboards. Niche distros may need MOK enrolment.Why does Valorant require Secure Boot?
Vanguard is a kernel-level anti-cheat that needs a verified boot chain to trust the OS. Without Secure Boot, cheaters could load tampered kernels or unsigned drivers. Since June 2024, Vanguard hard-blocks queue without Secure Boot + TPM 2.0.What happens if I disable Secure Boot?
Windows 11 still runs but flags the system as non-compliant. Vanguard, Faceit AC and EA AC stop allowing matches. The boot chain becomes vulnerable to bootkits. There's no performance gain to disabling it.How do I enable Secure Boot on a Gigabyte / MSI / ASUS motherboard?
Gigabyte: BIOS Features → CSM Disabled → Secure Boot Enabled. MSI: Settings → Security → Secure Boot Enabled (CSM mode set to UEFI first). ASUS: Boot → Secure Boot → OS Type → Windows UEFI Mode. Asrock: Security → Secure Boot → Enabled.What if my machine won't POST after enabling Secure Boot?
Clear CMOS via the motherboard's CLR_CMOS jumper or button, or pull the CR2032 coin-cell battery for 60 seconds with the system unplugged. Defaults restore, CSM re-enables, and the machine boots — convert MBR to GPT before trying again.