Troubleshooting · Diagnostic
PC won't turn on? — Diagnose it in ten minutes, fix it for free.
Almost three quarters of "dead PC" support tickets we see at the Centurion bench are free to fix — once you work the symptom branches in the right order. This guide walks you through that order.
- most common causes
- 8
- diagnostic
- 10-min
- free to fix
- 73%
The first thirty seconds — three checks before anything else
Before you start unscrewing the side panel, run these three checks. They resolve a surprising fraction of "dead PC" cases without any tools.
One: confirm wall power. Unplug the PC, plug a lamp or a phone charger into the same wall socket. If the lamp doesn't light, the issue is the socket, the trip switch in your DB board or the load-shedding schedule — not the PC.
Two: flip the PSU rear switch. The toggle marked "0 / 1" on the back of the PSU above the kettle-cord socket is the master power switch for the entire PC. It gets knocked to "0" during transport, when reaching behind the case for a cable, or when load shedding caused a panic-shutdown. Flip it to "1".
Three: check the monitor. Confirm the monitor itself powers on (its own LED comes alive), the input source matches the cable you're using (HDMI 1 vs HDMI 2 vs DisplayPort), and the cable is plugged into the GPU's HDMI/DisplayPort port — not the motherboard's port. Plugging into the motherboard port instead of the GPU is one of the most common "no display" causes on a new PC.
If all three pass, identify which symptom path you're on — that's the next section.
Path A: No power at all — nothing happens
No fans, no LEDs, no front-panel light, no PSU fan spin, no motherboard heartbeat LED. Hitting the power button does literally nothing. Work this list in order.
A1. PSU rear switch. Already covered, but it bears repeating because this single check resolves ~12% of dead-PC calls.
A2. Wall socket and kettle cord. Swap the kettle cord with a known-good one (the same cord type powers kettles, monitors and printers — easy to test). Try a different wall socket.
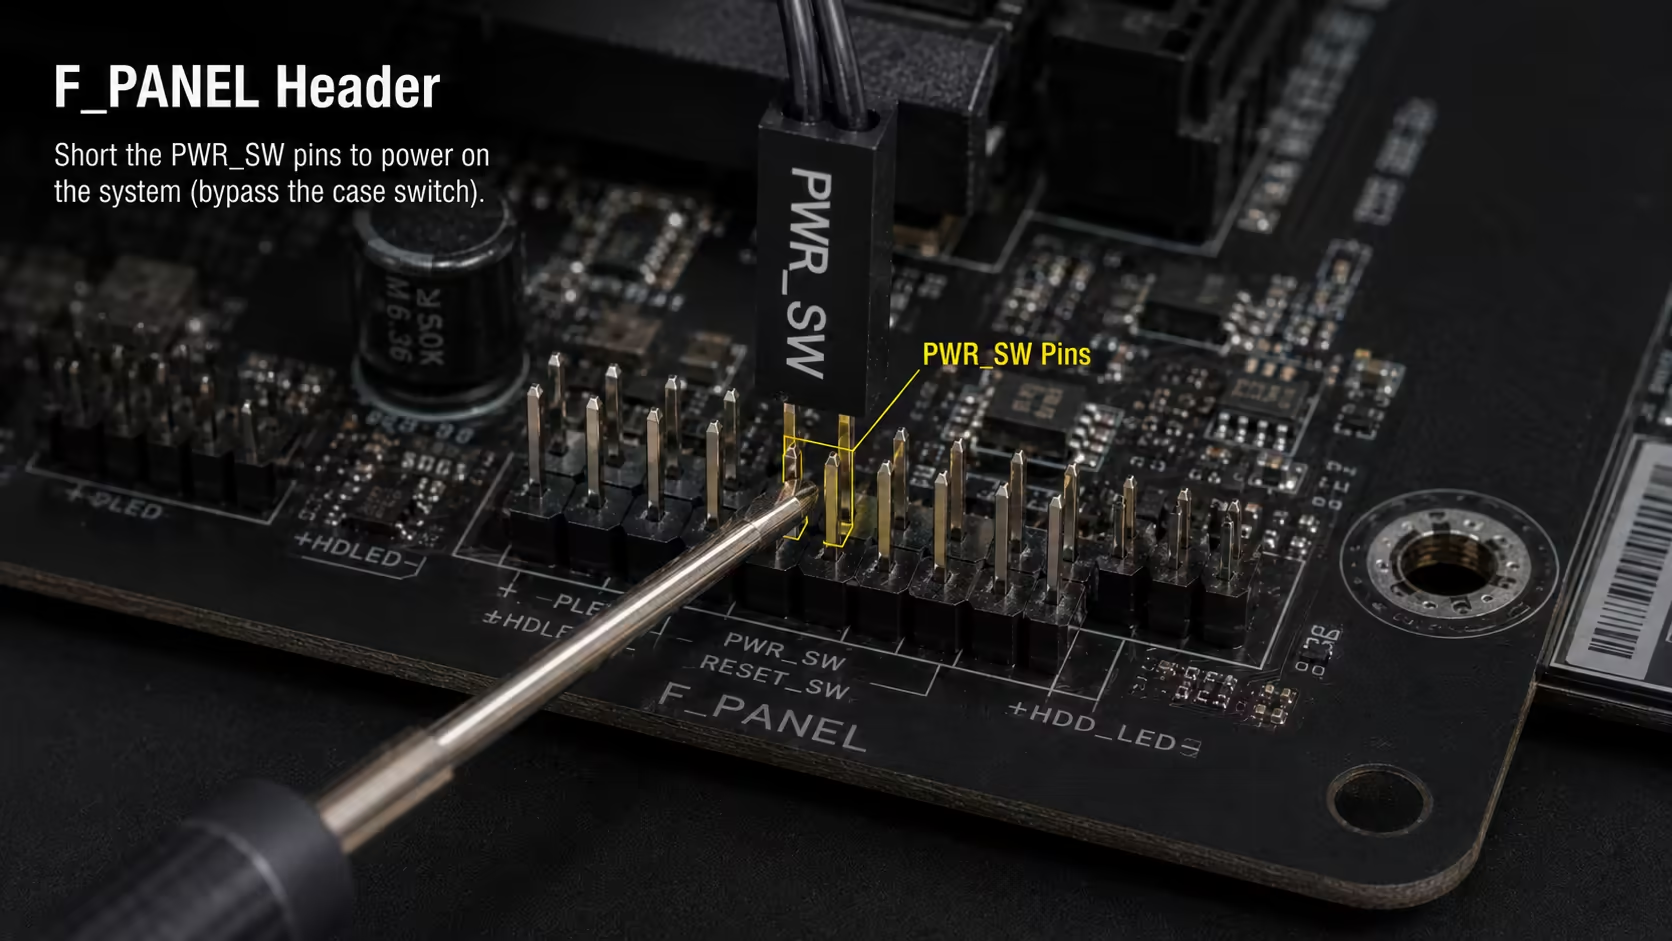
A3. Front-panel power switch wire. Open the case side panel. Locate the F_PANEL header on the motherboard (usually bottom-right edge, refer to your manual for the exact pinout). The PWR_SW (power switch) wire from the case is a small two-pin connector. Confirm it's plugged onto the correct two pins and that the wire itself isn't snapped at the case-side connector. If you're unsure, briefly touch a screwdriver tip across the PWR_SW pins on the motherboard — if the PC powers on this way, the case switch wire is the problem.
A4. 24-pin ATX power connector. Press the 24-pin connector firmly into the motherboard until you hear a clear click of the side latch. A partially-seated 24-pin is a classic dead-PC cause on a fresh build.
A5. CPU 8-pin (EPS) power. The 8-pin (or 4+4) power connector at the top-left of the motherboard above the CPU socket is mandatory and frequently forgotten. The PC will not boot without it. Confirm it's plugged in fully. If your board has dual 8-pins for high-power CPUs, both should be populated for stable operation though one usually allows boot.
A6. PSU paperclip test. With the PSU unplugged from the motherboard, locate the 24-pin connector and identify the green wire (PS_ON) and any black wire (ground). Bend a paperclip into a U and bridge those two pins. Plug in the PSU and flip the rear switch on. If PSU fans spin, the PSU is alive — fault is elsewhere. If nothing, the PSU is dead.
Path B: Fans spin but no display
The PC is clearly receiving power — fans spinning, RGB LEDs lit, possibly a heartbeat or POST LED on the motherboard. But the monitor stays blank. The fault is almost always RAM, GPU or the display cable.
B1. Monitor cable to GPU, not motherboard. On a desktop with a discrete graphics card, the monitor cable must plug into the GPU's HDMI or DisplayPort ports at the back of the card — not the motherboard's display ports. Plugging into the motherboard ports gets you nothing on a discrete-GPU build (unless your CPU has iGPU and BIOS is set to use it).
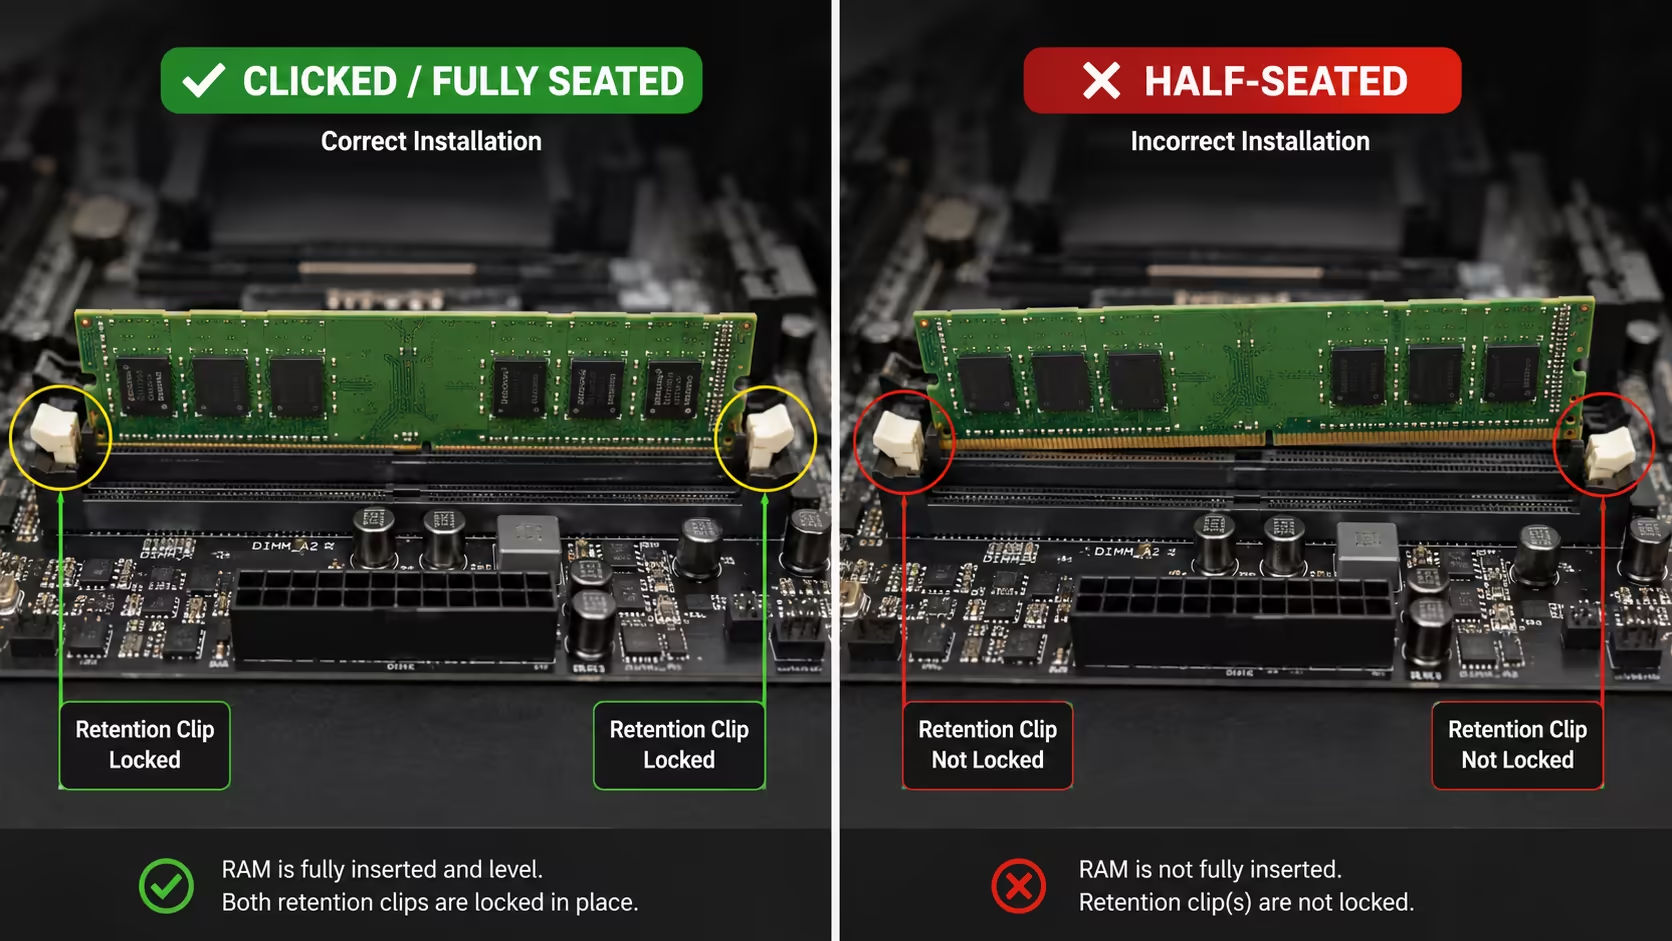
B2. Reseat the RAM completely. Push down hard on each RAM stick until both side clips snap up and lock. A half-seated stick is the single most common cause of no-display POST failure. After reseating, you should physically hear the clips click into the locked position.
B3. Test with one stick of RAM at a time. If reseating both didn't help, power down, remove all but one stick, and try again. Try the lone stick in the slot recommended by your motherboard manual (usually A2 / DIMM2 on AMD AM5 and most Intel boards). If that boots, the other stick is suspect — swap and retest. If neither boots alone, suspect the RAM kit or the slot.
B4. Reseat the GPU. Power down, unscrew the GPU bracket from the case, press the PCIe latch on the motherboard slot to release the card, lift it out completely, and re-insert with firm even pressure until the latch clicks. Re-screw the bracket. Confirm the GPU's PCIe power cables (6-pin / 8-pin / 12VHPWR depending on card) are fully seated on both ends.
B5. Listen for POST beeps. If your motherboard has a piezo speaker connected (or built-in), beep patterns identify the failing component — see the next section for the codebook.
Path C: POST fails or system restart loops
The PC powers on, fans spin briefly, then it cuts power and tries to boot again — or it gets to POST but throws an error and won't progress to OS. This is usually BIOS, CPU compatibility or RAM training.
C1. Clear CMOS. Unplug the PC. Locate the CR2032 coin battery on the motherboard, lever it out gently with a plastic tool, wait 30-60 seconds, refit. Alternatively, use the CLR_CMOS jumper or the rear-IO Clear CMOS button if your board has one. This wipes BIOS settings back to default and clears any memory training failure.
C2. BIOS Flashback for new CPU on old board. If you've just installed a CPU released after your motherboard, the BIOS may not recognise the chip and the board won't POST. Use BIOS Flashback (USB-based BIOS update that runs without CPU/RAM/GPU installed) to flash the latest BIOS. Most modern enthusiast boards from ASUS, MSI and Gigabyte support this — refer to the manual for the BIOS Flashback procedure and the correctly-named BIOS file on a FAT32 USB drive.
C3. Test with one stick of RAM. Memory training can fail on the first boot with a full kit, especially on AMD AM5 with high-speed DDR5. Pull all but one stick, attempt boot. If it boots, shut down and add a second stick.
C4. Try a known-good PSU. A dying PSU can deliver enough power for fans to spin but not enough for stable POST under CPU load. If you have access to a spare known-good PSU, swap it in as a definitive test.
C5. Listen for and decode POST beep codes — covered next.
POST beep codes — what each pattern means
A small piezo speaker plugged into the motherboard's SPK header (or a built-in buzzer on some boards) emits beeps during the Power-On Self-Test to indicate hardware status. The exact mapping depends on which BIOS your board uses.
| Beep pattern | AMI / common meaning | What to try |
|---|---|---|
| 1 short beep | Healthy POST | No fault — boot continuing |
| 3 short beeps | Memory error | Reseat RAM, test one stick |
| 1 long, 2 short | Video card error | Reseat GPU, check PCIe power |
| 1 long, 3 short | Video memory error | GPU likely faulty; swap to test |
| 5 short beeps | CPU error | Reseat CPU, check 8-pin power |
| 7 short beeps | CPU exception | CPU/BIOS compatibility — flash BIOS |
| Continuous beep | Power / over-heat | Check PSU, CPU cooler mount, fans |
| No beeps, no boot | No POST at all | Likely CPU, board or PSU dead |
Newer enthusiast boards often include a two-digit POST code display or four diagnostic LEDs (CPU / DRAM / VGA / BOOT) instead of beeps. The Q-Code or Debug-Code map in your motherboard manual translates the two-digit code to a specific failure stage. Use that map alongside the beep table above.
Top 8 causes ranked by frequency
Across the support tickets we work at the Centurion bench, "won't boot" complaints break down into a remarkably consistent distribution. Knowing the ranking saves diagnostic time — start at the top, work down.
| Cause | Share of tickets | Fix |
|---|---|---|
| 1. RAM not fully seated | 28% | Re-press both clips until they click |
| 2. CPU 8-pin not connected | 21% | Plug in the 8-pin (or 4+4) above CPU socket |
| 3. Front-panel header wrong pins | 16% | Refer to motherboard manual for F_PANEL layout |
| 4. PSU rear switch left at 0 | 12% | Flip rear switch to 1 |
| 5. Standoff shorting board | 9% | Remove extra standoff under board |
| 6. Dead PSU (often post load-shedding) | 7% | Replace PSU |
| 7. Dead motherboard | 4% | RMA / replace |
| 8. Other (CPU damage, BIOS, cables) | 3% | Case-by-case diagnosis |
Causes 1-5 collectively make up 86% of cases and are free to fix. Causes 6-8 require component replacement.
Load shedding and PSU failure — the SA-specific killer
South Africa's grid instability is a real factor in PSU lifespan. The killer isn't the loss of power — it's the voltage spike when power returns. Grid restoration after a load shedding stage can swing voltage well outside spec for a few seconds, and that surge is what destroys PSUs.
What to do:
- Shut the PC down before scheduled load shedding and unplug it from the wall socket. The surge can't hurt a disconnected machine.
- Run a line-interactive UPS rather than a basic plug-strip with "surge protection". A real UPS regulates voltage and absorbs spikes; a R200 surge-only plug strip does almost nothing against grid-level surges.
- Buy a PSU with proper protection circuits. Look for OVP (over-voltage protection), OCP, OPP, SCP and brown-out protection — listed in the spec sheet of any decent PSU. Tier-A and Tier-B PSUs from Corsair, Seasonic, Be Quiet, Cooler Master MWE Gold and ASUS ROG have these as standard. Generic / unbranded PSUs often don't.
- Replace any PSU older than 5-6 years proactively if you're in a load-shedding-heavy area. Capacitors age, protection circuits weaken, and the inevitable surge eventually finds the weakness.
When it's actually a dead component
Once you've worked the symptom branch and ruled out the common causes, the remaining suspects are dead components. The order to confirm them, cheapest to most expensive:
Dead PSU. Confirm with the paperclip test (described under Path A6). If PSU fans don't spin on the paperclip jump, the PSU is dead — replace it. New PSU at SA retail starts around R900 for an entry 550W unit; quality 750W Gold sits R1,800-R2,500.
Dead RAM. Tested by booting with one stick at a time across multiple sticks. If no individual stick boots, RAM is suspect — most-warrantied component on a PC, lifetime cover from Corsair/G.Skill/Kingston makes this easy.
Dead GPU. Tested by removing the GPU and using CPU iGPU (if available) to confirm system boots otherwise. RMA via SA distributor (2-4 weeks typical).
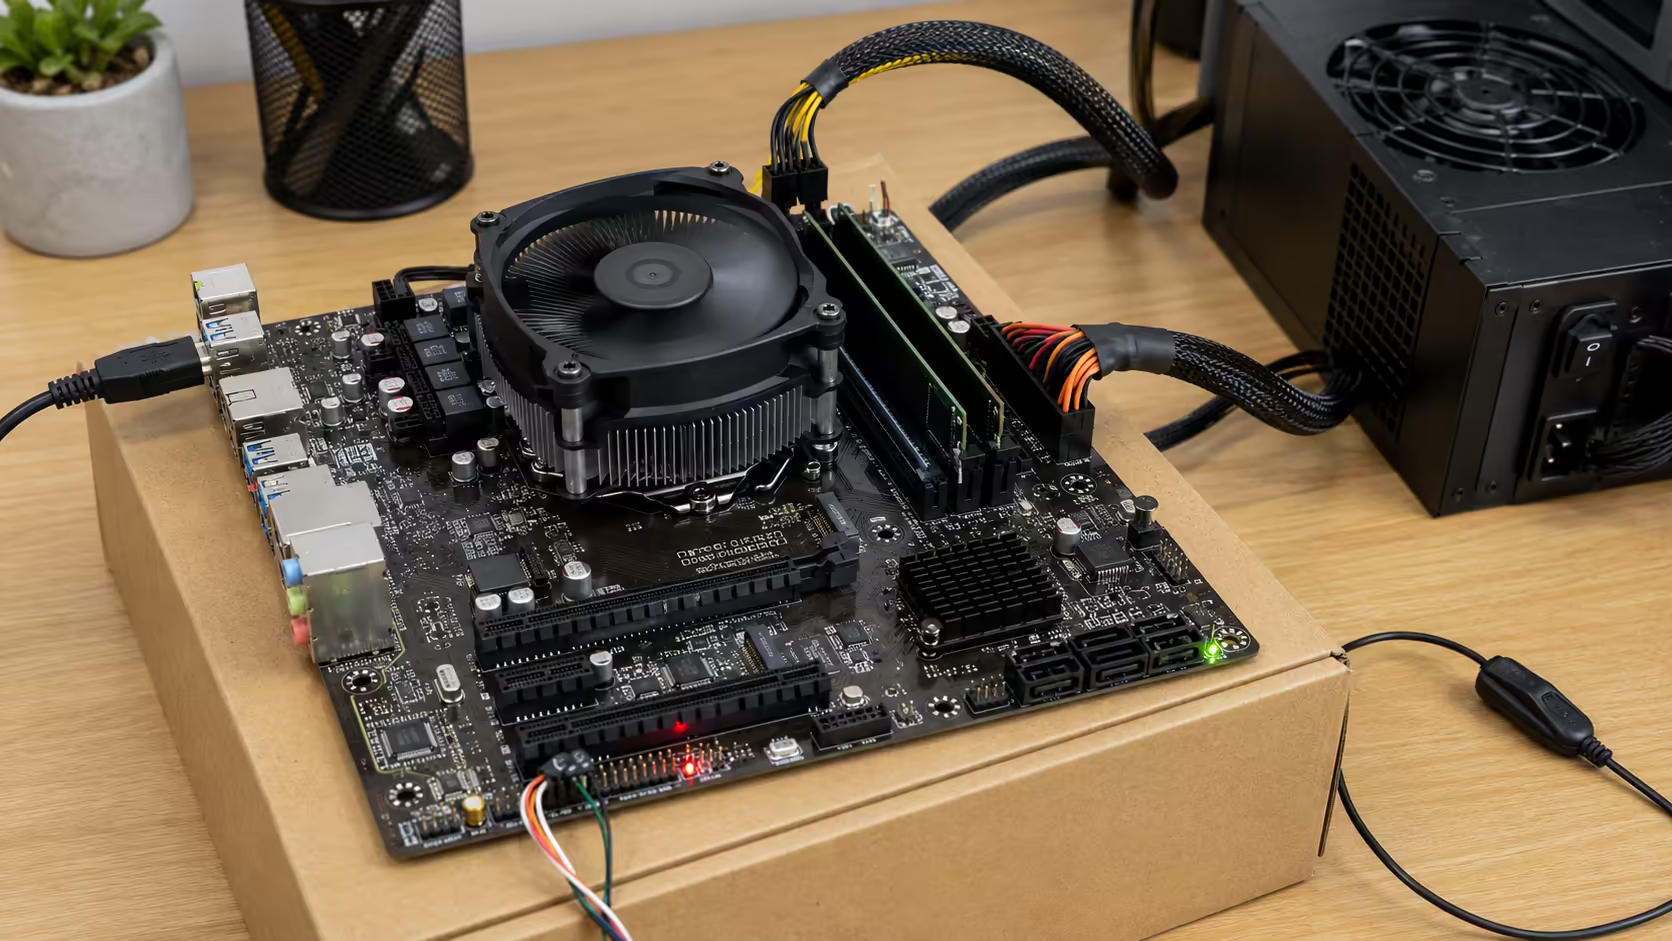
Dead motherboard. The trickiest to confirm. Strip the build to absolute minimum (CPU + cooler, one stick of RAM in slot 2, no GPU if iGPU available, no storage). Bench-test on the motherboard box (cardboard, never anti-static bag — they conduct). If nothing on a minimal config with a known-good PSU, the board is the most likely culprit.
Dead CPU. Extremely rare on modern CPUs unless physically damaged during install (bent socket pins on AM4/AM5, bent contact array on LGA1851). Confirmed only by swapping into a known-good board.
Common diagnostic mistakes to avoid
Skipping the wall-socket check. Going straight to opening the case before confirming the wall socket has power costs the most time and embarrassment in our support data. Always test the socket first.
Reseating once and giving up. "Reseat the RAM" means pull both sticks completely out, blow any dust out of the slots, and re-press both until both clips click. Half-reseating is the same as not reseating.
Replacing the wrong component first. Buying a new PSU because the PC won't turn on, when the actual fault is a CPU 8-pin not plugged in, is the most expensive way to discover the cable was loose. Work the symptom branch before spending money.
Anti-static bag mistake. Bench-testing a motherboard on the anti-static bag the board shipped in is a common YouTube error — those bags conduct electricity on the outer layer. Bench-test on the cardboard box itself, never the bag.
Forgetting the monitor input source. Pressing the monitor's "source" or "input" button to confirm it's set to the right HDMI/DisplayPort input takes two seconds and resolves an embarrassing number of "no display" cases.

Key takeaways
- Identify the symptom path first: no power / fans spin no display / POST fails. Then work that branch in order.
- 73% of dead-PC tickets are free to fix — most commonly loose RAM, missing CPU 8-pin, or the PSU rear switch left at 0.
- Monitor cable goes in the GPU's ports, never the motherboard's, on a discrete-graphics build.
- POST beep codes (or Debug-Code LEDs / Q-Code display) point straight at the failing component class.
- Post load-shedding, suspect the PSU first. A line-interactive UPS prevents recurrence.
Frequently asked questions
Why does my PC have no power at all when I press the button?
Check PSU rear switch is at 1, wall socket has power, 24-pin and CPU 8-pin are fully seated, and front-panel power-switch wire is on the correct F_PANEL pins. Bridge the PWR_SW pins with a screwdriver to bypass the case switch as a final test.My PC fans spin but I get no display — what now?
Reseat both RAM sticks until clips click; test one at a time. Reseat the GPU and confirm PCIe power cables seated. Monitor cable must go in the GPU not the motherboard. Listen for POST beep codes.What is a POST beep and what do the codes mean?
POST beeps signal hardware faults during boot. 1 short = healthy, 3 short = memory, 1 long + 2 short = video, 5 short = CPU, continuous = power/overheat. Mapping varies by BIOS vendor — check motherboard manual for the exact codebook.How do I clear CMOS to fix a boot problem?
Unplug PC, remove the CR2032 coin battery on the motherboard for 30-60 seconds, refit. Or use the CLR_CMOS jumper or rear-panel button. Resets BIOS to defaults — useful after failed overclock or memory training.My PC was working then load shedding hit — now nothing. What happened?
Voltage surges when grid returns kill PSUs. Swap in a known-good PSU to confirm. Going forward, shut PC down before scheduled load shedding and unplug, or run on a line-interactive UPS not a basic surge strip.Why does my PC turn on then immediately turn off?
Short-cycle usually means a motherboard fault detected before POST completes — standoff shorting the board to the case, partial CPU 8-pin, half-seated RAM, or cooler not mounted properly. Bench-test on cardboard to rule out the standoff short.Should I try jumpstarting the motherboard with a paperclip?
Yes, as a diagnostic. With PC off, touch a screwdriver across the two PWR_SW pins on the F_PANEL header. If it boots, the case power-switch wire is faulty or on the wrong pins.When is the problem a dead motherboard versus a dead PSU?
PSU paperclip test (green + black on 24-pin, PSU unplugged from board) confirms PSU is alive if fans spin. To confirm a dead motherboard, strip to bare minimum (CPU, one RAM stick, no GPU if iGPU available) and bench-test on cardboard with a known-good PSU.