Desk Layout Setup Guide
The best desk layout for work & play.
A good desk layout isn't about RGB or trending YouTube setups. It's a handful of physical distances and angles that decide whether you'll have neck pain in two years — and whether you'll actually want to sit down to work.
- monitor distance
- 50-70 cm
- elbow angle
- 90-100°
- SA setup tiers
- R3k-R20k
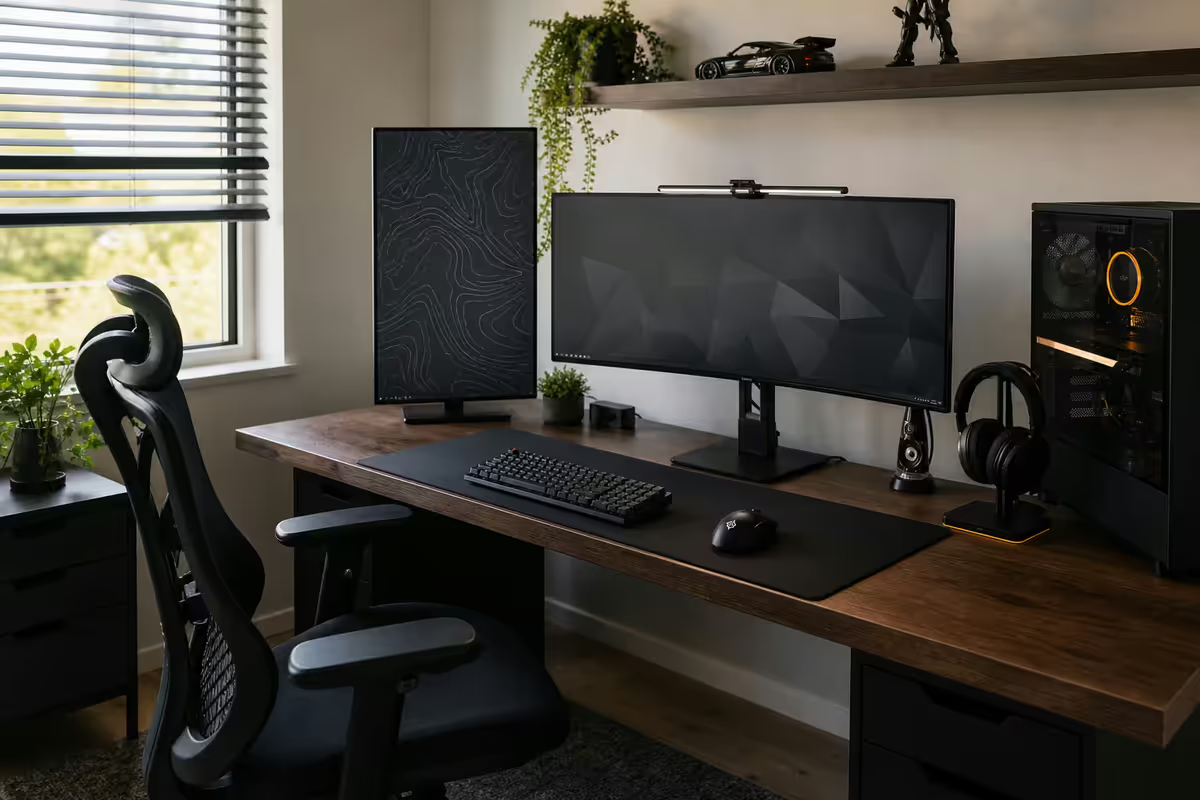
Monitor position — centre, eye level, arm-length
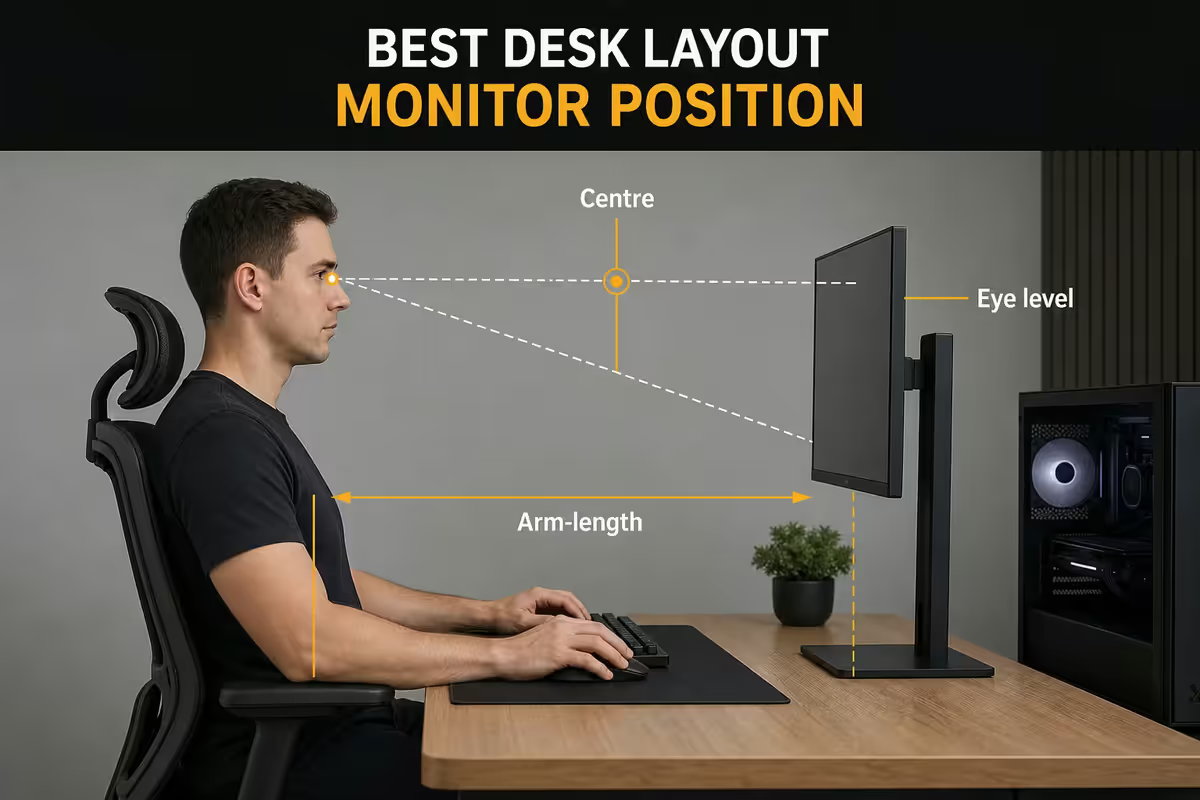
Almost every desk-related neck and shoulder complaint traces back to the monitor sitting in the wrong place. Three numbers fix it: top third at eye level, arm-length distance (50-70 cm), and a 10-15° backward tilt.
| Variable | Target | Why it matters |
|---|---|---|
| Top of screen vs eye level | Top third at eye height | Neck stays neutral; no chronic forward tilt |
| Eye-to-screen distance | 50-70 cm (arm-length) | Reduces refocus strain & squinting |
| Tilt angle | 10-15° back | Reflections minimised, gaze hits middle |
| Monitor centring | Directly in front of nose | No twisting; spine stays aligned |
A simple test: sit fully upright, close your eyes, then open them. Your gaze should land on the top third of the screen, not the centre and not the top edge. If it lands lower, the monitor is too low — a stack of books works as a temporary fix; a proper monitor arm or VESA stand is the long-term answer.
For curved ultrawides (34" and 49"), the rules don't change — the natural curve helps the edges fall within easy gaze range, but the centre still needs to be at eye level and arm-length away. Don't push the desk against the wall and the screen against the wall — leave 10 cm of breathing room behind the monitor for cables and airflow.
Keyboard ergonomics — 90° elbows, straight wrists
The single biggest predictor of wrist pain is the angle of your forearms when typing. The target is simple: elbows at 90-100°, wrists perfectly straight, shoulders relaxed. Everything follows from getting the desk height right.
A standard SA desk surface is 72-75 cm from the floor — designed around the average seated adult. If you're taller, raise the chair until elbows hit 90° and add a footrest so feet stay flat. If the desk is genuinely too tall and the chair won't go high enough, a height-adjustable desk or sit-stand converter is the only real fix.
Things that quietly hurt your wrists:
- Tilting the keyboard up with its built-in feet — this bends wrists backward. Keep the keyboard flat or tilted slightly down (negative tilt).
- Wrist rests used while typing — they're for resting between bursts, not for supporting wrists mid-keystroke. Floating your wrists is correct.
- Reaching too far forward — keyboard should sit at the edge of the desk's primary reach zone, not pushed against the monitor.
- Hunching the shoulders — usually a sign the desk is too high or the chair too low.
Mouse + reach zones — same plane, no overreach
The keyboard and mouse should be on the same horizontal plane — not the mouse on a separate pad-mounted-on-pad combo, not the mouse on a different desk height. Your right hand (for right-handers) moves between the home row and the mouse dozens of times per minute; any height mismatch becomes shoulder tension fast.
Think of the desk in three reach zones:
- Primary zone (within forearm radius) — keyboard, mouse, notepad you're actively writing in. Items used continuously.
- Secondary zone (full arm radius) — coffee mug, phone, second device, notepads for reference. Items used several times per hour.
- Tertiary zone (lean-forward) — speakers, monitor controls, decor, plants. Items rarely touched during a session.
If something you touch every five minutes is in the secondary zone, you'll feel it as cumulative fatigue. Move it inward. If something is in the primary zone but you only use it once a day, move it outward — it's stealing valuable space from the things you use constantly.
Second monitor angle — 30° inward, same height
A second monitor multiplies productive output more reliably than almost any other accessory. But only if it's positioned correctly. The two reliable layouts:
Side-by-side, 30° inward angle. The primary monitor sits straight ahead; the secondary sits to one side at 30° angled inward to face you. Both at the same height. This works for general productivity — Slack on one screen, document on the other, browser on the second.
Vertically stacked. The secondary monitor goes directly above the main one, typically in portrait orientation. Best for code, long-form documents and chat-heavy workflows. Saves desk width and keeps your horizontal field of view narrow.
Avoid: a secondary monitor pushed out to the side at 90° angle. If you genuinely look at it as much as the main screen, that twist will give you neck stiffness by week two. If it's strictly reference (showing a stock ticker or build status that you glance at), 90° is fine.
Lighting — key from the side, ambient fill
Bad lighting is invisible until you have a headache by 3 pm. The principle: your face and notepad should be lit from one side, the monitor itself should never have a bright light directly behind it, and the room should never be in total darkness while the screen is bright.
A working setup uses three light sources:
- Key light from the side — a desk lamp or wall-mounted task light on the left (for right-handers) so writing hand doesn't shadow the page.
- Ambient room fill — overhead pendant or floor lamp giving general low-level brightness; never harsh direct overhead light.
- Bias light behind the monitor — an LED strip taped to the back of the screen, casting warm light onto the wall. Reduces eye strain by raising the perceived contrast floor.
For windows: position the desk so the window is to your side, not behind you (the camera glare problem on video calls) and not in front of you (sun blinding you). A north-facing window (in the southern hemisphere) gives the most consistent ambient light across the day.
For gaming-heavy use, dim the room slightly more than productivity calls for — but never to darkness. A bias light alone is enough.
Cable management — discipline beats gear
Cable management isn't a one-time effort, it's a discipline. The rule: every cable routes to one corner of the desk, gets bundled, and disappears into a tray or vertical channel down the leg.
The minimum kit (under R600 in SA):
- Under-desk cable tray — bolted or clamped under the desk. Holds the power strip, hub, and dangling cable slack. Brateck and Smart Office Solutions sell decent ones for R300-R500.
- Velcro ties (not zip ties) — wrap bundled cables every 15-20 cm. You'll add/remove cables over the years; velcro lets you do this without scissors.
- One desktop-mounted power strip — for daily plug/unplug items (phone charger, laptop power, lamp). Everything else stays in the tray.
- Vertical leg channel — sticky-back PVC channel or fabric sleeve down one desk leg to carry cables from tray to floor cleanly.
Mount the PC on an under-desk arm if you have a tower. Wall-mounted PC trays cost R450-R900 and lift the case off the floor — better airflow, no dust pickup, and the desktop instantly looks 40% tidier.
L-shape vs straight desk — pick by workflow
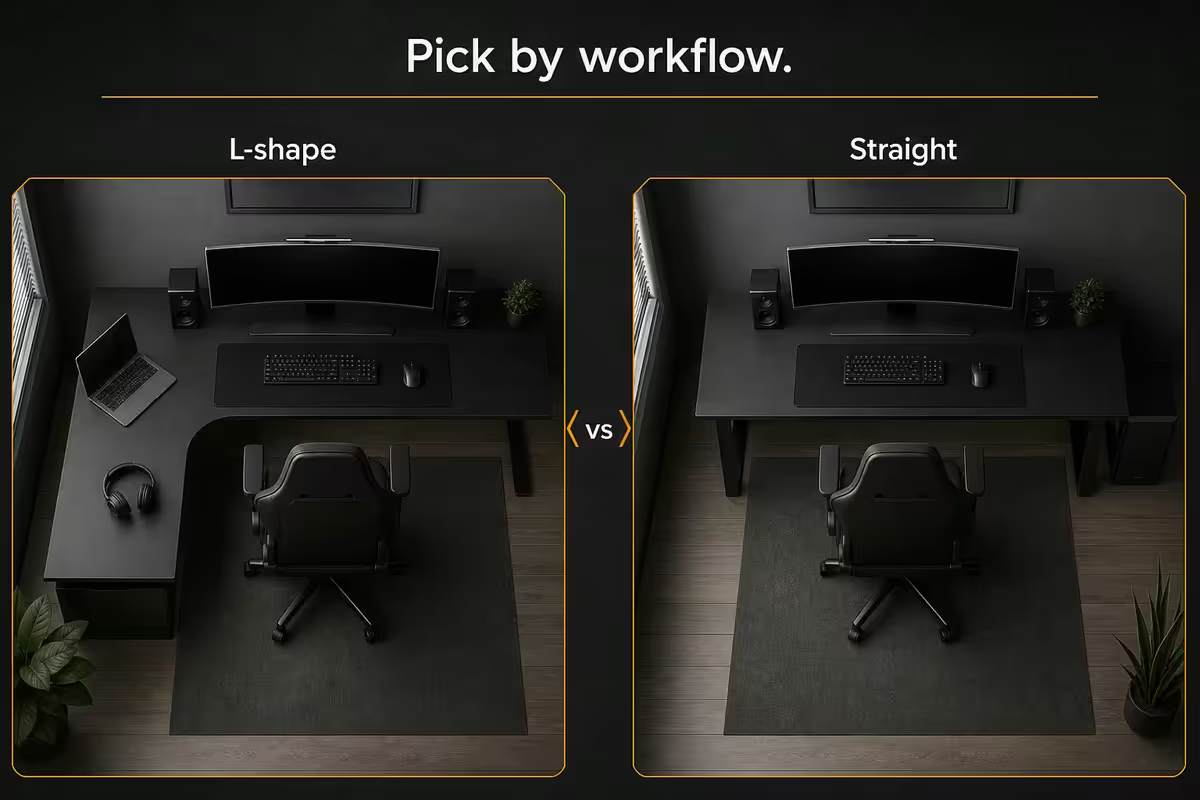
L-shape and straight desks aren't aesthetic choices — they encode different workflows. Choose based on how you actually use the desk, not what looks good on Instagram.
| Need | Pick | Why |
|---|---|---|
| Single screen, focused work | Straight (140-160 cm) | Less wasted surface; cleaner aesthetic |
| Dual monitor + work papers | Straight (180 cm) or L-shape | Width matters more than corner space |
| Mix of laptop & desktop | L-shape | Secondary surface for the device not in active use |
| Triple monitor / studio work | L-shape (160×140 cm) | Corner anchors three monitors in a curve |
| Gaming + work combo | L-shape | Drift between zones without rearranging |
| Tight room (under 3 m wide) | Straight (120-140 cm) | L-shape eats space; not worth the corner |
Height-adjustable variants are worth it. Standing desks aren't a productivity hack — they're an ergonomic safety net. Even if you only stand for 30 minutes a day, that's an hour of seated load you avoid. Mid-tier (R5k-R8k) electric standing desks from JustOffice, Yaasa or local SA brands like ErgoSmart are now within reach.
Work vs gaming zones — same desk, different layouts
If you use one desk for both deep work and gaming, don't try to build two competing setups. Split the desk into zones and swap the accessories that change.
The constants across both modes:
- Main monitor centred at eye level, 50-70 cm away.
- Same chair, same keyboard if you use a productivity-and-gaming hybrid keyboard like a Keychron Q-series or Logitech MX Mechanical.
- Same lighting strategy — bias light + side key light works for both.
- Cables, PC, UPS — all permanent.
Productivity mode needs: notepad in primary reach zone, document space, lamp at slightly higher brightness, optional second monitor angled at 30°. Mouse precision matters less than comfort — a vertical or contoured mouse may suit you better.
Gaming mode needs: large mousepad (extended XL covering keyboard + mouse area), headset stand within reach, controller drawer or stand for couch-style games, RGB ambient if that's your thing — kept dim enough that the screen still dominates. A second monitor optional but often useful for Discord, OBS or stream chat.
The trick is making the swap take under 30 seconds. Notepad in a tray drawer; headset stand on a side ledge; mousepad rolled and stored in a corner. If the swap takes effort, you'll skip it and one mode will always feel like a compromise.
Desk setup tiers for South Africa
| Tier | What you get | SA price |
|---|---|---|
| Entry (R3k) | 140 cm flat-pack desk + basic single monitor arm | R2 800-R3 500 |
| Entry+ (R4-R5k) | 140-160 cm fixed desk + dual monitor arm + cable tray | R4 200-R5 200 |
| Mid (R8k) | 160 cm manual height-adjustable + dual arm + tray + bias light | R7 500-R8 800 |
| Mid+ (R10-R12k) | 160 cm electric standing + Ergotron-style arm + side lamp | R10 500-R12 500 |
| Premium (R20k+) | 180 cm electric standing + Ergotron LX dual + bias light + acoustic panels | R19 000-R28 000 |
| L-shape variant | 160×140 cm L-desk + dual arm + cable tray | +R1 500-R3 500 vs straight |
| Chair (don't skip) | Ergonomic mid-tier (Linx, ErgoChair, Herman Miller Sayl) | R4 500-R12 000 |
Key takeaways
- Monitor: top third at eye level, arm-length away (50-70 cm), tilted back 10-15°.
- Keyboard: elbows 90-100°, wrists straight, keyboard flat or slightly negative-tilted.
- Mouse on the same plane as the keyboard; primary reach zone for daily items only.
- Second monitor 30° inward at the same height, or stacked vertically for code/chat.
- Lighting from one side as key, ambient fill, bias light behind screen — never overhead direct.
- Route all cables to one corner via under-desk tray; PC on a wall-mounted arm.
- L-shape for dual-use and triple monitors; straight desk for focused, smaller-room setups.
- Spend 60% of the budget on desk, chair and monitor arm — they touch you 8 hours daily.
Frequently asked questions
How high should my monitor be on my desk?
Top third of the screen at eye level when seated upright. For most 27-32" monitors, that means 8-14 cm above the desk surface using a stand or arm. Arm-length distance away (50-70 cm), tilted back 10-15°.What is the correct keyboard height for a desk?
Elbows at 90-100°, wrists straight. For most adults that's a 72-75 cm desk surface. If desk is fixed and too high, raise the chair and add a footrest; if too low, sit-stand converter or new desk.L-shaped desk or straight desk — which is better?
L-shape for multi-monitor, mixed work and dual-use setups. Straight for focused, smaller rooms or single-screen productivity. L-shape wins long-term if you have the space.Where should the second monitor go?
30° inward from main, same height. Or stacked vertically above the main monitor for code/chat workflows. Avoid 90° to your far side unless reference-only.What's the best lighting for a desk setup?
Side key light (left for right-handers) + ambient fill + bias light behind monitor. Never bright light behind screen, never harsh overhead direct.How do I manage cables under my desk?
Route to one corner, use an under-desk tray, bundle with velcro ties (not zip ties). PC on wall-mounted under-desk arm. One desktop power strip for daily plug/unplug items only.Should I separate my gaming and productivity setups?
On the same desk, split into zones rather than two competing setups. Productivity zone (centre): main monitor, keyboard, mouse, lamp, notepad. Gaming zone: headset stand, large mousepad, controller drawer. Swap accessories under 30 seconds.How much should I spend on a desk setup in South Africa?
R3k entry (flat-pack + basic arm), R8k mid (height-adjustable + dual arm + tray), R20k+ premium (electric standing + Ergotron arm + bias light + acoustic). Spend on desk + chair + monitor arm before accessories.