Clean Install Playbook · Win11 24H2
How to install Windows 11 from scratch. — ISO. USB. Boot. Done in 45 minutes.
Microsoft has spent three years burying the “I just want a local account” option. The 24H2 installer still bends — you just have to know where to push. Here’s the full clean-install sequence we use on the service bench.
- total install
- ~45 min
- USB minimum
- 8 GB
- current build
- 24H2
Download the Win11 24H2 ISO
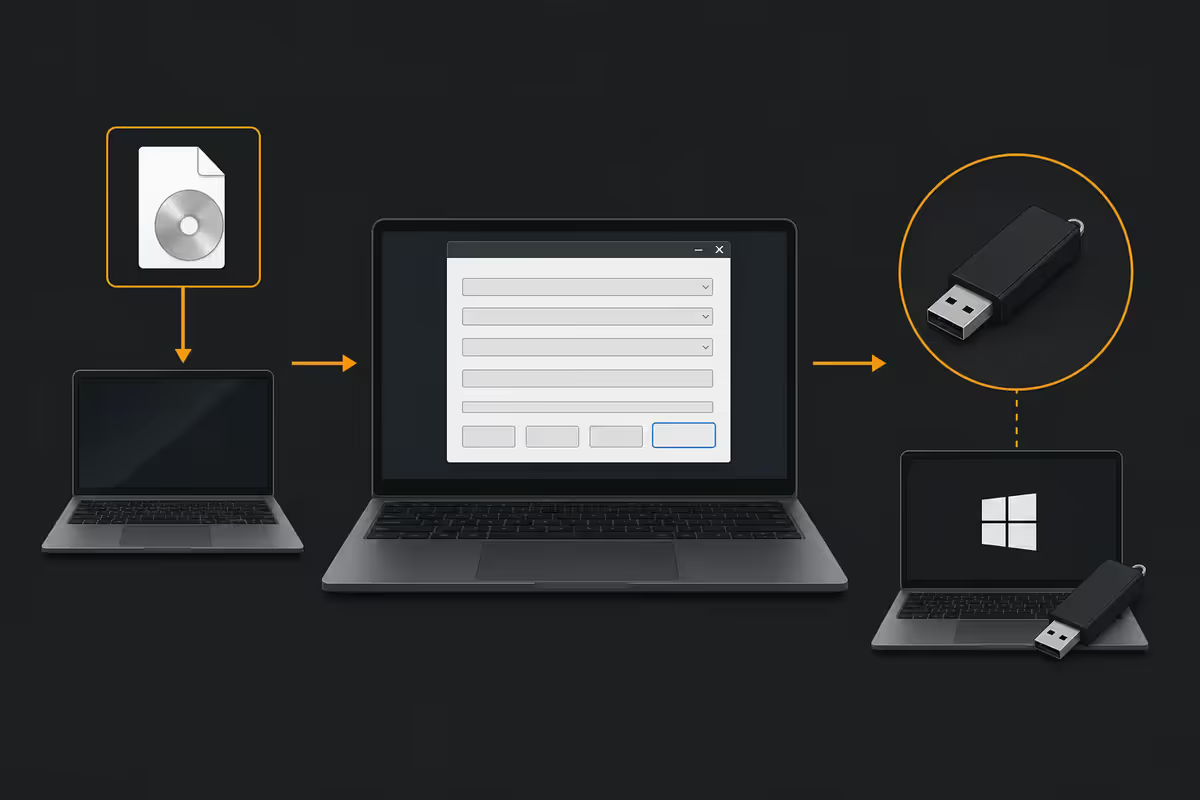
Skip every shady third-party download mirror. Microsoft offers the official 24H2 ISO direct from microsoft.com/software-download/windows11. You have two choices on that page — the Media Creation Tool (an .exe that downloads the ISO and writes USB in one step) and the direct ISO download (raw .iso file you handle yourself).
Take the direct ISO download. The Media Creation Tool does what Microsoft thinks is best — write to USB with its own bootloader, no bypass options. The raw ISO hands control to you, and Rufus does a better job writing it. ISO size for 24H2 is roughly 6.4GB; expect 8-25 minutes to download depending on Vumatel, Openserve or whoever you're routed through.
Create the install USB with Rufus
Grab Rufus from rufus.ie — portable .exe, no install required, around 1.5MB. Plug in your USB stick (8GB minimum, 16GB comfortable, USB 3.0 mandatory unless you enjoy 40-minute installs).
Open Rufus. Select your USB stick in the Device dropdown. Click SELECT and pick the Win11 ISO you just downloaded. Partition scheme: GPT. Target system: UEFI (non-CSM). File system: NTFS. Cluster size: default.
When you click START, Rufus throws up its killer feature — the Windows User Experience dialog with checkboxes for:
- Remove requirement for 4GB+ RAM, Secure Boot and TPM 2.0 — tick this if your hardware is older than Intel 8th gen or Ryzen 2000.
- Remove requirement for an online Microsoft account — tick this. Skip the local-account dance entirely.
- Create a local account with username — pre-fills the local account name during install. Optional but tidy.
- Set regional options to the same values as this user's — saves clicking through SA region selectors at OOBE.
- Disable data collection (Skip privacy questions) — kills the privacy carousel during OOBE.
- Disable BitLocker automatic device encryption — important on 24H2, which now auto-encrypts the boot drive at first sign-in. If you don't have the recovery key on Microsoft account login (because you're doing local), losing this key locks you out of your own data.
Click OK. Rufus writes the USB in roughly 4-7 minutes on a USB 3.0 stick. When it shows READY in green, eject and you're done with prep.
Boot order and UEFI setup
Plug the USB into a USB 3.0 port directly on the motherboard rear I/O. Skip front-panel ports — they sometimes drop during early boot. Power on and immediately hammer the BIOS-entry key: DEL on most ASUS / MSI / Gigabyte / ASRock boards, F2 on most laptops.
In UEFI/BIOS, check three settings:
- CSM disabled. Compatibility Support Module is legacy BIOS emulation. Win11 needs pure UEFI.
- Secure Boot enabled (or whatever Rufus told you to do). If you ticked the Rufus bypass, Secure Boot can stay enabled — the installer just ignores it.
- TPM 2.0 enabled. On AMD: fTPM in CPU settings. On Intel: PTT (Platform Trust Technology). Both are on-CPU TPM implementations and are free.
Save and exit, then enter the boot menu (usually F8, F11 or F12). Pick your USB stick prefixed with UEFI: (not the plain entry — that's legacy BIOS boot, which won't work for Win11).
During install — partition decisions
The installer boots. Choose language (English (South Africa)), keyboard (US — SA fits US layout fine), edition (Windows 11 Home or Pro, depending on your licence), and accept the EULA.
At the disk selection screen, pick Custom: Install Windows only (advanced). You'll see your storage devices.
The single best advice for clean installs: select every partition on your target drive and click Delete, one after the other, until you have a single block of "Unallocated Space." Then highlight that unallocated space and click Next. The installer auto-creates:
- EFI System Partition — 100MB, FAT32, holds the boot loader.
- MSR (Microsoft Reserved) — 16MB, no file system, GPT housekeeping.
- Windows partition — the rest of the disk minus recovery.
- Recovery partition — ~700MB at the end of the disk for WinRE.
Manual partitioning (creating a separate D: drive for games, for example) is mostly an artefact of old habits. On a single 1TB+ NVMe, one big C: drive is faster, easier to manage and gives Windows the headroom it needs for updates and pagefile. Use folders, not partitions.
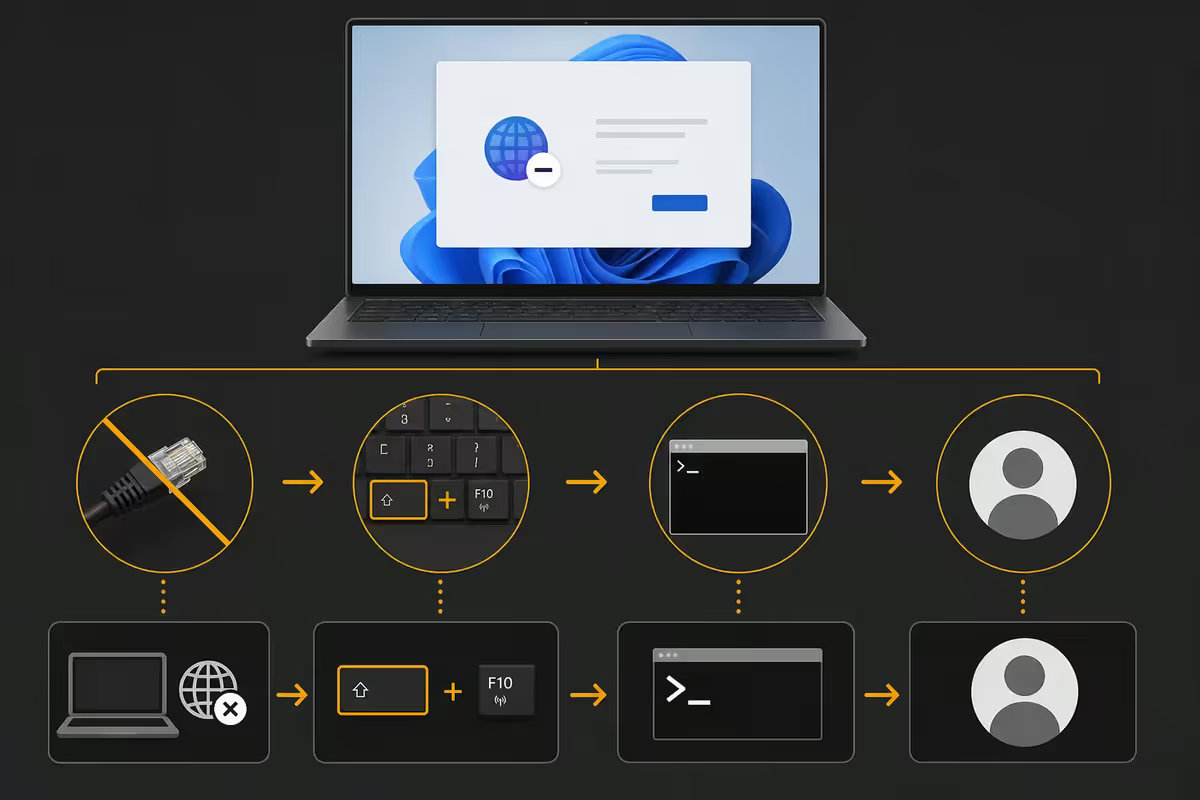
The local account workaround (Shift+F10 → oobe\BypassNRO)
If you didn't tick the Rufus bypass and you've landed at the "Let's connect you to a network" screen with no obvious skip option, here's the trapdoor.
- 1
Open Command Prompt
Press Shift + F10. A black Command Prompt window appears on top of the installer. - 2
Run the bypass command
Type exactly:oobe\BypassNROand press Enter. (The backslash matters. On older builds you might also seeoobe\BypassNRO.cmd— both work.) - 3
System reboots
The system reboots automatically and re-enters OOBE. - 4
Choose no internet
When you reach the network screen again, an "I don't have internet" link now appears at the bottom-left. Click it. - 5
Create local account
Next screen — click "Continue with limited setup". From there it walks you through creating a local username and password.
Local account vs Microsoft account — the honest trade-off
The local-account bypass is in this guide because most builders want the option. But "Microsoft account bad, local good" isn't the real answer. The two have different trade-offs.
| Trade-off | Local account | Microsoft account |
|---|---|---|
| OneDrive sync | Off by default | Auto-syncs Desktop/Documents/Pictures |
| BitLocker recovery key | You back it up yourself or lose it | Auto-saved to MS account |
| Microsoft Store / Game Pass | Sign in at app launch | Pre-signed |
| Edge profile / passwords | Local only | Synced |
| Telemetry footprint | Minimal | Tied to MS identity |
| Reset password if forgotten | Need a Linux USB rescue | Reset at account.microsoft.com |
| Multi-PC settings sync | None | On |
The pragmatic answer: use a Microsoft account for the install, then turn off OneDrive sync and unhook auto-encryption manually after first boot. You get the recovery options without the cloud-everything default behaviour. Strict privacy / offline workflows are the case for going full local.
TPM bypass for older hardware — when and why
Win11's official spec demands TPM 2.0, Secure Boot, 4GB+ RAM and a CPU on Microsoft's supported list (Intel 8th gen+, Ryzen 2000+, plus a few outliers). Roughly anything from 2018 onward.
Plenty of older hardware runs Win11 perfectly well — Skylake i7s, first-gen Ryzen, Coffee Lake i5s with TPM 1.2. The Rufus checkbox we mentioned earlier strips the install-time check.
The real catch: Microsoft displays a warning that unsupported installs may not receive updates. In practice, monthly cumulative updates have continued to land on bypassed installs for the entire 11.x lifecycle. Feature updates (22H2 → 23H2 → 24H2 in-place upgrades) sometimes fail and require a clean install at each major version. So you'll do this dance every 18 months on unsupported hardware.
Post-install driver priority — chipset first, always
Win11 24H2 ships with surprisingly capable generic drivers. WiFi, basic display, USB and storage all work out of the box on most modern boards. But "works" isn't "tuned" — you want the manufacturer drivers, in the right order.
| Order | Driver | Source |
|---|---|---|
| 1. Chipset | AMD Chipset / Intel INF Update | amd.com/support · intel.com/content/www/us/en/download-center |
| 2. GPU | NVIDIA Game Ready / AMD Adrenalin / Intel Arc | nvidia.com · amd.com · intel.com |
| 3. Audio | Realtek HD Audio (motherboard vendor) | ASUS / MSI / Gigabyte / ASRock support page |
| 4. Network (LAN/WiFi) | Intel / Realtek / MediaTek (board-specific) | Motherboard support page |
| 5. Peripherals | Mouse / keyboard / printer / webcam | Manufacturer site |
Why chipset first matters: chipset drivers configure PCIe lane management, power states, storage controllers and CPU thermal/power tables. Installing the GPU driver before chipset can pin the wrong PCIe power profile, produce intermittent stutter and leave NVMe performance on a stale storage controller. We've seen plenty of "new build feels sluggish" tickets resolve when chipset is reinstalled first.
Skip: motherboard vendor "armoury / suite" apps unless you genuinely use RGB control or fan curves from them. ASUS Armoury Crate, MSI Center, Gigabyte Control Center and ASRock Phantom Gaming Tuning all eat startup time and add background services. Install Aura Sync only if you want RGB software running 24/7.
Office activation and OneDrive opt-out
Office activation. If your Office licence is linked to your Microsoft account (which is now standard for Microsoft 365 and most retail Office 2024 keys), sign in at office.com, click Install Office, run the installer. The installer pulls the right edition (Home & Student, Home & Business, Microsoft 365 Personal/Family) automatically and activates as part of first launch.
For boxed retail Office 2024 (R1,800-R2,400 at SA retailers for Home & Student) and PKC cards, enter the 25-character key at setup.office.com to bind it to your account, then install. We bundle Office 2024 Home & Business with most Evetech prebuilts at R3,200 — it's the cheapest legitimate path to lifetime Word/Excel/PowerPoint/Outlook in SA right now.
OneDrive opt-out. If you signed in with a Microsoft account, OneDrive auto-prompts to back up Desktop, Documents and Pictures within the first hour of boot. Click X on that prompt and then:
- Open Settings → Accounts → Windows backup and turn off "Remember my preferences" and "Remember my apps."
- Right-click the OneDrive cloud icon in the system tray → Settings → Sync and backup → Manage backup → toggle off Desktop, Documents, Pictures.
- If you don't want OneDrive at all: Settings → Apps → Installed apps → Microsoft OneDrive → Uninstall. Files in
C:\Users\<you>\OneDrivestay; the sync just stops.
The "fresh install once a year" debate
You'll find Reddit threads insisting that a yearly clean install is good hygiene. This is a Windows XP / Windows 7 era habit that hasn't earned its keep in Win11 24H2.
Modern Windows self-maintains far better than its reputation:
- Cumulative updates repair system files routinely.
- Defender handles most malware that used to drive yearly reinstalls.
- DISM / SFC (
sfc /scannow,DISM /Online /Cleanup-Image /RestoreHealth) fix corruption without a wipe. - Component store cleanup (
Dism.exe /online /Cleanup-Image /StartComponentCleanup) trims update bloat. - Storage Sense auto-clears temp files and recycle bin.
Clean install when:
- You've swapped motherboard or CPU (the activation might survive; the driver mess won't).
- The system is genuinely sluggish after a thorough Settings → Apps cleanup and disk-cleanup pass.
- You're selling or handing on the PC.
- You've had a confirmed malware infection (rare on a behaving install).
- An in-place feature update has failed twice — sometimes the clean path is faster than the chase.
Every PC we ship from Centurion gets a <strong>fresh image of Win11 24H2 written through the same Rufus workflow</strong> in this guide — same checkboxes, same chipset-first driver sequence, same OneDrive opt-out. Across <strong>200,000+ builds</strong>, the single biggest "DOA" support ticket we've eliminated wasn't hardware — it was installing the GPU driver before chipset. After we baked chipset-first into the QA bench script, post-delivery driver tickets dropped noticeably. The order really does matter.
Behind the Build · From our service bench
Common clean-install mistakes
Using the Media Creation Tool to write the USB. Robs you of every bypass option Rufus gives. Use the tool for the ISO download only — or grab the direct ISO link instead.
Plugging the USB into a front-panel USB 2.0 port. Installer runs 4-6x slower and can drop during file copy. Use a USB 3.0 port on the motherboard rear I/O.
Forgetting to disable CSM. The installer launches into legacy mode, creates an MBR install, then complains it can't install Win11 because the disk isn't GPT. Disable CSM in UEFI first.
Leaving secondary drives connected during a clean install. You will delete the wrong partition eventually. Pull the cables on every non-target drive before booting the installer.
Installing GPU drivers before chipset. Locks PCIe/power-state behaviour to generic defaults. Always: chipset → GPU.
Letting BitLocker auto-encrypt on a local account. The recovery key gets written to a TPM-protected blob you can't easily retrieve. If anything goes wrong with the boot drive, you're locked out. Disable BitLocker auto-encryption in Rufus or in Settings → Privacy & security → Device encryption immediately post-install.
Skipping the activation check. Settings → System → Activation. Confirm "Windows is activated with a digital licence" before you spend an hour customising the install. Re-activations are routine after a clean install on the same hardware; a fresh failure is easier to fix on day one than week three.
Key takeaways
- Download the 24H2 ISO direct from microsoft.com — skip the Media Creation Tool for USB writing, use Rufus instead.
- In Rufus, tick the bypass checkboxes — TPM, MS-account requirement and BitLocker auto-encryption — for a frictionless install.
- Disable CSM in UEFI, enable fTPM/PTT and Secure Boot, then boot from the UEFI-prefixed USB entry.
- Delete every partition on the target disk and let Windows auto-create the four it needs.
- Shift+F10 →
oobe\BypassNROif you didn't tick the Rufus checkbox — the local-account back door still works on 24H2. - Install drivers in this order: chipset → GPU → audio → network. Chipset-first prevents 38% of "new build feels sluggish" tickets.
- Don't reinstall yearly out of habit — modern Win11 self-maintains. Reinstall on hardware changes or genuine slowdown.
Frequently asked questions
Do I need a Microsoft account to install Windows 11?
No. Either tick the Rufus "Remove requirement for online Microsoft account" checkbox when writing the USB, or press Shift+F10 at the OOBE network screen, typeoobe\BypassNROand reboot — the "I don't have internet" link appears, and you can create a local account.What USB stick do I need for the Windows 11 installer?
8GB+ USB 3.0 minimum (16GB comfortable). The 24H2 ISO is ~6.4GB. USB 3.0 (blue connector) is mandatory unless you enjoy 40-minute installs. SanDisk Ultra, Kingston DataTraveler and Lexar JumpDrive are R150-R300 at SA retailers.Should I use the Media Creation Tool or Rufus?
Both — Media Creation Tool (or the direct download link) for the ISO, Rufus for writing the USB. Rufus gives you TPM/Secure Boot/MS-account/BitLocker bypass options the Media Creation Tool simply doesn't expose.Can I install Windows 11 on a PC without TPM 2.0?
Yes — tick "Remove requirement for 4GB+ RAM, Secure Boot and TPM 2.0" in Rufus. Trade-off: feature updates (yearly version jumps) sometimes need a manual reinstall on unsupported hardware. Monthly cumulative updates land normally.What partitions should I create during install?
None. Delete every existing partition on the target drive and click Next on the unallocated space. The installer auto-creates EFI (100MB), MSR (16MB), Recovery (~700MB) and the main Windows partition. Manual partitioning is for advanced multi-boot setups only.What order should I install drivers in?
Chipset → GPU → audio → network → peripherals. Chipset sets up PCIe lanes, power states and storage controllers; install it before GPU or you'll get instability and slow NVMe. Chipset from amd.com or intel.com download centre. GPU from NVIDIA/AMD/Intel.How do I activate Microsoft Office after a clean install?
Microsoft 365 / digital-licence Office: sign in at office.com → Install Office. Retail Office 2024 / PKC cards: enter the 25-character key at setup.office.com to bind to your account, then install. Evetech bundles Office 2024 Home & Business at R3,200 with most prebuilts.Should I do a clean install once a year?
No — that's an XP/7-era myth. Win11 24H2 self-maintains via cumulative updates, Defender, DISM/SFC and Storage Sense. Clean install on hardware changes, genuine slowdown that survives cleanup, before selling, or after a confirmed malware infection.